![]()
Turn a FONT into a STICKER!
Gingerscrapper Heather requested some help with creating eye-catching titles, so this little lesson will focus on turning a font into an outstanding sticker. Over the next few weeks we’ll go into more detail on how to really jazz up your layouts, so stay tuned!
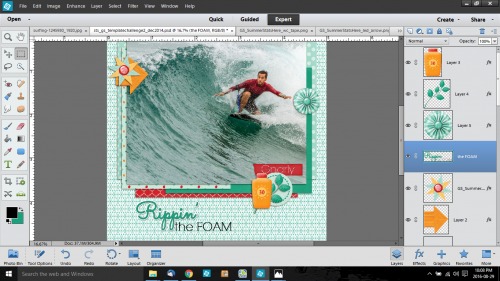
The very first step is to figure out what to call your layout. You want to choose something that works with the topic, but you don’t want it to be “Joey’s 8th Birthday”… where’s the excitement in that? Instead you could go with “Today He’s 8!” For the layout I created to help with this lesson, I looked up some surfing terms, looking for a hook. I came up with “Rippin’ the Foam”.
I like to build my titles on their own work space – there are fewer distractions and I can see clearly what I’m doing – so I always open a new file <CTRL/CMD+N>. (I use keyboard shortcuts, they really speed things up, but if you’re not comfortable with them, go ahead and do things as you usually do.) The size of the work space can be whatever you want, because you’ll be able to resize your title when you’re ready to use it.

As you can see, I’ve already chosen the colour for my title. I decided to work with the two fonts selected by Jennifer of Leaving a Legacy Designs for the August challenge, since I hadn’t done it yet. Using Sacramento I typed out “Rippin'” but found it to be a little anemic for a title. To beef it up a bit, I simplified the text <right-click on the layer and select Simplify Layer from the drop-down menu> then I selected the text by <CTRL/CMD+click> on the thumbnail (the little image in the layers panel). Once I got those little ants marching around my text, I went to the SELECT menu and chose Modify > Expand and put the number 3 in the box.

That pushed the line of ants out by 3 pixels, which was just enough. (Sometimes you have to play around to get it right, so don’t forget that CTRL/CMD+Z is your best friend.) Next I used the Fill tool (the paint bucket) to fill in the space created in the last step. You’ll notice that there’s a very thin line inside the filled space so just keep moving the paint bucket around and clicking until all the space is filled in. Now I had a nice, fat word but it was a little umm… meh. So my next step was to change the foreground colour in my colour picker to a medium-dark gray.

In the EDIT menu, I chose Stroke (Outline) Selection, set the value to 1 and chose Center.


That puts a very thin gray line around the edge of the text. To continue on achieving the sticker look, I changed the colour of my foreground to white (ffffff) and I again selected the EDIT menu, only this time I put 6 as the value and selected Outside for the location.


Now we’re cookin’! I changed the font to the other featured font for August, RNS Camelia and added the rest of my title in black. It needed a little nudging to get it where I wanted it – that’s part of the process. deciding what looks good. I chose not to include that part in the sticker because I wanted it to look like I’d written it on the layout. At this point, I had two layers on my work space. With the Rippin’ layer selected, I added a drop shadow and tweaked it so it was close to the sticker, sort of sharp and fairly dark. <Double-click on the fx icon on the layer in the layers palette, then use the sliders to adjust the size – sharpness of the edge, distance -width of the shadow and opacity – darkness of the shadow until it looks good to your eye.>

Once that was done, I merged the two layers together so I could move the title in one piece onto my layout. Now, knowing that I didn’t want my title to “float”, I selected the background paper layer of my layout to drop the title onto. It needed to be adjusted for size and placed where it looked best then ta-da! it was done! As you can see in the very first photo above, if I’d just used the font by itself, my title would have been lost against the patterned paper in the background. With a few simple steps, I made it so much better!
There you have one very basic method of adding interest to your titles. The tutorials to follow will build on this lesson and add a lot of cool techniques to your skill set. I hope you’ll continue to suggest topics for future lessons so you can grow your skills to match your imagination. ![]()


Очень интересно! Обязательно попробую! Большое спасибо!!!
Very interesting! Be sure to try ! Many thanks!!! (translated from Russian)
Thank you so much! I always like to learn something new.
Thank you so much for this interesting tutorial!
Fun information. Several techniques that i had not tried. Thanks!
Excellent tutorial for adding some punch to title work! Thanks so much! Hope to see a lot more of these here!
Awesome tutorial! Thanks for doing this. My first attempt is here https://gallery.gingerscraps.net/showphoto.php?photo=257533&title=doing-the-zoo-sept-mini-kit-challenge&cat=842