When Is a Square NOT a Square?
![]()
When it’s a rectangle! Two of my fellow Sugar Cookies asked me to talk to you all about how to manipulate frames so they better fit photos that aren’t the same dimensions… but without distorting the frame itself. EvaMarie (mskinsey) and Jen (hclappy), this one’s for you!
The basic principles of this trick work in reverse as well, so don’t think you can only go in one direction. But for today, I’m going to turn this square frame below into a rectangle with a few easy steps. You’ve probably all tried to s-t-r-e-t-c-h a frame only to find that the pieces you’ve elongated are now skinnier and look funny compared to the sides you didn’t play with. And who wants that?!

It’s really noticeable when you use a striped frame like this one. You can see how skinny the top part of the frame is compared to the side, and the stripes…

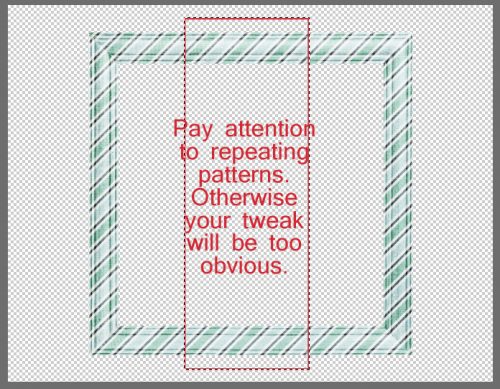
ONE CAVEAT: The more detailed and complex the frame, the less likely you’ll be happy with the results. So choose a frame with obvious pattern repeats having enough space between details to allow this trick to work for you.

The frame in the screenshot is from Ooh La La Scraps‘ gorgeous In the Frosty Air collection, which is one of my favourites (and is on sale for the fire-sale price of $5!!).
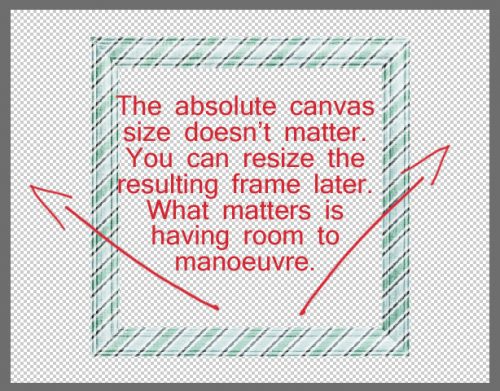
The first thing to do is resize the canvas the frame is on. You want to do this so you have lots of room to make your changes, and so you can see what you’re doing. To me this is about the most important way to ensure I’m doing things well… so I use Zoom In and Zoom Out ALL THE TIME. (W[ork]S[mart]N[ot]H[ard] tip: Ctrl/CMD>+ to magnify, CTRL/CMD>- to shrink)
You can follow the steps as shown below or you can WSNH: CTRL/CMD>ALT/OPT>C.

Key in some numbers in the boxes as shown. You can always resize the canvas again if you find it’s still too small.

The actual size you go to doesn’t matter too much, you just want your canvas to be larger – in the direction you want to stretch your frame – than your frame.
Now select your Rectangle Marquee tool.

Select an area of your frame using the Rectangular Marquee tool as shown. Pick a specific detail of any pattern repeat so when you line things up later you won’t have too much cleaning up to do. I made two of the darker lines my reference points.
Next, Cut your selection out of the middle of your frame. WSNH: CTRL/CMD>X

And you get something that looks like this.

… you can Paste that chunk back onto the canvas for further manipulation. WSNH: CTRL/CMD>V

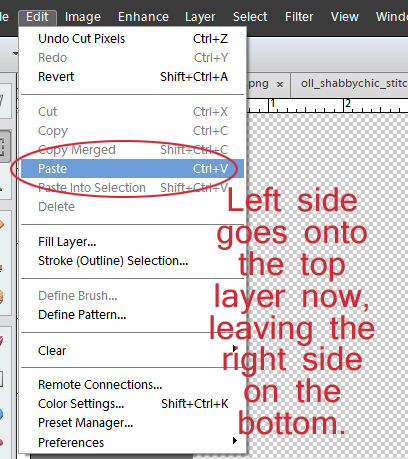
Now select the left side of the original frame, down there on the bottom layer and repeat the process of cutting and pasting so the three pieces are all on their own layer.

So now it’s time to reposition the two sides of the original frame using the Move tool so that there’s a nice big gap between them.

Take the guesswork out of aligning your layers by selecting all of them then with the Move tool still selected, go down to the control panel underneath your work space. You can use these quick little buttons to align whatever part of several layers that you want. The software will move all the layers into alignment based on the little boxes you see on your bounding box. These buttons can be really handy for aligning alphas, buttons, rows of stitches, paper strips, ribbons, you name it. (And… the Distribute buttons will do something similar, making the spaces between objects the same.) You have to click on the ICON, not the aspect. So go ahead and click on Align>Bottom. Boom!

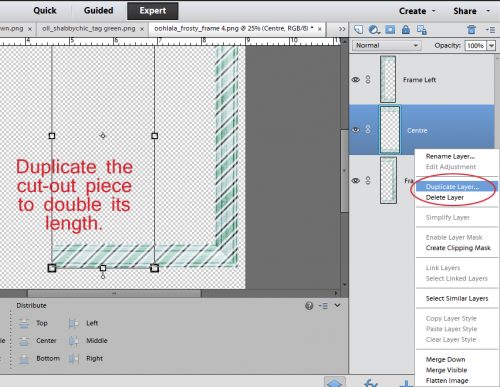
If the section of frame that you cut out in several steps back isn’t as big as you need it to be*, Duplicate that bit. WSNH: CTRL/CMD>J
* Put your photo on the workspace and move it to the bottom layer then shift the pieces around to see if the frame will be big enough. You can leave it there when you’ve got the outside edges in place, just turn the visibility off so it doesn’t distract you.
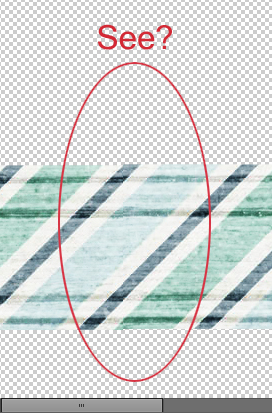
Now you have four layers with frame sections on them. Move the two cut pieces so that the ends butt up against the outside edges. Don’t be alarmed if they don’t match exactly.
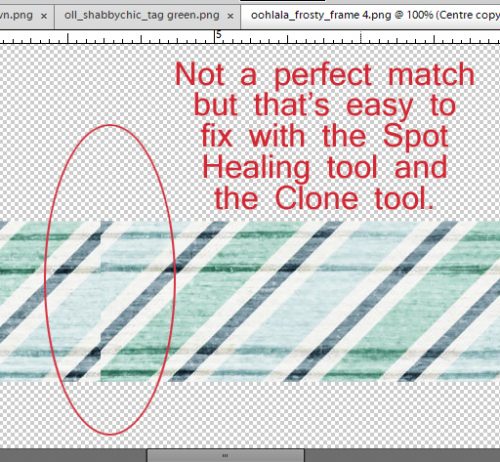
When all the edges are butted together with no gaps and most of the details lined up, Merge the layers together. WSNH: CTRL/CMD>E

Sometimes all that’s needed is a little Spot Healing. That’s the band-aid icon in your Tools panel. Use a soft round brush just a little bit bigger than the area you want to blend and click away. Watch carefully so you don’t accidentally make things worse. If you see a whoops, just Undo it. WSNH: CTRL/CMD>Z… my best friend.
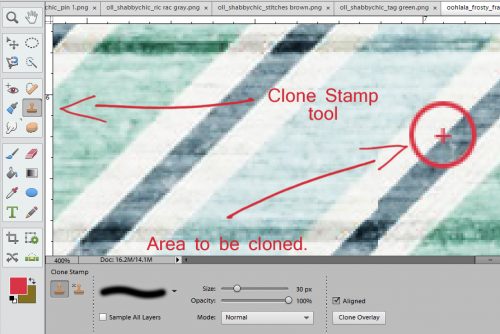
But sometimes a little more aggressive editing is necessary. For that you’ll use the Clone Stamp tool. It’s the “rubber stamp” icon just under the Spot Healing tool. To choose the area to be cloned, you’ll need to watch closely when you hold down the ALT/OPT key and click. A little cross hair will show up on your work space that shows you what little section of your image it’s going to copy. When you’re working with stripes like I was, you want to have that sampling spot on the edge of a stripe. Once you’ve “defined your sample” you can very carefully line up your cursor with the area to tweak and click. Do this as often as needed until your two pieces are blended together seamlessly.
Below you can see the result after a couple of clicks. I’ve only worked on the navy stripe so far in this image. I kept on going, carefully cloning the stripes until the seams disappeared.
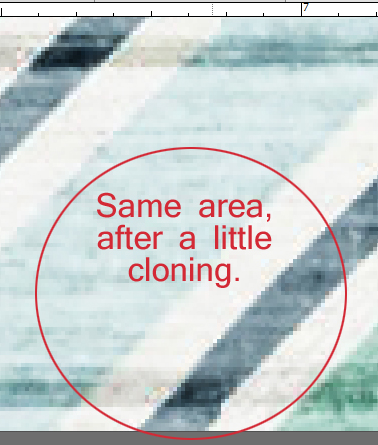
Work your way around the frame, zooming in as much as you need to so you see what’s happening with your clicks. Just to be sure you’ve made the seams invisible, check again all the way around a couple of times, either cloning or spot healing as needed.

Ta-DA!! Virtually invisible seams, a much larger rectangular frame and it only took about 10 minutes of real time to do. Honest!

You’ll see this frame again next week when the topic is building a frame cluster without a template.
Remember, if you’ve used a technique from these tutorials, post your finished layout in the GingerScraps Facebook Tutorial Tuesday Challenge Gallery for an opportunity to have YOUR chance to challenge me. (I apologize for putting the Challenge Gallery in an inaccessible spot, so we’re starting fresh from NOW. All previous entries are still in the running.) If you’re not a Facebooker, you can post a link to the layout you’ve created with the tutorial you used in the comments section here on the Blog. I’ll get a notification and will then enter you into the draw. The first week of March I’ll have a random draw of all entries and the winner will be announced at the end of the first tutorial of the month.
See you all next week!
![]()


