Archives for August 2017

Tutorial Tuesday (Photoshop Elements)

Abstract Meets Graphic Art

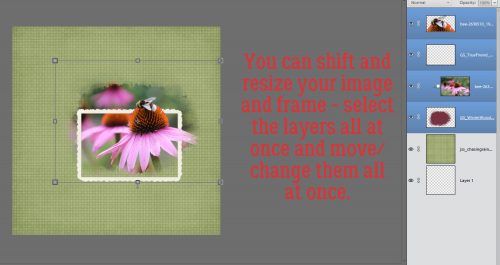
On August 30, 2016 I posted my very first PSE tutorial here on the GingerScraps Blog. It’s hard to believe it has been a year already! Inspiration for many of my posts have come from you, the GingerScrappers who read my posts and for that I thank you. Today I want to give you something really cool to try that once again builds on some of the other things we’ve looked at over the last year. We’ll be creating something really individual and artistic from a photo. If you really can’t wait, go ahead and scroll down to see the final image…

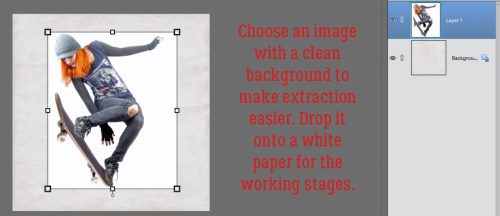
To begin, you’ll need a great photo with a relatively plain background, because the image will be extracted. This photo of a skateboarder from Pixabay was a great choice for my example since my inspiration for the tutorial came from an image of a skateboarder. I dropped it on a white paper for the initial steps to make extraction easier.

I used the Magic Wand tool to extract my image. This tutorial will provide a refresher for you if you’re still getting the hang of extracting images. You can duplicate your photo now, or wait until you’ve got your extraction complete or the line of marching ants in place. But you will need to duplicate your photo. Make your duplicate layer invisible.

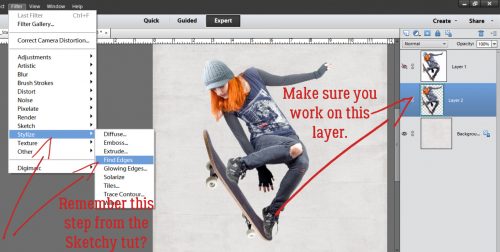
Working on the extracted photo, I clicked on the Filter menu, selected Stylize and Find Edges as shown. Remember when I showed you how to do this?

Once the image has been filtered, some of the colour from the image is still visible. Right now, I don’t want that. It looks a bit odd.

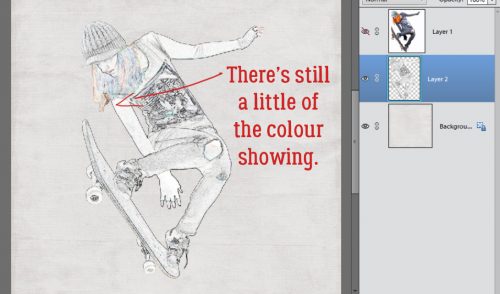
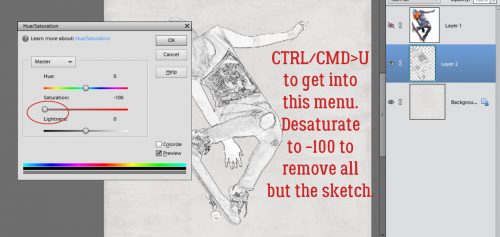
So to remove that hint of colour, I chose Enhance>Adjust Color>Hue/Saturation (CTRL/CMD>U) and pulled the Saturation slider all the way to the left. That leaves only the sketch.

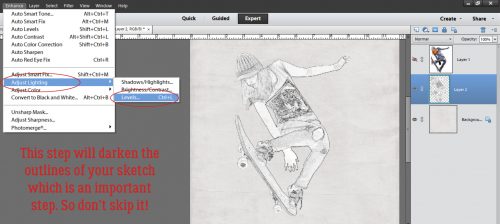
We didn’t do this in the Sketchy tutorial, but for this one it’s a vital step. Enhance>Adjust Lighting>Levels will take you to the menu shown. What this step does is dramatically darken the lines in the sketched image.

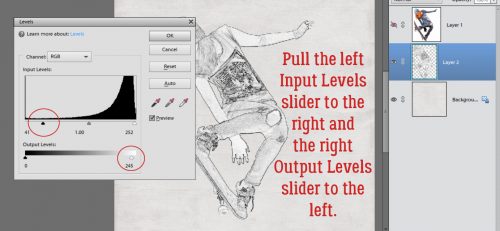
The histogram shown below is part of the adjustment menu. You can adjust both sections simply by pulling the sliders. Make sure you can see your image so you know when you’ve gone far enough. If you need to move the dialog box, click and hold the gray bar at the top of the box then drag it up, down or to one side so you can see what’s underneath it. I wanted my background area to stay bright white and my sketch to be darker and more detailed. The changes I made are shown in the dialog box.

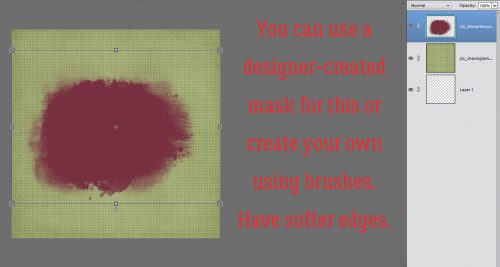
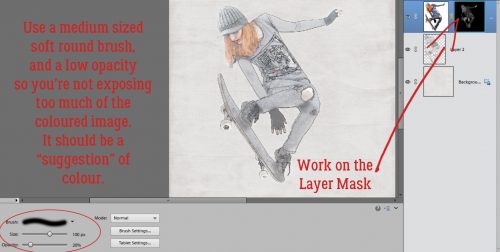
Now I have what looks like a charcoal drawing of the skateboarder. I want to have some of the colour from the original image in there, so I selected the topmost layer and added an adjustment layer mask by ALT>clicking on the Layer Mask icon (the divided circle icon above the Layers panel). The image disappeared but was really still there. I just had to reveal it.

I used a medium-sized soft round brush from the default brushes PSE comes with to paint back the colour, working on the Layer Mask. By using a low opacity (20%) I was able to build up colour where it naturally would appear darker and keep other areas much lighter. When you hold down your mouse button as you paint, you can overlap your brush strokes and have no visible overlap. Once you release the mouse button, the tool resets and areas of overlap will be darker. You want to brush over the whole area in one step to avoid those overlap spots. Keep that in mind as you go so you don’t end up with streaks.

Once I had the colour the way I wanted it, I Simplified the layer. (Right-click on the layer in the Layers panel and select Simplify Layer.) That step merges the mask with the image and prevents me from messing it up.

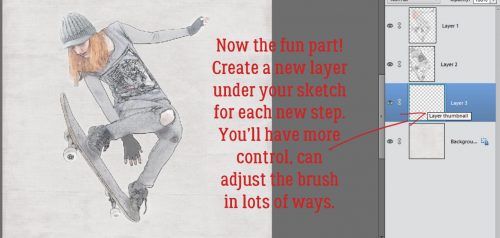
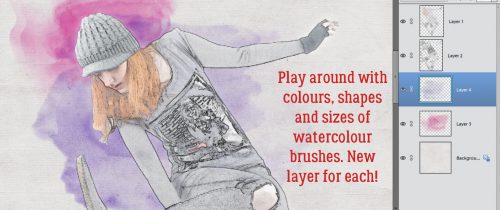
Now for the really fun stuff! I added a new blank layer underneath the sketch layer then used a watercolour brush at 100% Opacity from my collection of free brushes. I had an idea what colours I wanted to use so I just played around with both colour and brush selection until I liked what it looked like. By putting each brush on its own layer I can resize it, reposition it, decrease the opacity of it, increase the opacity by duplicating the layer, position it above or below my sketch and photo layers and whatever whim enters my head.

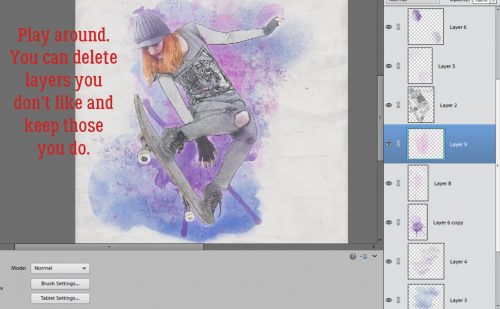
I experimented with lots of different watercolour and grunge brushes, deleting the layers that just didn’t work.

If you look closely you’ll see I’ve made a lot of changes by adding and subtracting, shifting and overlaying layers. You might also notice that the original photo colours are darker in this image. I duplicated the topmost simplified colour layer from the Layer Mask step then adjusted the opacity of that duplicate layer until I liked it.

To add a little more grunge and graphic feel I chose a gray colour and used a free graph paper brush that I duplicated and rotated. One layer is above the sketch and one is below it.

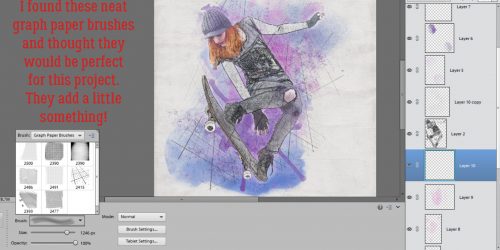
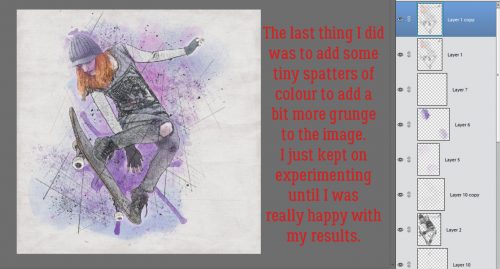
For the finishing touch I added some tiny gray splatters on top of all the layers and some below.  The process is one of playing with your stash and experimenting with things you never thought you could do.

I saved the finished image as a .png file for even more versatility. This is what it looks like with no paper behind it.

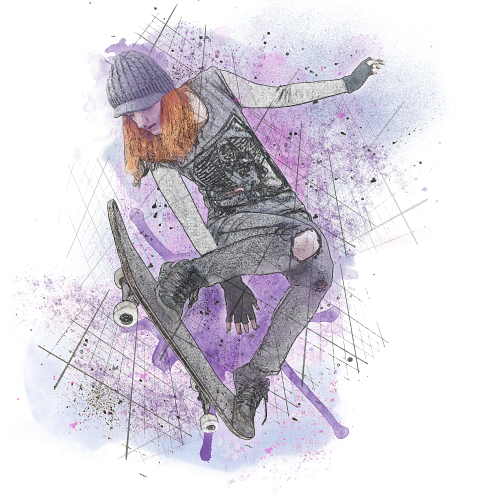
I can’t WAIT to see how you use this technique!!

Let’s Celebrate Spring!

Fall is just around the corner where I live. Of course it will likely stay hot and humid until October or November. Such is the life of the Southern parts of the States. That being said, it is heading into Spring for you guys in the Southern Hemisphere. With that in mind we are going to take a look at a lot of the pretty and Spring-tastic things we have in the store to scrap those layouts.

If you are not familiar with our Let’s Celebrate posts, here is a little information about them. Get ready to be blown away with a lot of great items from the store. These posts are usually image heavy. (I have a hard time narrowing down the items to a reasonable amount for a blog post! They are all just too great). Also all images are linked to their counterpart in the store. GingerScraps has so many great designers; and a lot of them have been here for years. Therefore we have so many great items spanning pages and pages. If you don’t see something you like in today’s post, you can always check out the store for more. In fact there is a section just for Spring related items.


GingerBread Ladies Collab: Showers & Sunshine


GingerBread Ladies Collab: Renew


Springs Whispers – Mini Kit by Kristmess >> This beautiful mini kit was made as part of my Spring Whispers Collection. This beautiful collection is perfect for all your Spring or feminine layouts!


Busy Bees – Kit by Connie Prince


Spring Cleaning KIT by MagsGraphics >> Open those windows, let in some fresh air, and get ready for some SPRING CLEANING! Be sure to check out the entire collection for you spring, cleaning, home, moving, or garage sale photos!

[Read more…]

Fresh Baked: August 25, 2017

Happy Friday! I hope you had a great week! We’re so close to September, but don’t worry! The designers are working hard on kits and templates. The designs are super cute and fun! There is definitely something for everyone!

Remember when you spend $10 in the store, you get a great new collab!

fwp_thumb_thumb_thumb_thumb
https://store.gingerscraps.net/GingerBread-Ladies-Collab-Tropical-Paradise.html

[Read more…]

Sneak Peeks August 24th, 2017

Happy Thursday! There’s only one more Thursday this month! Fall will soon be here! This week the designers have some great new releases! Let’s take a look at some of the awesome layouts using them!

From Dagi

From JoCee and Blue Heart Scraps

From Miss Fish

From Mags Graphics

I hope you have a great weekend!


Tutorial Tuesday (Photoshop Elements)

There’s a Flag on the Play – Out Of Bounds!

I had a mini-crisis on Friday when the screen on my laptop started to fail. Geek Squad guy I’m married to tried to fix it but was unable to so out he went to find me a new one. I spent the weekend transferring files and installing software so I apologize for all the redirects you’re going to find in this tutorial. I try to show every step and explain it all in detail as I go along, but I ran out of time… And I seem to have lost the font I was using to label my screenshots, so I’ve switched to Lumberjack. At any rate, this tutorial builds on skills I’ve already shared with you in past tutorials, so I’m going to link you up where necessary.

I spent some time recently checking out the forum at another shop that had a big event happening. One of the event-related threads asked members to show a layout with a technique the member really wanted to learn. Guess what I’m teaching you today? You guessed it! We’re going to take this:

to THIS!

I used a stock photo I found on Pixabay, along with a mask created by PHOTOCowgirl (former GingerScraps designer), a paper from Just So Scrappy‘s Chasing Rainbows kit (the bundle is on sale right now for the incredible price of $5!) and a frame from the GingerBread Ladies‘ MEGA collab True Friend. If you don’t have a mask that will work with your photo, you can make your own using brushes, varying the opacity from 100% at the center to about 30% at the edges.

I laid down my mask then dropped my photo on top of it. I made a copy (CTRL/CMD>J) of the photo so I could extract the bee and part of the cone on the focal flower.

I clipped the photo to the mask temporarily while I decided where to put the frame. Looking at it now, I might want to move it up a smidge so the cone on the flower just behind the focal point is inside the frame… or I could extract it too. Let me think about that…

Zoom in (CTRL/CMD>+ to enlarge, CTRL/CMD>- to shrink) and out while you’re working so you can see what you’ve done.

I turned off the visibility of the photo to be clipped to the mask and the frame, using the Rectangular Marquee tool (CTRL/CMD>M) to cut away the areas in the background that I don’t want to show against the frame. Then I added a Layer Mask to my cut-down photo.

Working on the Layer Mask I carefully erased the remainder of the background. The basics of this technique can be found in this tutorial. Later I went to the frame layer and masked off the area where the petals extend over the frame.

You can resize and move the mask, clipped photo, frame and extracted bit of photo to suit yourself by selecting all the layers using the click-shift-click method.

Now I wanted to have the cone and bee cast a shadow on the frame and the photo to add some dimension. CTRL/CMD>click on the sheet of paper at the top of the Layers panel to create a new layer underneath your extraction. Or just click on the icon then move the layer down. In case you need some reminders on how to create shadows on their own layer, you can review this tutorial. Make sure your shadow layer doesn’t shadow the photo underneath the frame where the sharp edge is, along the bottom of your extraction.

One step that isn’t always needed is to remove areas of that shadow layer that wouldn’t be there if the image was a real thing. You can just erase those areas.

For the petals’ shadow I used a drop shadow brush that is one of the prepackaged brushes Elements comes with. This too went on its own layer so I could adjust it as much as I needed to.

Shadow the frame and it’s good to go!

Next week’s tutorial is going to blow your socks off, so get ready!!!!

Focus On – Pop Culture

Happy Saturday scrappers! Just as promised in last week’s post with those free pop culture fonts, we are back this week with some digital scrapbooking supplies with the same theme. Now, this is just a tiny glimpse into what the store has to offer. We went along with the themes of the fonts from last week. Check back on later posts for more pop culture fonts and digital scrapbooking supplies. You can also check the store out for more. If these are not what you are looking for.

Galactic Heroes by BoomersGirl Designs >> Don’t go to the dark side! Join these galactic cuties as you celebrate all of the “out of this world” fun in your life. Whether scrapbooking your favorite movies, little (or big) heroes of your own or the magic of the universe, this kit has it all – cute characters, beautiful colors and tons of themed (and non-themed) goodies! The vibrant color palette includes oranges, yellow, green, blues, purple, gray, black and white.

A Far Away Galaxy by Scrap N Pieces >> While some people’s favorite stories start “once upon a time,” other stories begin with “a long time ago in a galaxy far, far away…” If you are already picturing the scrolling crawl, this kit is for you. A Far Away Galaxy pays tribute to Star Wars including light sabers, insignias, and a galactic alphabet. This kit also contains other nods to a love of space, including planets, moons, and galaxies. A Far Away Galaxy also contains traditional elements and patterned papers versatile enough to be used for every occasion, helpijng to stretch your stash. Whether it’s blue milk for breakfast or the Jedi training academy, tell your stories with A Far Away Galaxy…


Space Wars by Laurie’s Scraps and Designs >> Cherish those memories from a galaxy far, far away with this intergalactic collection. Perfect for any space layouts!

[Read more…]

Fresh Baked: August 18, 2017

It’s FRIDAY! The big news around here is the ECLIPSE! Parts of the US will get to see a FULL solar eclipse. Others will get a partial. It’s big news! They’re calling for issues with internet and phones, due to the high volume of people. That just means time to stay home, take some pictures (wear your special glasses!) and scrap! Make sure you purchase your kits ahead of time, just in case!

Remember when you spend $10 in the store, you get a great new collab!

fwp_thumb_thumb_thumb
https://store.gingerscraps.net/GingerBread-Ladies-Collab-Tropical-Paradise.html

[Read more…]

Sneak Peeks August 17th, 2017

Happy Thursday! My son went back to school today! I can’t believe summer vacation is done! But now I have more time to scrap! The designers have some great products releasing tomorrow and I have some sneak peeks to show you!

From Love Ewe Designs

From Dagi

From Tinci


From Lindsay Jane

From Neia Scraps

From Aimee Harrison

Have a Wonderful weekend!

Tutorial Tuesday (A Little Departure)

The EYEs Have It

This week, I’m going to go a little off-script, but in the end I think you’ll agree it’ll make for better layouts. So let’s talk about taking better photos. There are some really simple tips coming up that will make your photos so much more interesting and by default, your layouts will benefit too. I’m not going to baffle you with a lot of technical jargon, just some hints on things like composition, vision and mindfulness. The main component of great photos is light. If you train your eye to look at light as an extension of the image you’re planning to capture, you’ll be halfway there!

Oh, and taming that photo-destroying camera shake is an absolute must! If you’re going to be moving around and don’t want the encumbrance of a tripod to keep that camera stock still, you’ll need to brace your arms to minimize movement. If you WANT blurry, out-of-focus photos, hold your camera at arms’-length and snap away. If you don’t, hold your camera in both hands, tuck your elbows in against your trunk, take a deep breath, let it out slowly while you compose your shot and hit the shutter button as you get to the end of your exhale. This stays the same whether you’re shooting with a wildly expensive DSLR with a 300mm lens on it (although if you’re doing that, I’m going to bet there’s a tripod in there too) or if you’re snapping away with a cell phone camera.

This past weekend I went to a local festival I try to attend every year. Photo ops are everywhere at events like this, as long as you can be patient. If you can wait even a couple of minutes until the people clear out, you’ll get better shots. I have an abundance of patience and if I’m by myself, I take all the time I need to get what I want; I left the menfolk at home this year! So anyway, this festival is a classic-cars-and-classic-rock event that actually runs over 4 days. The weather is usually stellar for the Saturday show-and-shine and this year was no exception. Taking photos of cars in bright sunshine presents some particular difficulties and you’ll see how I addressed them when I show you my examples. All the photos I’m going to show you are SOOC… straight out of the camera and shot using the same lens. I haven’t made any adjustments.

Let’s start with exposure. Using the light that’s available to your advantage is going to make your photos look a lot better. In this first photo I was shooting toward the light, so the fender and door area are a lot darker than I’d like. There’s also a LOT of glare from the windshield. Sure, I could fix it with PSE, but why not try to minimize how much tweakage will be needed right from the start? (A little WSNH tip. 😉 )

By going around the car and shooting from the other side, the exposure is much more even and the glare is gone.

Think about what’s actually in your viewfinder – or on your LCD screen – and try not to have objects growing out of people’s heads or otherwise messing up your shot. Pay attention to what’s in the background. If you have to move a little, it’s not a bad idea. In this first image, that snow fence is just NASTY! I could crop it out, but…

by just moving a couple of feet and changing the angle of approach, I caught a couple of sweet little sunflares and the hood ornament’s details are much more visible. At this angle the chrome reflects less of the paint colour and the crowds are still reflected but undefined.

Another example of how simply changing your point of view improves your shot… if I wait a minute the guy will move. But the lawn chair and the sun canopy? Doubtful.

So I moved. Lawn chair? Gone. Sun canopy? Gone! Dude in the rust coloured shirt? Also gone!

Reflections and shadows can make or break a photo. I often think details are more interesting than whole objects so I wanted to get a shot of the tail end of this Hudson. Oh dear… who is that old woman reflected in the paint? Oh yeah. Me.

I took a step to my left, reframed and took this one. Much better!

I think this photo can be redeemed a little (dodging and burning perhaps); I do like the way the woman’s face is framed by the parrot’s beak and breast, but the shadows are so overwhelming. Some judicious editing – and cropping – in PSE might make it useable.

Fortunately, I was able to move a couple of steps to my left and got this one! Get a load of that depth of field. What a handsome bird. Fancy name too… hyacinthine macaw.

Another example of both attending to reflections and cropping in the viewfinder follows. The hood ornament is the subject here, but it’s a bit distracted from by the car behind it.

A slightly different angle and moving a bit closer captures nice reflections in the chrome, and plays up the detail a bit.

I’ve seen a lot of photos of ridiculously cute kids and pets that could be made really special just by getting down to their level. See the difference between these two photos? I think we’ll all agree that the second one is the more interesting one… even with the people in the background.

This shot is also taken from a crouch.

The next two examples show how the point of view makes or breaks your shot. This Caddy has been part of the show-and-shine for as long as I can remember. It’s one of my favourite cutesy touches so I usually take at least one snap of it. This is the first one I took. Kinda ho-hum. The exposure isn’t particularly great – the tray is underexposed and the Root Bear is overexposed. If I was telling a story with this photo, it would have put people to sleep in a heartbeat.

So I moved around, Now the Bear is the story. I could have done a better crop in my viewfinder, but that’s a really easy fix.

When I’m shooting points of interest like this view of one of our parks, I try and get the most effective shot I can. Sometimes that means ditching the good old landscape orientation.

Beauty is in the eye of the beholder and to my eyes, this portrait-oriented shot is better.

Before I forget… when you’re shooting photos of water – rivers, lakes, oceans – remember that water will ALWAYS be level! There are few things more visually jarring than a tilted horizon with water in it, unless there’s something or someone in the foreground that provides the subject and the angle of the horizon is an artistic statement.

I think this pair of photos brings everything I’ve just suggested together in one. Cropping in the viewfinder, shooting up rather than down, taking advantage of the light and paying attention to the background are all aspects of the better shot. And I can’t wait to play with it!

Ooh, I caught a little bit of bokeh in these. Sweet!!

I hope you’ve found something useful in there and that I haven’t come across as bossy. I wanted to keep it simple and achievable for everybody. Let me know what you think!


August Bake Sale

It’s August Bake Sale time!! The designers have picked some wonderful goodies for you this month. All these kits are on sale for just $1 through August 20th.

I can’t wait to go shopping!!