You’ve Gotta Know When to FOLD ‘Em
![]()
Are you ready for some football? Oh wait, that’s NEXT week…
I have a neat little visual trick for you to add to your digi-scrapping arsenal. Have you ever wanted to know how others get those cool folded papers they use? In 20 minutes you’ll be doing it yourself!
I’m showing this technique against a background of other papers but you can totally do it with a transparent background if you like. The papers below are the ones I’ve pulled onto a template (credits to follow) and if you look closely you can see that I’ve eliminated the shadow from the top, blue sponged paper by Clearing the Layer Style. It’s not an essential step so if you’re working with a paper within a template, don’t worry about it.

The first step is to select the Polygon Shape tool. Then when the tool options menu opens, tell it you want 3 sides. Use one of the colours from the paper, or white for your fill colour.

Don’t be concerned that PSE wants it to be an equilateral triangle, because you’re in control and you can bend it to your will. To make an isosceles or scalene triangle (yeah, I remember a bit of 10th grade geometry – some days I scare myself!) go to Image>Transform Shape>Skew.

“Grab” one of the handles on the bounding box and pull it in the direction you want it to go, and adjust the shape to make a right triangle. That will ensure you’ve got a little smidge of the underlying paper visible later.

Once you have your triangle the shape you want – mine is a narrow wedge – don’t forget to Simplify it.

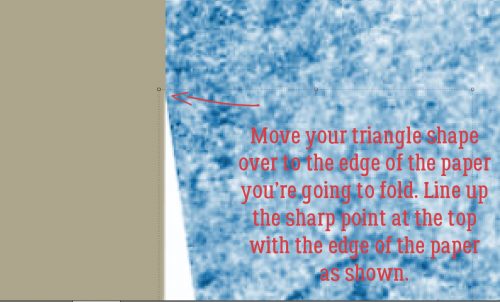
Now move that triangle over so that one of the long edges is flush with the paper edge. (I turned visibility for the papers underneath off so these steps will be easier to follow.)
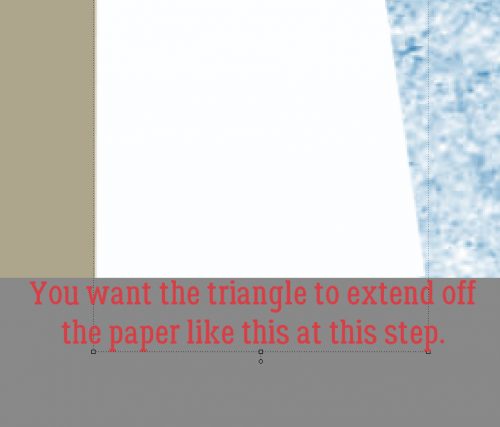
For this part of the process, you want to bottom edge of the triangle to extend past the bottom edge of the paper.
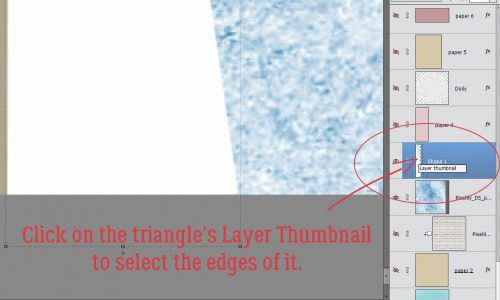
Now Select the edges of the triangle by clicking on the Layer Thumbnail to get those marching ants.
Look to see that you’re on the layer with the paper you’re folding and not any of the others. Then Cut the triangle from the paper using the CTRL/CMD>X keyboard shortcut.

Go back to the triangle layer and Deselect it (CTRL/CMD>D) then drag it from one lower corner until that same edge you lined up with the paper’s edge is lined up with the new cut edge. Check that the pointy top of the triangle is exactly positioned on the edge of the paper as shown – zoom in as much as you need to. Then hit the green checkmark.

That should give you a little sliver of your paper visible right at the bottom of the image, as shown below. If you want to, you can adjust the shape or size of your triangle to make it happen, but that shouldn’t be necessary.

Of course, this fold needs a proper shadow. Once again, Select the triangle by clicking on the Layer Thumbnail. Create a new layer underneath the triangle by CTRL/CMD>clicking on the New Layer icon – the single sheet of paper at the top left of the Layers panel – to put your shadow on. Then using the Paint Bucket tool, fill the selected area on that new layer with the shadow colour. If you’re using a template, you can right-click on the fx icon on any of the shadowed layers then click on the colour swatch. Copy the colour number from the menu box. Then click on the Foreground colour on the Tools panel and paste the number into the same box. That way all the shadows will be the same colour. Now you’ve got a dark triangle layer underneath your folded paper. Nudge it over so you can see it.

Apply a Gaussian Blur filter to the shadow then tweak the Opacity down to somewhere around 50%, or whatever looks similar to the existing shadows on your template. You can then change the Blend Mode to Linear Burn and your shadow is perfect. You can then Smudge the shadow layer so it’s narrower at the top of the triangle and wider at the bottom, as you’d expect to see if the folded paper isn’t lying directly on top of the paper under it. Another way to accomplish that is to slightly tilt the shadow.

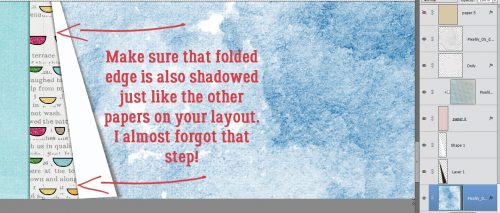
If you’ve Cleared the Layer Style on your paper layer at Step One, add it back now. I almost forgot that step!
Easy-peasy, isn’t it? My layout was created for the November Designer Spotlight challenge using a template from Aprilisa‘s Picture Perfect 155 and Pixelily‘s Daily Stuff kit. This is what it looks like altogether.

Let me know how you like this technique!
![]()


