Totally TACKY!
![]()
We’ve moved into the second quarter of 2018 already! And with a new month comes new challenges at GingerScraps… Don’t you love them?? This month, Marina (Magical Scraps Galore) has a really different spin on the Mix It Up challenge. She wants us to use at least 3 different silver or chrome elements on a layout. Well. When I saw “chrome”, it was like a bell went off! I had planned to show you how to create a dotted border the quick-and-easy way, and it very quickly morphed into a tacky border instead. (Well, it’s a couple of additional steps.)
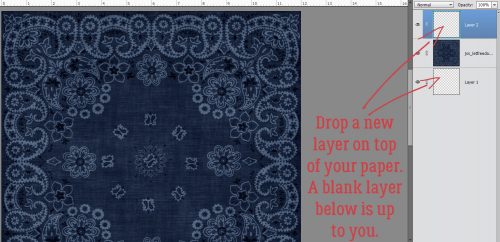
I chose this fabulous bandana-style paper as my background. It’s from Just So Scrappy‘s Let Freedom Ring collection. Then I popped a new layer on top of it for my border layer.
Next step was to choose a round brush from the Brush tool menu. I resized it to 75 pixels (to give it some presence) and set the Opacity to 100%. The colour really doesn’t matter but you should choose something that will show up against your background. I’m going to turn the visibility of my paper layer off for the next few steps. You can do whatever works for you.

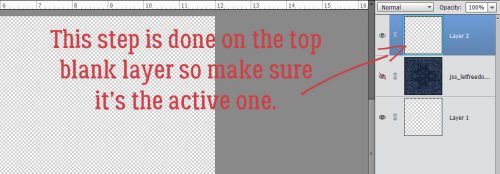
After making sure I was working on the BLANK layer at the top, I went on to my next step.
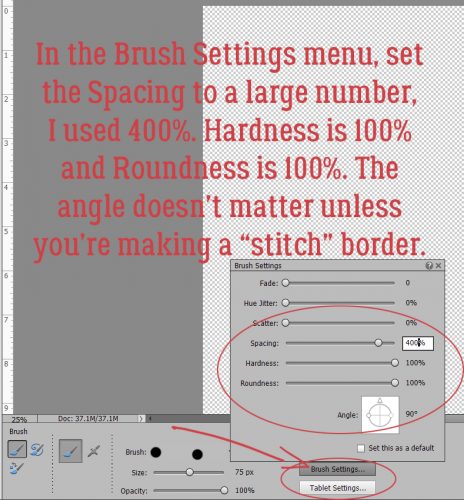
I went back to my Brush menu and clicked on the Brush Settings button. Here I made sure my Fade was set to 0, Hue Jitter also to 0 and Scatter to 0. Spacing needs to be a big number. It’s a percentage of the brush’s size and will determine how much space is between the dots. Since I have a 75 pixel brush, I set this number to 400%. But feel free to experiment. Hardness (determines how sharp the edge of the brush will be) and Roundness both need to be at 100% (unless you’re faking a stitched border but we’re not going to go there today).
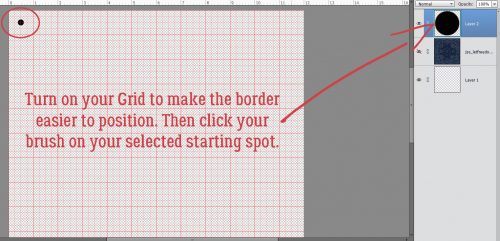
I turned on my Grid (View>Grid or CTRL/CMD>’) to save myself some effort. I decided my border should be 1/2 inch in from the corner. Then I clicked my Brush at that spot.
Do you remember how to draw a straight line in Elements? Hold down the Shift key and click at the spot where you want your line to end!
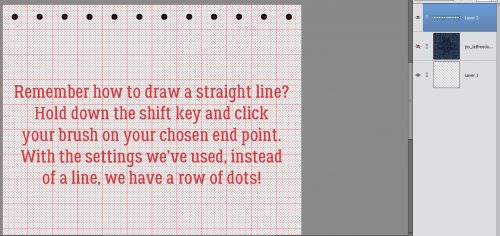
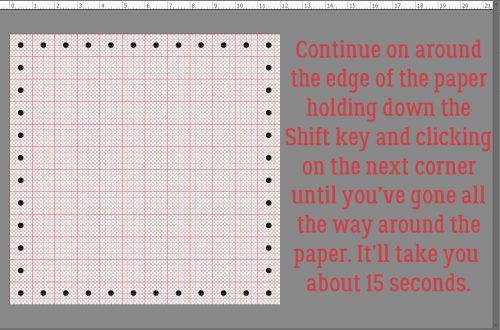
To make the rest of the border, it’s simply holding down the Shift key and clicking in the other three corners. It literally will take you 15 seconds. You can stop here if you just want a dotted border.
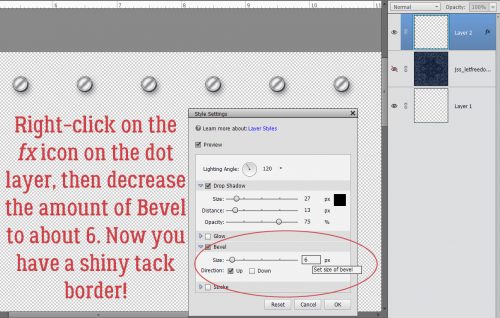
Now, to turn that dotted border into a tack border. I went to my Styles button down at the bottom of the Layers panel then chose Wow Chrome. In that menu I selected Wow-Chrome Shiny Edge. This Style set is one of the default styles that come with the Elements software right out of the box.

I liked the effect but thought it looked too umm… domed. If I’m smacking tacks with a hammer, they’re gonna flatten a bit. So I right-clicked on the fx on the layer and decreased the Bevel to about 6 pixels. I left the drop shadow alone.
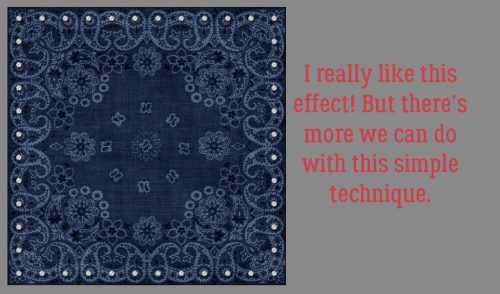
This is how the finished border looked with the paper behind it.

To give you a better idea of scale, here’s the entire 12×12 canvas.
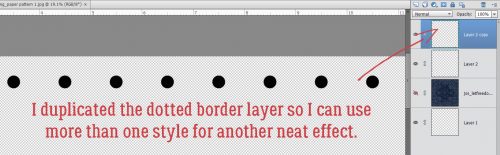
I wanted to see what other effects I could get using default Styles. So I copied the border layer and turned the Visibility of that layer off. It’s possible to add multiple Styles to an object or text as long as you work on individual layers with each.
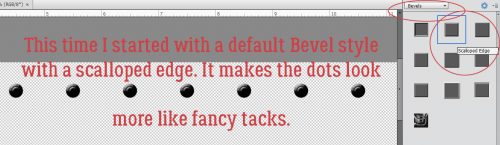
This time I chose Bevels from the Styles menu and went with the Scalloped Edge bevel. Now the dots look like fancy tacks.
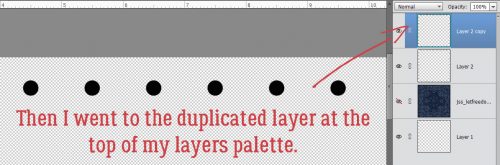
Next I selected the top layer and turned the Visibility back on.
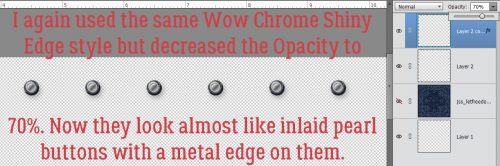
I used the very same Wow-Chrome Shiny Edge style, but dropped the Opacity of that layer to 70%. Now the tacks look more like those pearl-inlaid buttons you see on Western shirts.
The different isn’t blatant, but it’s definitely there.

Another of the default Styles that came with Elements is Complex. I tried a couple of the choices here and settled on the Diamond Plate style. It has a funky industrial look to it.

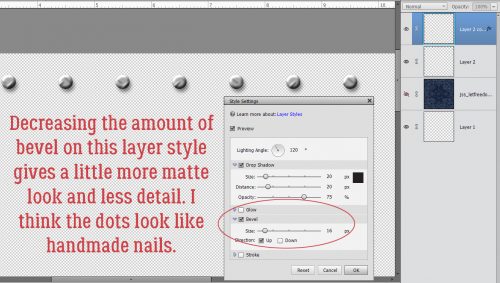
When I decreased the amount of Bevel on this style, the effect became somewhat more matte and there wasn’t as much detail. It really looks like hand-cut nail heads to me now.
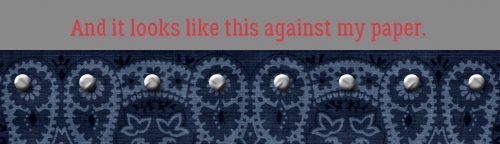
And here it is with the paper behind it. I’m not sure which one I like best. They’re all so neat!
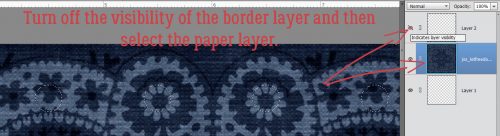
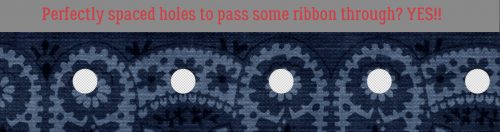
There’s one more thing I played with and that’s turning the dotted border into holes in the paper. So I Selected the Layer thumbnail of the dotted border layer by clicking on the thumbnail in the Layers panel. That gave me my marching ants.

I turned off Visibility for the border layer and made sure I was working on the paper layer.
Then I Cut the selected dots out of the paper. (Edit>Cut or CTRL/CMD>X)
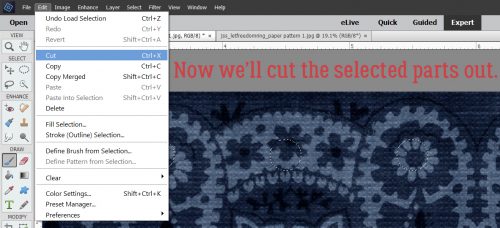
That gave me perfectly spaced holes in my paper to perhaps weave a ribbon through.
I bet you can think of a few more ways to make this technique work for you. I’d love to see what you do with it!
![]()


