In the RAW!
![]()
How many of you have high-tech, high-priced camera gear? How many of you actually use all those fancy features that came with your HTHP camera? Show of hands? How many of you are shooting RAW? (NOT naked…) Anybody?
I’m sure there are more than a few people scratching their heads about now. Let me explain. RAW is a file format that records ALL the data collected by the sensor (creating ginormous files, by the way) that allows for a wide range of adjustments in post-processing. The files it generates are huge for a reason – the image compression ratio is much larger than the JPEG format’s files so there’s more that can be fine-tuned once the images are downloaded. (To understand compression ratio, look at a photo you shot with your camera then posted to Facebook. Examine it in its original state zoomed in 200% then do the same with the FB version. It should be obvious… FB compresses images to a significant degree and they look really awful zoomed.) It’s a great tool for pros, but not necessarily useful for the average soccer mom snapping cell phone photos of the little darlings running with the ball. But what if I told you that PSE 14 and above has a photo editor setting that emulates RAW format editing but without the enormous files? I’m going to show you how it works…
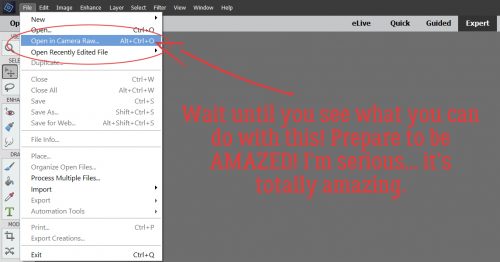
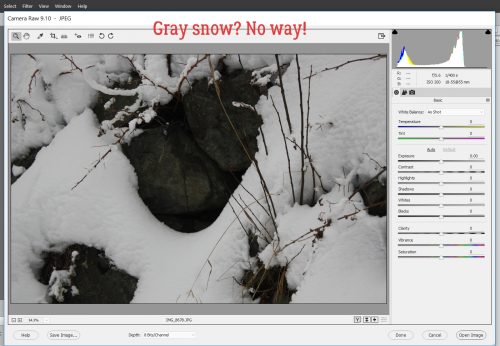
First you need to open your image in the Camera Raw editor. Find the image in your photo folder so you know where it is, then click File>Open in Camera Raw.
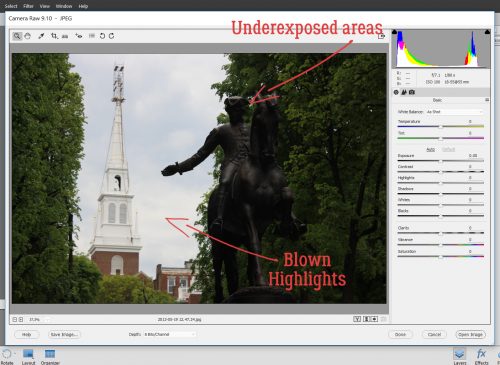
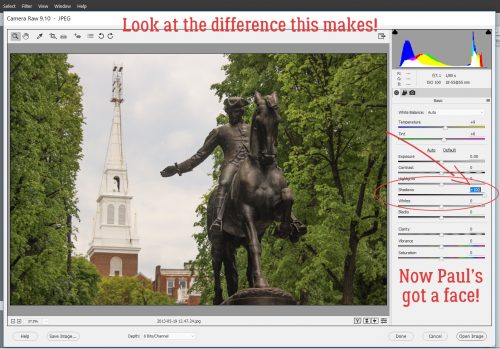
The interface looks like this. Don’t be intimidated! It’s really not that hard to follow. If you look at the photo I’m using, you can see the sky is really washed out but there’s no detail visible in the statue’s face. I’m going to fix that.
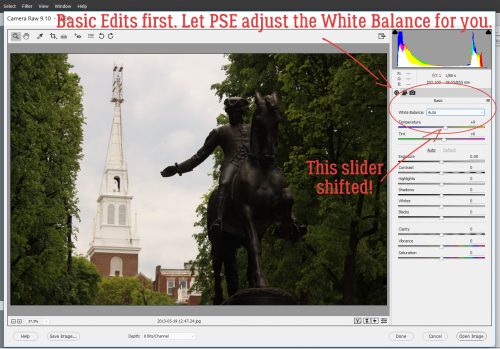
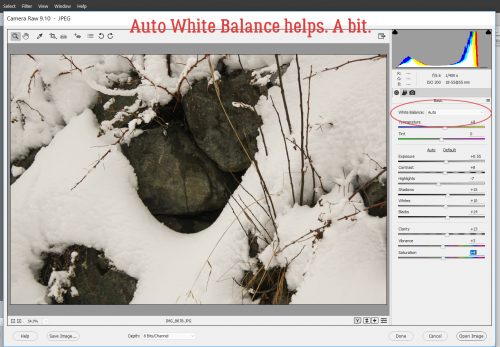
The default when your image opens is the Basic adjustment panel. It includes a White Balance setting that you can leave as shot, set to Auto or set to Custom. In the image below I’ve selected Auto. If you look closely you can see that the Temperature slider has shifted a bit to the right, or warmer side. So has the Tint slider.
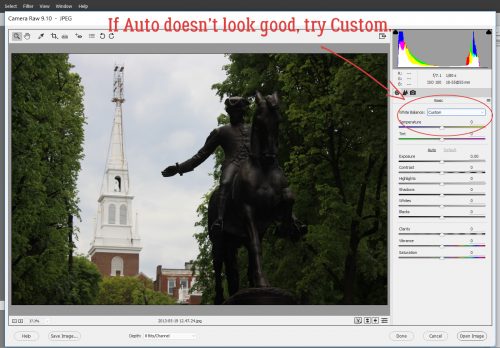
I changed it to Custom just to show you that all the sliders reset and you’d need to adjust all the sliders to achieve the White Balance you want.
So I went back to Auto, then played with the sliders. Adjustments here, listed in order from just below the White Balance, include Temperature, Tint, Exposure, Contrast, Highlights, Shadows, Whites, Blacks, Clarity, Vibrance and Saturation. I moved the Shadows slider all the way to the right; see the change?
The adjustments aren’t individually obvious, but when taken altogether, there’s a significant change. With each image, look at where the sliders are to see what I’ve tweaked.
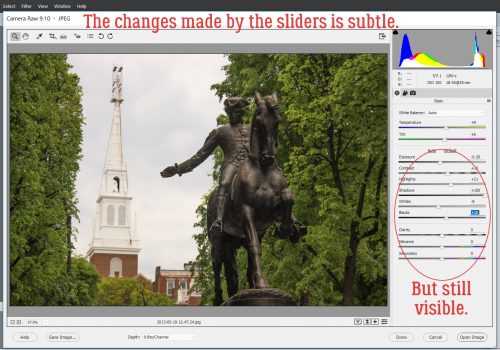
Each of the controls adjusts a different basic aspect of your image. You can adjust the exposure so that over-exposed, blown-out areas aren’t any more, and so that underexposed areas are suddenly quite visible. And look at the definition suddenly showing up in the foliage!

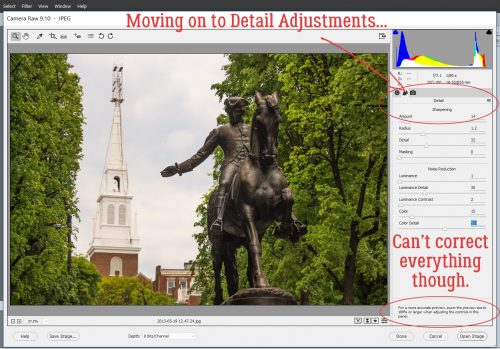
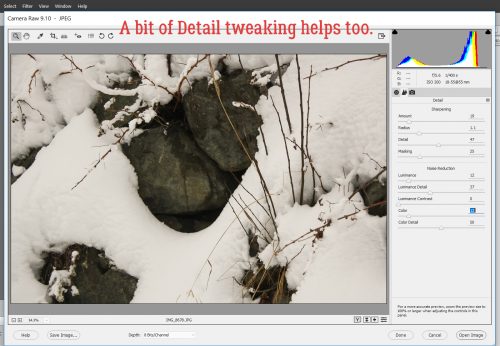
Once you’ve gotten the exposure and and colour more to your liking you can move on to the Detail adjustments. It can’t correct everything though. It’s not going to magically take an out-of-focus photo and make it tack-sharp.
The adjustments in this panel include Sharpening and Noise Reduction, with some options within each. In this panel, it’s helpful to zoom in on the part of the image that you’re trying to improve on so you can gauge the degree of change you want. You don’t want to overdo it!
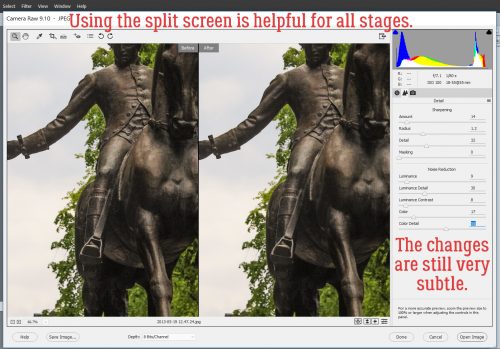
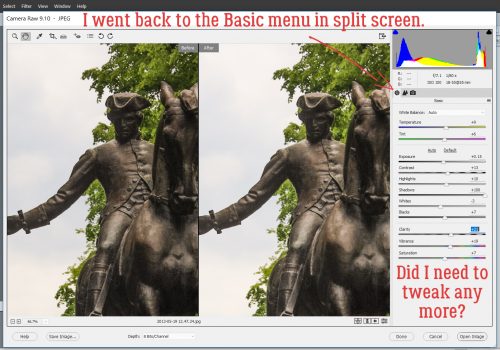
And then there’s the split-screen preview option. This is really useful for all stages of adjustment. To get the split screen go down to the bottom right corner of the image and click on the box with the “Y” in it. If you click on it once, you get the side-to-side split shown below. Clicking on it a second time will split it top-to-bottom. That might work better for landscapes. Seeing the before and after lets you control your adjustments even more. (And you know I’m ALL about control!)
So after I’d done some Sharpening and some Noise Reduction in split screen, I went back to the Basic menu to see if there were any other nudges I wanted to add.
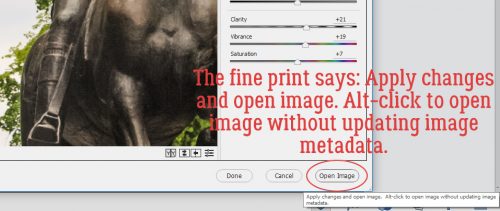
Once I was happy with the changes I’d made, I clicked on that Open Image button.
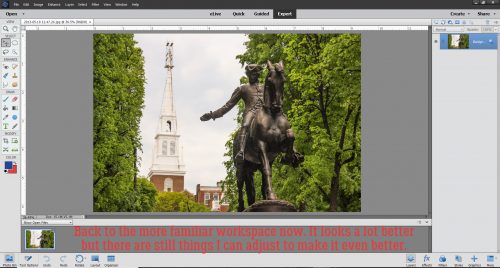
That opens up the more comfortable PSE Expert interface. I think the image looks heaps better, but there might still be some things I can tweak a bit more.
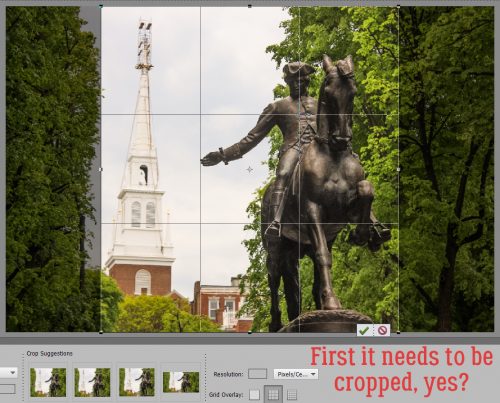
The first thing I did was Crop it to make the overall image more appealing. I like to see the Rule of Thirds grid when I’m cropping. It helps me see where the focal point should be… at a point where two of the lines intersect. You can see that one of the vertical lines passes right through Paul Revere’s head and down the centre of his horse.
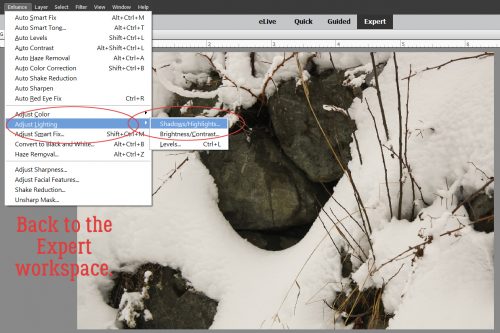
Now I decided to adjust the Lighting a wee bit more. Enhance>Adjust Lighting>Shadows/Highlights.
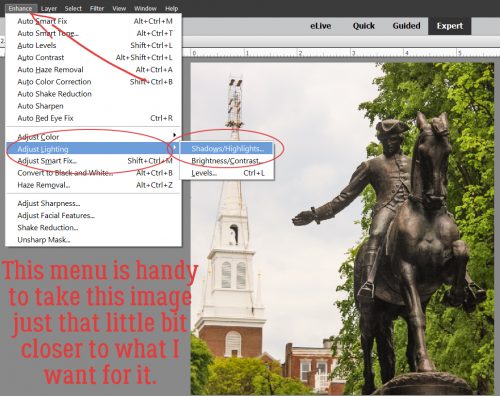
One thing you should keep in mind when using this menu is that the default setting is to Lighten Shadows by 35%. Sometimes that’s perfect and sometimes it’s way too much. Or not enough. Watch your image while you’re making these changes so you don’t go too far. I didn’t really want the shadows lightened. I was more interested in bringing back some of the still-blown highlights and some adjustment of the midtone contrast. Did you notice that the steeple on the Old North Church suddenly is more visible? It’s magic, right??

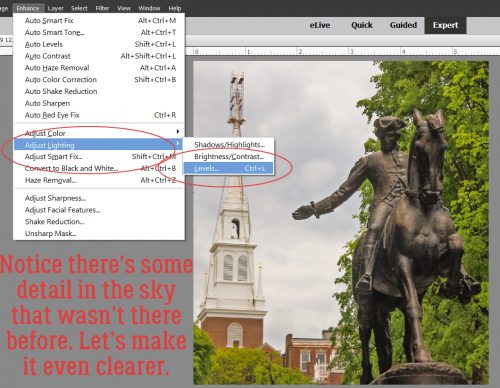
Because this image still looked a little dark in spots but too washed-out in others, I decided to play with the Levels. Enhance>Adjust Lighting>Levels (CTRL/CMD>L)
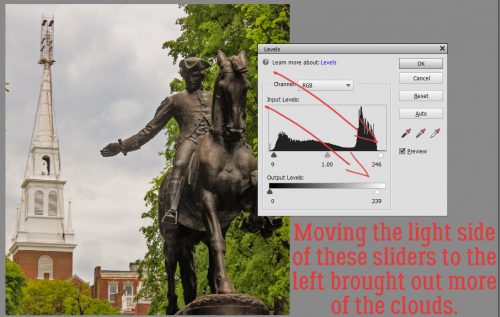
All I did in this menu was to move the sliders a smidge to the left. That brought out some nice detail in the clouds. Try moving the sliders around in either direction so you can see what happens with them.
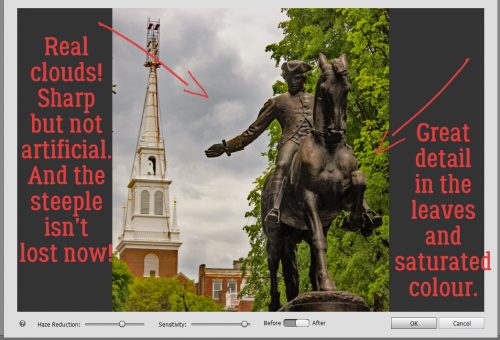
And that brings me to another neat feature that has been in PSE since Version 11. It’s called Haze Removal and it’s even more useful than the Noise Reduction options in Camera Raw. So click Enhance>Haze Reduction (CTRL/CMD>ALT>Z) to get into the menu.
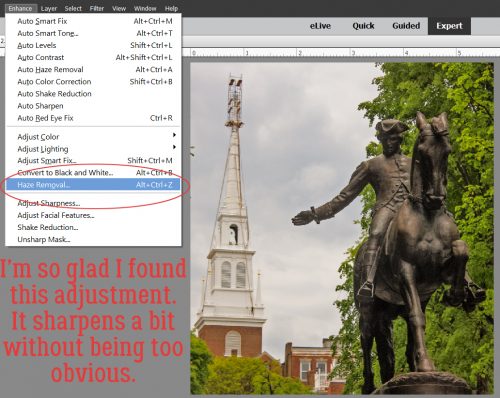
Oh look! The steeple is even more in balance with the exposure of the rest of the photo and the clouds look like they mean business. The leaves have some lovely detail that is brought out even more. And I’m thrilled!
Since there was a snowpocalyse this past weekend in areas of North America that haven’t seen snow in decades, I thought it would be a great opportunity, and an obvious one, to show another way these tools are useful. I’m sure most of us (who live in the snow belt) have photos where the snow is gray, or blue, or some other unnatural cast. And Remove Color Cast isn’t always the best way to change that.
I hit the Auto White Balance and the snow looked more white, but not enough. I worked down the list of sliders, moving them a tiny bit at a time.
I wanted the texture of the snow to be more visible so I did some Detail adjustments too.
Then I Opened Image and went into the Enhance>Lighting>Shadows/Highlights menu.
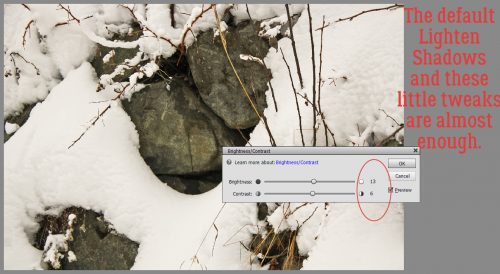
This time I was happy to see the default Lighten Shadows. I just added a little more Contrast.
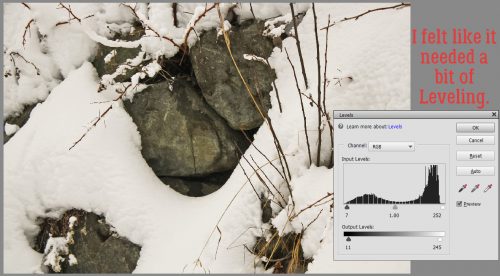
And then I decided it needed some Leveling, again moving the sliders a bit to the left.
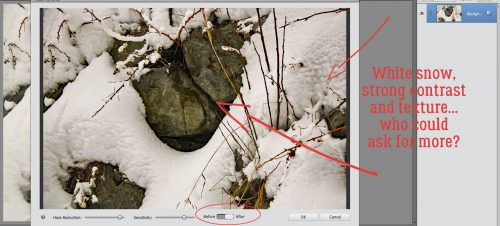
Then I went to Enhance>Haze Removal (CTRL/CMD>ALT>Z) to show you how you can toggle between the Before and After images to decide how much to remove.
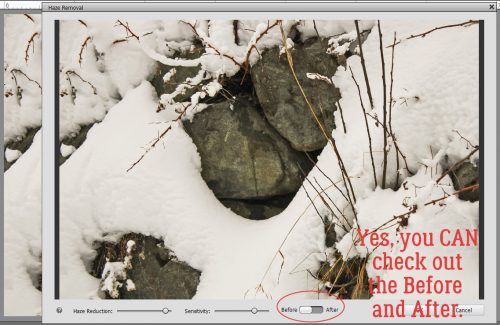
And this is where my snow shot ended up. There’s some definite highlights, texture in both the snow and the rock and the icy effect is pretty good!
I think you can really have fun with this. I KNOW you can take some of your ho-hum photos that you’d hoped would be better and make them that way. And great photos make for fantastic scrapbook layouts. So go, give it a whirl! See y’all next Tuesday.
![]()
This is great! Thank you for showing how to do this!
i’ve played around with the RAW settings but it’s great to have a nice tutorial! thank you so much!!!
Thank you for explaining Camera Raw AND how we phone-photographers can use it! Your tutorial came just as I was about to print out my Christmas letters with photos and one was too dark, another had a blown out sun glare off a bbq right behind the subject. I managed to fix both with your guidelines! I will be using the Camera Raw settings a lot now, I think.
I’m so glad it worked for you the way it works for me! It can be a really powerful tool.