Weekly Wrap-Up: Banner Love

Good morning scrappy friends!

Can you believe June is almost over? One more week! I really can’t. Where is the time going? I swear, it’s just getting up and walking away, unannounced and unnoticed. Soon we’ll all be celebrating the Fourth (those of us in the United States, that is 😉 )!  Now since I don’t have any clever transitions, I’ll just come out and say it, I LOVE BANNERS! I’ve been oohing and ahhing for a while now at all the delicious banners out there, so really, the next step in my addiction is to go hybrid, right?

So I’ve got to share with you this gem I found in our store,

I’ll be honest, I’ve been eyeing it up for a while, now is as good a time as ever to jump on the hybrid bandwagon- with July 4th a little over a week away! It looks too cute and EASY to pass up!  There are some great kits in the store you could use to create your banner! I want to share with you a new one by Connie Prince and an older (but still absolutely beautiful!) kit by Kathy Winters Designs!

I have yet to grab Connie’s but I am TOTALLY loving that banner! 😉 (see, addicted) I have used Kathy’s and it’s VERY awesome. I love all the stars and buttons and word art and… well, go grab it now and see for yourself! 😀

To stray a bit from scrap-talk, there is a fascinating and insightful thread hoppin’ in the forum right now. Sara (Tree City) asked, “What are the Top 5 Most Important Decisions You’ve Made in Your Life?”  Responses are so different from each person, sad, happy, ongoing challenges. It really makes you sit back and think, what ARE  the 5 most important decision you’ve made in your life? I’ve yet to answer but that’s because it really does make you think!  So, tell me, what are YOUR five?

Have you finished reading our June read, The Lucky One for book club? You’ve got a few days left before the book chat! You can find the information on The Lucky One by Nicholas Sparks in this thread. The forum discussion can be found here in this thread and the chat is on June 28th.

We hope to see you there!

Remember to get your June challenges in, you’ve got one week left! I know I’ve got to finish up a few, which is what I plan to do today! Make sure to check out this past Friday’s new releases in the Fresh Baked section, there are some great new kits in the store! A few in particular I am oogling, that’s for sure!

Have a scrap happy Sunday my friends!


<3 April

Let’s Get Crafty!

Wow…Thursday…I’m totally unprepared forLet’s get Crafty today! Even after Steph posted last week! I’m still not prepared. Since I am such a flake 🙂 For this weeks Let’s Get Crafty I am going to just feature a challenge from Gingerscraps! It’s is a crafty challenge though 🙂 The “Candy Wrapper Challenge” is our “Hybrid” challenge! Now that is crafty right! Hybrid crafts are great! Cute name too huh. Shannon came up with that one, she is so clever!
For the month of March the hybrid challenge is so easy! I made it nice and simple so everyone could play along!

So, for march we are actually doing something pretty easy…although, some of you have probably never used your digi scrapping supplies to make “Home Decor” I do it all the time! Hey, these kits are so cute. Why not show them off in your home!
You can get very elaborate with these home decor projects, or they can be as simple as making a “LO” and printing, framing and putting on your wall.
So, let’s start with EASY! Printing, Framing and Hanging on the wall! Any one can do it!
Here is a real simple idea. Take a frame, maybe one that you go buy, or one that is sitting around your house. I have one in my dining room that I put some Valentines day “Digi Artwork” in for the month of Feb. I liked it so much I decided to replace the Artwork monthly for holidays or seasons.
Here is the Feb artwork…

Here it is with the March “Artwork”…

So, your challenge for the month is to get some kind of digi design up in your house somewhere! Anyway you like. you can go the easy way like I did or make something else! Just get some Hybrid juice flowing!

Visit us in the Hybrid Challenge Forum and get your Craft on!

Oh, hey I just thought of something cute to share with you for St. Pattys Day! I guess this post will have a little project..lol..funny how I just though of this! Last night my daughter had to make “Something Sweet” and take photos of it for her 12th grade photography class.  With is being St. Patty’s Day she decided to make these…

The ingerdients…Marshmellows, White Choc Chips, yellow Food coloring and Green Sprinkles!

Melt the chocolate chips, add some yellow food coloring, dip the marshmallow in the melted chocolate and sprinkle on the green! Done! Sweet and cute!! Display them in a cute container with some little decorations. (I used my St. Pattys Day Felties.) It looks like a party! 🙂

Wouldn’t your kids love to have this for a special St. Pattys Day treat!

Happy St. Patty’s Day! Here is a pinch from me if your not wearing GREEN!

“Clock” Plate on Let’s Get Crafty.

First off, before I start my Crafty Thursday post I want to say Happy Birthday to my best friend, my sister Ginger! She is the strongest, prettiest, smartest, best-est sister ever! Oh and make sure you scroll down to the post below to see a little Birthday Secret!

As I was browsing around some of my favorite crafty blogs the other day I came across this oh so pretty plate. I was like, Oh so cute. I could Hybridize that idea! So today for Let’s Get Crafty we are making a “Clock Plate”. It’s not a “Real” clock :). But, it is so pretty hanging on my wall. The original idea came from this lovely Blog HERE, Vintage Sky.

For my version the first step..well the second, the first was to go to the Thrift Store and find the perfect plate. Measure the plate and design a clock in Photoshop, or do what I did and find one in your digi stash! There are tons of kits that have clocks in them! The clock I used was a freebie I downloaded forever ago, by Digital Anemona. Re size to the size you need for your plate and print!

(Don’t mind those little squares at the bottom, those are for some scrabble tile necklaces I’m making)

Then cut it out and use some ModPodge to attach to your plate. Cover it with another layer of ModPodge to seal it.

It will dry clear.

When it’s dray make a little “hanger” on the back like this. I used my glue gun, but it came off a few days later..lol..so then I used super glue. That is holding so far!

Add a long piece of ribbon of lace to “hang” the plate. It’s really being held by the little tab we made. But it looks like it’s hung with the long pretty ribbon. Just tie the long piece to the short piece.

Ta DA! Here is the finished product.

Close up…

That’s it! Easy and cute!

Have a Crafty Thursday!

Let’s Get Crafty, Valentine Decorations!

It’s that time again! Time to get crafty!  Today I have a bunch of cute ideas for Valentine Decorations that you can make your self 🙂 For some reason I just love to decorate for Valentines Day. I guess it’s all the pink and red and hearts! So cute! Every year I seem to make something new to display in Feb. This year is made a couple of new things. These little home decor crafty items were all made with stuff I had around the house. I did not have to go and buy anything. Which is a good thing! I know I’m not made of money. Now, if you are thinking…I want to make something like that but I don’t have such and such around the house. Just to let you know, the things I did use all came from the Thrift store 🙂

The first thing I made was a cute little Family Photo Holder. I picked up two scrabble board games at a thrift store a while back. No, I do not play Scrabble..I just buy them to make projects. LOL.

Here are the items I used…Oh and a glue gun too…

And here is my Scrabble Tile Family Photo Holder.

The next thing I made was a cute little Valentine Garland for my window. For this one I just used some Hemp yarn, and old book (my Mom make purses out of books, so I took the insides of one of the books she tore up to make a purse) I cut some hearts out of the book pages. Then I strung a few together by poking holes into the hearts and threading the hemp yarn threw the holes, I took some mini wooden clothes pins and clipped the hearts to the “clothesline” that I strung in my window. I added the hearts that I had already made out of felt. Look how cute it is. And so easy to make! You can even take the really easy way out and instead of making the hearts out of felt get the “I Love You Felties” in the GingerScraps store, just print and cut out.

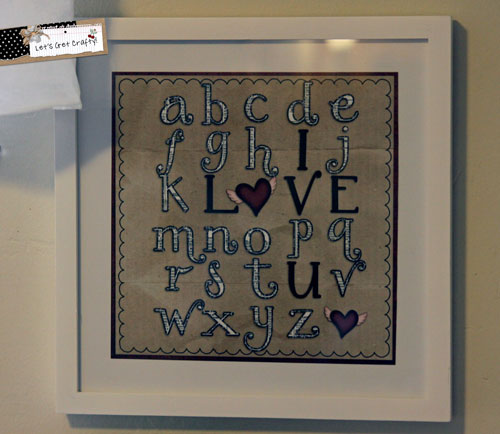
This one I just finished this morning. I saw this cute idea of the alphabet somewhere and thought it was so adorable. This is just a simple Hybird project. I used the Alpha from Happy New Year by GingerScraps(recolored), the Hearts, Wings and burgundy paper are from Angel Mail by, Wyld Web Designs and the craft paper is by GingerScrapsin the Life 365 paper pack.  Then I just printed and put it in a frame I got a Wal Mart forever ago.

So, there you have it! I made all three of those cute and fun Decorations with out even going to the store. LOL..They make my little home look so happy. Go make some for your self! Craft Time! Yea! See you next Thursday!

Let’s Get Crafty: Halloween Crafts

Hi GingerScrapers! I know..I know..I have missed a few Crafty Thursdays…I’m sorry! I have been so busy. I am the team Mom for the Freshmen Football team…our games are on Thursdays. But, not only is it the games, we feed the team and caoches before each game. It’s a big meal and I’m in charge of it!  I have to be at the school at 7am to collect all the food from the players. Make sure the food all gets warmed up by the lunch ladies, then serve the food at 2…game time at 5. So, what I’m saying here is…I’m a busy girl during Football sason 🙂 This week my kids don’t have school. We still have a football game though, but I dont have to collect the food until noon:) So, I figured I would do a little Let’s Get Crafty post for you!

Halloween is in like 10 days. I went online to find some cheap and easy Halloween projects to do with my kids and I am going to share them with you!

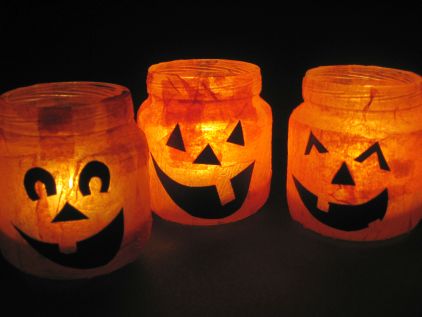
This first one is a great way to use up all those baby food jars you have laying around..

It’s super easy and fun to make with the kiddos. Go to Skip to my Lou for a tutorial.

How about a spooky tree…

You can get instructions and templates for this one here

How about a cute fabric banner…

You can learn how to make this on Running With Needles

How about making a “Hybrid Banner” Instead of fabric, use your digital scrapbooking supplies! There are so many cute Halloween kits at GingerScraps you could use! How about I give you a free template to make yourself a banner 🙂

I used the kit Gobblin Delights which is a GingerScraps collab that you will be able to get at our Halloween party next weekend! I use Statements by Jodis part for my banner:) Make sure you come to our Halloween Party at GingerScraps to get this kit and lots of fun games and prizes!

You can download your Free Template here!

I hope you make some time to get Crafty today! See you at the Halloween Party

Let’s Get Crafty: Gone Hybrid!

Who is ready to get Crafty! It’s Thursday! Yea!

So, you all see all these awesome Hybrid project in the galleries. You are thinking, man I really want to try that. But…it’s got to be so expensive. i don’t have the money to buy all those fancy supplies. Well, I am the queen of cheap! LOL! I love making Hybrid projects…but I don’t have a bottomless wallet! So, lets chat! How can you get started in Hybrid with out breaking the bank.

Some basic supplies…

*Scissors, small sharp ones work best, but I have even used my kids scissors when mine go missing…which happens a lot! lol

*Adhesive of some sort, there are 100’s of different adhesives out there, but really to get started all you need is a trusty old glue stick. My fave is the Pioneer Extra Strong Glue Stick. I get it at Wal Mart for like $1.50 or so. And we all have glue guns laying around. Mod Podge is great. It cost a little more that you might want..but it lasts forever. I have had the same bottle for years. And that 3D double sided tape is great. But, you don’t have to pay a lot for it. I get mine at the dollar store!

*Speaking of the Dollar Store, I love to find things at the Dollar Store to Embellish. I got these frames at the Dollar Store…gave them a little Hybrid love and what a great gift! The wooden letters came form the craft store but they were only like $5.00 for a huge pack of all different letters. I’ve been using them forever.

The flowers on this frame are not from the store. They are digi flowers from the kit I used, I just cut them out and inked the edges! Fold them a little on the edges. They look great!

*I get frames at the Thrift Store too! I even find craft supplies like ribbon, embroidery floss, buttons,  glitter etc at Thrift Stores! You just have to look! Yard Sales are great too!

*Another great thing to have is distress ink. Start out with one color like black or brown. It’s only about $3.00. I actually only have those 2 colors and use them on almost all my hybrid projects.

*Distressing the edges on your projects really gives a nice finished look. You can go to the craft store and buy special “Distressing Tools” but, why not just go grab a piece of sandpaper out of the garage, a nail file works great too.  You just need something that will “rough up” your edges a bit.

*A lot of times if you want to make a card or use one of the nifty “Hybrid Template” you will need to “Crease before folding.” Your fold will turn out way nicer id you crease them first. But, of course you don’t need any fancy tools for this either. You can use a magazine for a mat, an envelope or book for a straight edge if you don’t have a ruler, and even a butter knife or credit card will work as a “bone folder.”

*Now of course you will need a printer, ink and paper. My favorite paper is Epson Matte Photo Paper, but you can use cardstock too.

Now just get creative! Think of things in a different way. If you see a project that calls for “Chipboard” use a cereal box instead.

Like I used on this project….

How about these…I made them from coasters. Yes, those coasters they give you at Restaurants. Check these out….

So, come on! Do some Hybrid! You know you want to! 🙂 How about starting with GingerScraps “Sweet Cards” Challenge! Greeting cards are a super great way to get started in Hybrid!

Let’s Get Crafty: CD Envelopes

It’s time to get crafty! Are you ready?

Today I’m going to show you a simple but useful project. As digital scrapbookers we all have millions of photos. I know I do. I’m also an amateur photographer and take pictures of friends and families in my community. I of course have to put  all these photos on Cd’s.  But then I will have these Cd’s full of pictures laying around. So, I make CD envelopes.  The great thing about doing these Hybrid CD Envelopes is, you can take your digi kits and decorate the envelopes in themes to match whatever photos are on the CD.

You want to give the Grandparents a CD with family pictures on it for Christmas. Decorate the CD Envelope with a Christmas kit, have birthday pictures on the CD, decorate it with a birthday kit! What  a great gift.

The envelope I did today is done with a little bit of a Western Theme. The photos I took were a a family and their horses. They were all wearing jeans and boots.

Let me show you how I did it!

The easiest way to make one of these envelope is to use a template. I used the CD/DVD Envelope Template by, Kelleigh Ratzlaff. She has some great Templates! Just clip your digi papers right to the layers on the template.

Of course you will need some digi paper, I used the Project 365 Scrap Your Life The Neutrals by, Scrappy Cocoa. The My Favorite Jeans Alpha by, HarmonyStar, and a cute little spur from the kit Buckaroo Blues by, Teri Mayo.

You will need a printer and some matte photo paper or cardstock, a glue stick and a bone folder (or whatever you have to crease the fold lines)

So, first step is to design your CD Envelope in your photo editing program. Easy Peasy. Just clip the papers to the layers and add a title or some elements to the front flap. Just remember to design the front flap upside-down. Then print..

Now cut it out and score on the fold lines.

Now fold where you scored…

Now glue and put it together. I like to use clothespins to hold it nice and tight until it dries. I also like to put little Velcro stickers to keep it closed too 🙂

Now put your CD in your envelope and you are done!

Here is another one I made for some photos of 3 girls.

I hope you make some too! See you next Thursday!

Let’s Get Crafty: Hybrid Graduation

Today is the first of our new Thursday “Let’s Get Crafty” Feature! I will be sharing with you all kinds of crafty goodness! Hybrid of course will be one of the many topics we will cover!

Today I will be showing you how to make a Hybrid Graduation Cap Greeting Card from the New Template in the GingerScraps Store by Wyld Web Designs!

This was Charmaine’s very first try at designing a hybrid template and she did a fabulous job! Perfect timing for me too! My niece graduates High School on Friday! So let’s get started.

What I used  for this project was…

The Graduation Cap Template, A digi paper in the color you want you cap to be. I also used the perfect Word Art for this project! The Graduation Day Word Art by, Kathy Winters at GingerScraps. I also used the Doodle Borders by GingerScraps.

You will also need a printer and some nice card stock or Matte photo paper to print on, a glue stick or some tape something to score your folds, and some ribbon to make a tassel!

The first step is to design your card in Photoshop (or whatever program you use to digi scrapbook) Its is so easy with this template, you just clip you paper to the layers. Then add the word art. This took me like 2 minutes! Maybe even less. Then print it out on your photo setting of your printer.

After the ink is nice and dry cut it out and score on the dashed lines. You should always score before folding for nice crisp folds.

Now fold on the lines you just scored.

Now glue the curved piece together to make the bottom of the cap and glue it to the bottom of the card. Just put glue on the tabs and press it on with your bone folder or a Popsicle stick or something. Just to make a nice good hold.

You can add a little tape too if you would like.  Now for the tassel, you can always just go buy a tassel at the craft store, but, I didn’t have any tassels on hand so I just took a few pieces of ribbon about 6 inches long each, folded them in half and tie another piece of ribbon around the top to hold them together.

Punch a hole in the corner of your card and tie the tassel on with another piece of ribbon! So simple and what a Great impression this card will make!

Isn’t it so cool! I loved this template! It was so fun to make, and easy to. I came together super fast!

Give it a try! I would love to see some more of these fabulous card popping up in the GingerScraps gallery!

Come see us next Thursday for another “Let’s Get Crafty” session!

Scrap Happy!