Let’s Get Crafty – Combining DigiScrap and Crochet

Happy Tuesday everyone. I’m here today with a new twist on our blog posts. How many of you have another craft you do? Beading, vinyl, quilting, crochet, knitting? If you do have another hobby, do you ever use your projects in your digiscrap layouts?

I LOVE to dabble in so many things. My husband just rolls his eyes and shakes his head when I jump into another craft because when I jump, I go all the way in. But I seem to have stuck with crocheting the longest. When I started digi-scrapping, I was finding I didn’t have a lot of recent pictures to scrap. My kids absolutely hate having their pictures taken, so those are few and far between. I have a bunch of older photos (both digi and printed that I can scan) but I wanted something more recent, so I started using pictures of crochet projects.

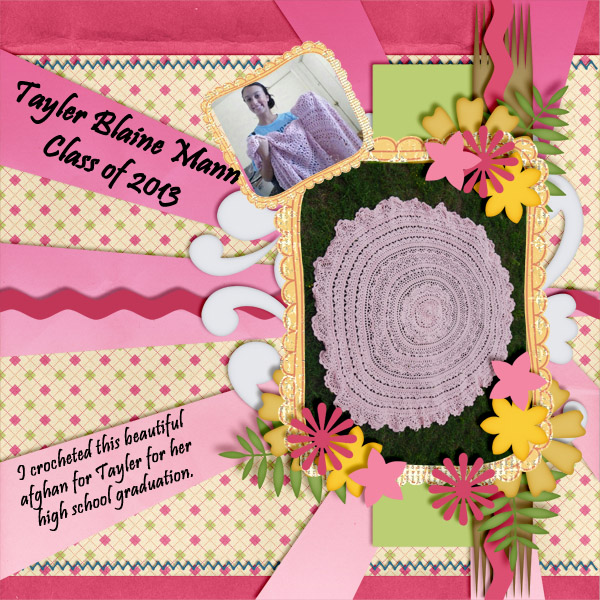
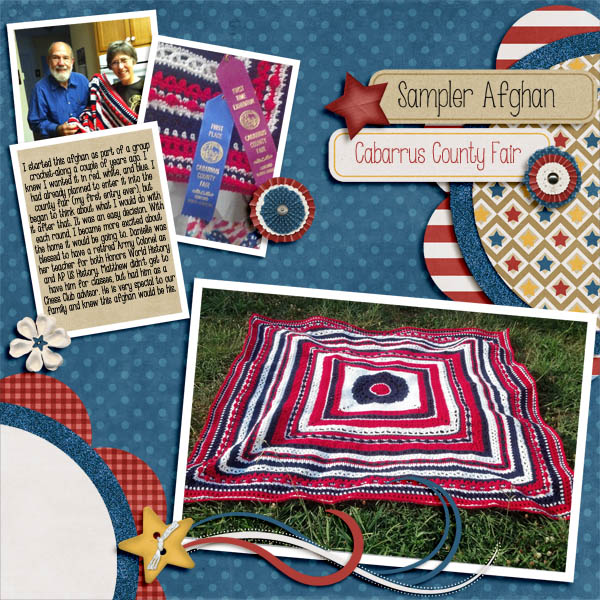
I love to find a pattern that I want to try and then do the project – mostly afghans. Problem there is, we only have so much room and only need so many afghans. So I started doing them to just give away. Below are some of the layouts I’ve done with my projects.

I can definitely see how my scrapping style has changed in the last few years.

Now it’s your turn! Do YOU have a hobby you have used as the focus of a layout. Post the link in the comments. I would LOVE to see what you’ve done.

Enjoy your week!!


“Clock” Plate on Let’s Get Crafty.

First off, before I start my Crafty Thursday post I want to say Happy Birthday to my best friend, my sister Ginger! She is the strongest, prettiest, smartest, best-est sister ever! Oh and make sure you scroll down to the post below to see a little Birthday Secret!

As I was browsing around some of my favorite crafty blogs the other day I came across this oh so pretty plate. I was like, Oh so cute. I could Hybridize that idea! So today for Let’s Get Crafty we are making a “Clock Plate”. It’s not a “Real” clock :). But, it is so pretty hanging on my wall. The original idea came from this lovely Blog HERE, Vintage Sky.

For my version the first step..well the second, the first was to go to the Thrift Store and find the perfect plate. Measure the plate and design a clock in Photoshop, or do what I did and find one in your digi stash! There are tons of kits that have clocks in them! The clock I used was a freebie I downloaded forever ago, by Digital Anemona. Re size to the size you need for your plate and print!

(Don’t mind those little squares at the bottom, those are for some scrabble tile necklaces I’m making)

Then cut it out and use some ModPodge to attach to your plate. Cover it with another layer of ModPodge to seal it.

It will dry clear.

When it’s dray make a little “hanger” on the back like this. I used my glue gun, but it came off a few days later..lol..so then I used super glue. That is holding so far!

Add a long piece of ribbon of lace to “hang” the plate. It’s really being held by the little tab we made. But it looks like it’s hung with the long pretty ribbon. Just tie the long piece to the short piece.

Ta DA! Here is the finished product.

Close up…

That’s it! Easy and cute!

Have a Crafty Thursday!

Jewelry Holder on Let’s Get Crafty!

Hi my little crafty friends. Today we are making some thing very pretty but very practical at the same time. I don’t know about you all, but my necklaces were a hot mess! I had them hanging on this really cute wire holder that sits on top of  my dresser. My boys are always messing with it and they are always getting knocked over. LOL. They were just all twisted up and getting broken. So, I went on a google search for Home made Jewelry Holders. There are a lot of options. This little tutorial will show you what I made. There are definitely a lot of different ways to make these Jewelry Holders, but this seemed like the best option for me.

First of all you will need to gather your supplies. You might even have some of this stuff laying around. If not, hit those thrift stores again! Everything I used I either had already or got it at the Thrift Store. You will need thses items.

Gather your supplies. My frame did not have a back so I had to create one out of cardboard. Then I placed the batting (I see that I forgot to put batting on the list, you need batting) on top of my cardboard and cut around it.

Like that. Glue the batting to the cardboard, or frame back if your frame has one. Then take your fabric and place the batting covered cardboard, batting side down on the fabric. Pull it tightly around to the back and glue with your glue gun. Take your trims and do the same this. Pull them around tightly and glue them to the back, Like this. Don’t glue the trin down on the front of the fabric. Only on the back.

Now if your frame had a back you can put it back on now. My frame did not have a back, so i got out the trusty old duck tape and taped on the back. It’s bright green duck tape too…haha, but no one needs to see the back right. I also put 2 cup hooks on the side for even more places to hang necklaces.

Now hang it on your wall and display all your pretties.  You can hang the necklaces from the trim, or stick pins into it and hang stuff there too. Hang them on the cup hooks too. The trim works great to clip hair clips onto also. Here is my Jewelry Hanger on my wall. See how the pretties hang right off of the trim. Cute huh.

Check out this Blog for even more Jewelry organizing ideas! There are tons! Have a great Crafty Thursday! Let’s Get Crafty people!

Let’s Get Crafty: Cutest Pedestal Goodie Stand

Have you missed me? It’s time to get crafty! Yea! I have missed doing these posts…it gives me an excuse to get crafty. Today is a fun one, and totally cheap..oh does that sound bad…how about inexpensive. That’s better. This whole project was my Mom’s idea, she is THE QUEEN of crafting. She does it all! She is amazing. I could do years worth of Crafty Thursdays with all the stuff she makes. This is where my sister Ginger and I get our artsy genes from. My Mom LOVES to make beautiful items that look like they came from one of those cute little boutiques, out of stuff she has around the house or finds at yard sales and thrift stores. She was the Queen of Up-Cycling before it became cool 🙂

So, this is what we are playing with today. Plates and candle holders. We probably all have one of those plates laying around that looks so cute but you never use it. And a mismatched candle holder. You just don’t want to throw away. Heck if you don’t just go to any Thrift Store. There are tons of super cute plates and candle holders you can pick up for next to nothing! My Mom took a bunch of her plates and candle holders she had gathered over the years and made them into the Cutest Pedestal goodie stand. Perfect to serve you yummy cookies, muffins, fruit, gosh everything looks great on these Pedestals!  Let me share with you some of the one’s my lovely Mother has created. Then I will show you step by step how we made mine 🙂

Here are my Mom’s creations…

Now aren’t those adorable! I just had to make one and I had the perfect plate. When my husband was in the Army we were stationed at Fort Bragg, in Fayetteville NC, lot’s of great memories there. One day I was looking around in my local Thrift Store..by the way, I’m in CA now. No where near Fayetteville, NC.  I found this plate that said Fayetteville NC on it! Can you believe that. All those years I lived there and I find the Fayetteville plate in CA. LOL. Of course I had to have it, and the price of .75 cents was just right! Now I have had this plate sitting in my cupboard for a while and when I saw my Mom’s Pedestals, I knew I wanted to do that with my special plate. Oh course my Mom had the perfect cream colored candle holder for me to use 🙂 Thanks Mom. Of course she got the candle holder at the Thrift Store too. So let’s get started.

First step (after you choose the perfect candle holder and plate that is) is to clean any dust off of your candle holder and plate. Then take some sandpaper or a sanding block and sand the bottom of the plate and the top of the candle holder. I used a sanding block.

Next, take some nail polish remover and clean it again real good removing any dust from the sanding.

Next you will want to lay your plate down with the front of the plate towards the table then lay your candle right in the middle of your plate. Get it nice and centered. Take a sharpie and draw a circle all the way around the candle holder.

It will look like this.

Take your glue, I used gorilla glue, it is super strong super glue. Don’t use the cheapo super glue. Get the good stuff. You an also use epoxy, but I didn’t want to deal with the mixing and mess, so I just used Gorilla Super Glue.

Put your glue on your plate right on the inside of the circle that you just drew. Like this. Be quick, it dries fast. And don’t use too much. Just enough.

Now, stick your candle holder right on top of the glue. Press it down and hold for like 20 seconds. You can wipe off the ink now too if you want.

Now to seal it even more for a nice smooth tight hold. We took some Aleene’s Jewel it glue and went all around the edges where the plate and candle holder meet. You could also use clear caulk. It works too. Just make a nice smooth bead all around the edge and smooth it with your finger.

Place a nice big book on the top for a while while the glue dries.

Now you have a beautiful Pedestal Plate Stand to place your yummy goodies on top of. Here is mine.

From the top. (Yes, I know my plate has a little chip, but it’s ok, it’s a special plate)

My kids ate all the cookies, but it looks great with fruit on it too 🙂

Now doesn’t that look easy and fun! Go out and make your own! Please share with us if you do! Have a happy Thursday and go get Crafty!

Let’s Get Crafty: Camera Strap Covers

Time to get crafty! OK…so, I think I missed a week…sorry! Busy, Busy!

But, I actually made something today! I know!  Can you believe it!

I have been eyeballing these camera strap covers for a while now, and with all these football photos I have been taking, I need a little cushion for the neck! 🙂

So..lookie what I made today.

Yes, of course, with Cherry fabric!

I followed this tutorial on Skip to my Lou. It was really super easy. My fabric wasn’t even as long as the tut called for so I just seamed it together!

You girls, really, this is easy! Try it!

Let’s Get Crafty: Wallpaper Scraps Tree

It’s Thursday! OK, I just saw the cutest thing, so I have to share! I totally want to do this somewhere in my house!

They did it with Wallpaper scraps. But hey, why not use scrapbook paper, digi or regular!

Any blank surface becomes an enchanted forest with this patterned mural made from wallpaper scraps. Using this photo for reference, sketch a basic tree trunk on the back side of a sheet of wallpaper (you may want to practice first on butcher paper). Once you have your desired shape and height, cut out. On the back of another piece of the same wallpaper, again using this photo as a guide, draw branches of various sizes and shapes — including a group of three attached limbs for the treetop. Cut out the branches. Apply the paper trunk, then the branches, to your wall with ready-made paste. While the tree dries, trim remnants of other brightly patterned wallpapers into leaf shapes — you’ll need about 60. Paste these to the wall so they appear to be sprouting from the branches.
I’m totally doing this!
Have a great crafty day!

Let’s Get Crafty: Paper Flowers

Time to get Crafty! OK, so i must admit. I forgot it was Thursday again! Ha Ha. I have been soooo busy with my Team Mom duties, I haven’t had to to even think about crafting.

But, Ginger showed me these cool Paper flowers, and since it is my Birthday today 🙂 I am taking the easy way out and sharing these flowers with you!

Aren’t they pretty!

The instructions are HERE They look super simple to make!

Now, the really cool thing for us digi scrappers, use digital scrapbooking paper and make them any color you want!

There is even a video! Now that is what I call cool!

I hope you girls enjoy these as much as Ginger and I did! Have a great day!

Happy Crafting!

Let’s Get Crafty: Scrabble Tile Necklaces

Thursday!! Let’s Get Crafty!! Woot!!

Let’s make some Scrabble tile Necklaces!

I was so lucky one day and found 2 scrabble games at the Goodwill! I love me some Goodwill! I have been searching for them! I really wanted to make some Scrabble Tile Necklaces!

So, this is my first of many to come. It was so fun and easy to make.

The first thing I did was drill a hole in the top of the tile, a tiny hole with a tiny drill bit.

Then is designed my necklace front in PSE. Printed it on matte photo paper. Covered it with Mod Podge to seal it. Glued it to the back side of the tile. (Wait for the Mod Podge to dry)

Then apply your Diamond Glaze, just a nice smooth coat. I goes on so easy!

Now you just have to wait for it to dry! When it’s nice and dry take a piece of beading wire make a loop in the top and stick it in the hole. Put a little super glue in the hole to hold it. Then put a split ring on the loop and put it on your chain! Your done! You can wear it both ways!

Check out these ones.  🙂 I like cherries. Aren’t they cute!

Have a great day! Go find you some Scrabble Tiles and get crafting!

Let’s Get Crafty: Gone Hybrid!

Who is ready to get Crafty! It’s Thursday! Yea!

So, you all see all these awesome Hybrid project in the galleries. You are thinking, man I really want to try that. But…it’s got to be so expensive. i don’t have the money to buy all those fancy supplies. Well, I am the queen of cheap! LOL! I love making Hybrid projects…but I don’t have a bottomless wallet! So, lets chat! How can you get started in Hybrid with out breaking the bank.

Some basic supplies…

*Scissors, small sharp ones work best, but I have even used my kids scissors when mine go missing…which happens a lot! lol

*Adhesive of some sort, there are 100’s of different adhesives out there, but really to get started all you need is a trusty old glue stick. My fave is the Pioneer Extra Strong Glue Stick. I get it at Wal Mart for like $1.50 or so. And we all have glue guns laying around. Mod Podge is great. It cost a little more that you might want..but it lasts forever. I have had the same bottle for years. And that 3D double sided tape is great. But, you don’t have to pay a lot for it. I get mine at the dollar store!

*Speaking of the Dollar Store, I love to find things at the Dollar Store to Embellish. I got these frames at the Dollar Store…gave them a little Hybrid love and what a great gift! The wooden letters came form the craft store but they were only like $5.00 for a huge pack of all different letters. I’ve been using them forever.

The flowers on this frame are not from the store. They are digi flowers from the kit I used, I just cut them out and inked the edges! Fold them a little on the edges. They look great!

*I get frames at the Thrift Store too! I even find craft supplies like ribbon, embroidery floss, buttons,  glitter etc at Thrift Stores! You just have to look! Yard Sales are great too!

*Another great thing to have is distress ink. Start out with one color like black or brown. It’s only about $3.00. I actually only have those 2 colors and use them on almost all my hybrid projects.

*Distressing the edges on your projects really gives a nice finished look. You can go to the craft store and buy special “Distressing Tools” but, why not just go grab a piece of sandpaper out of the garage, a nail file works great too.  You just need something that will “rough up” your edges a bit.

*A lot of times if you want to make a card or use one of the nifty “Hybrid Template” you will need to “Crease before folding.” Your fold will turn out way nicer id you crease them first. But, of course you don’t need any fancy tools for this either. You can use a magazine for a mat, an envelope or book for a straight edge if you don’t have a ruler, and even a butter knife or credit card will work as a “bone folder.”

*Now of course you will need a printer, ink and paper. My favorite paper is Epson Matte Photo Paper, but you can use cardstock too.

Now just get creative! Think of things in a different way. If you see a project that calls for “Chipboard” use a cereal box instead.

Like I used on this project….

How about these…I made them from coasters. Yes, those coasters they give you at Restaurants. Check these out….

So, come on! Do some Hybrid! You know you want to! 🙂 How about starting with GingerScraps “Sweet Cards” Challenge! Greeting cards are a super great way to get started in Hybrid!

Let’s Get Crafty: CD Envelopes

It’s time to get crafty! Are you ready?

Today I’m going to show you a simple but useful project. As digital scrapbookers we all have millions of photos. I know I do. I’m also an amateur photographer and take pictures of friends and families in my community. I of course have to put  all these photos on Cd’s.  But then I will have these Cd’s full of pictures laying around. So, I make CD envelopes.  The great thing about doing these Hybrid CD Envelopes is, you can take your digi kits and decorate the envelopes in themes to match whatever photos are on the CD.

You want to give the Grandparents a CD with family pictures on it for Christmas. Decorate the CD Envelope with a Christmas kit, have birthday pictures on the CD, decorate it with a birthday kit! What  a great gift.

The envelope I did today is done with a little bit of a Western Theme. The photos I took were a a family and their horses. They were all wearing jeans and boots.

Let me show you how I did it!

The easiest way to make one of these envelope is to use a template. I used the CD/DVD Envelope Template by, Kelleigh Ratzlaff. She has some great Templates! Just clip your digi papers right to the layers on the template.

Of course you will need some digi paper, I used the Project 365 Scrap Your Life The Neutrals by, Scrappy Cocoa. The My Favorite Jeans Alpha by, HarmonyStar, and a cute little spur from the kit Buckaroo Blues by, Teri Mayo.

You will need a printer and some matte photo paper or cardstock, a glue stick and a bone folder (or whatever you have to crease the fold lines)

So, first step is to design your CD Envelope in your photo editing program. Easy Peasy. Just clip the papers to the layers and add a title or some elements to the front flap. Just remember to design the front flap upside-down. Then print..

Now cut it out and score on the fold lines.

Now fold where you scored…

Now glue and put it together. I like to use clothespins to hold it nice and tight until it dries. I also like to put little Velcro stickers to keep it closed too 🙂

Now put your CD in your envelope and you are done!

Here is another one I made for some photos of 3 girls.

I hope you make some too! See you next Thursday!