Fowers, Flowers, Flowers on Let’s Get Crafty Thursday!

It’s Thursday! Yea! Time to get crafty! Well, is wish I had time. I have been busy, busy this week. No time to get crafty yet! But, I will, Oh yes, I will. But, do not fear! We have other crafty ladies in our midst. One of our very own GingerScraps Designers has been making flowers, flowers and more flowers! Stephanie! I’m taking about you! You GingerScraps fans know her as the talented designer Scrappy Cocoa! But..not only is she a fab digi designer! She is a crafty goddess too! Look at all these cute little flowers…cute models too 🙂

Oh and her handsome little son even took his tired little sisters place as a model.

They look great in Mom’s hair too!

Steph even made this cool Flower Necklace.

Even cooler..she shows you all the steps you need to know to make your own on her blog! It’s really fun and pretty darn easy too! Pop over to her blog and make some of your own! You can check out all of her fabulous digi designs while you are there too 🙂

Happy Crafting!

“Clock” Plate on Let’s Get Crafty.

First off, before I start my Crafty Thursday post I want to say Happy Birthday to my best friend, my sister Ginger! She is the strongest, prettiest, smartest, best-est sister ever! Oh and make sure you scroll down to the post below to see a little Birthday Secret!

As I was browsing around some of my favorite crafty blogs the other day I came across this oh so pretty plate. I was like, Oh so cute. I could Hybridize that idea! So today for Let’s Get Crafty we are making a “Clock Plate”. It’s not a “Real” clock :). But, it is so pretty hanging on my wall. The original idea came from this lovely Blog HERE, Vintage Sky.

For my version the first step..well the second, the first was to go to the Thrift Store and find the perfect plate. Measure the plate and design a clock in Photoshop, or do what I did and find one in your digi stash! There are tons of kits that have clocks in them! The clock I used was a freebie I downloaded forever ago, by Digital Anemona. Re size to the size you need for your plate and print!

(Don’t mind those little squares at the bottom, those are for some scrabble tile necklaces I’m making)

Then cut it out and use some ModPodge to attach to your plate. Cover it with another layer of ModPodge to seal it.

It will dry clear.

When it’s dray make a little “hanger” on the back like this. I used my glue gun, but it came off a few days later..lol..so then I used super glue. That is holding so far!

Add a long piece of ribbon of lace to “hang” the plate. It’s really being held by the little tab we made. But it looks like it’s hung with the long pretty ribbon. Just tie the long piece to the short piece.

Ta DA! Here is the finished product.

Close up…

That’s it! Easy and cute!

Have a Crafty Thursday!

Jewelry Holder on Let’s Get Crafty!

Hi my little crafty friends. Today we are making some thing very pretty but very practical at the same time. I don’t know about you all, but my necklaces were a hot mess! I had them hanging on this really cute wire holder that sits on top of  my dresser. My boys are always messing with it and they are always getting knocked over. LOL. They were just all twisted up and getting broken. So, I went on a google search for Home made Jewelry Holders. There are a lot of options. This little tutorial will show you what I made. There are definitely a lot of different ways to make these Jewelry Holders, but this seemed like the best option for me.

First of all you will need to gather your supplies. You might even have some of this stuff laying around. If not, hit those thrift stores again! Everything I used I either had already or got it at the Thrift Store. You will need thses items.

Gather your supplies. My frame did not have a back so I had to create one out of cardboard. Then I placed the batting (I see that I forgot to put batting on the list, you need batting) on top of my cardboard and cut around it.

Like that. Glue the batting to the cardboard, or frame back if your frame has one. Then take your fabric and place the batting covered cardboard, batting side down on the fabric. Pull it tightly around to the back and glue with your glue gun. Take your trims and do the same this. Pull them around tightly and glue them to the back, Like this. Don’t glue the trin down on the front of the fabric. Only on the back.

Now if your frame had a back you can put it back on now. My frame did not have a back, so i got out the trusty old duck tape and taped on the back. It’s bright green duck tape too…haha, but no one needs to see the back right. I also put 2 cup hooks on the side for even more places to hang necklaces.

Now hang it on your wall and display all your pretties.  You can hang the necklaces from the trim, or stick pins into it and hang stuff there too. Hang them on the cup hooks too. The trim works great to clip hair clips onto also. Here is my Jewelry Hanger on my wall. See how the pretties hang right off of the trim. Cute huh.

Check out this Blog for even more Jewelry organizing ideas! There are tons! Have a great Crafty Thursday! Let’s Get Crafty people!

Let’s Get Crafty, Valentine Decorations!

It’s that time again! Time to get crafty!  Today I have a bunch of cute ideas for Valentine Decorations that you can make your self 🙂 For some reason I just love to decorate for Valentines Day. I guess it’s all the pink and red and hearts! So cute! Every year I seem to make something new to display in Feb. This year is made a couple of new things. These little home decor crafty items were all made with stuff I had around the house. I did not have to go and buy anything. Which is a good thing! I know I’m not made of money. Now, if you are thinking…I want to make something like that but I don’t have such and such around the house. Just to let you know, the things I did use all came from the Thrift store 🙂

The first thing I made was a cute little Family Photo Holder. I picked up two scrabble board games at a thrift store a while back. No, I do not play Scrabble..I just buy them to make projects. LOL.

Here are the items I used…Oh and a glue gun too…

And here is my Scrabble Tile Family Photo Holder.

The next thing I made was a cute little Valentine Garland for my window. For this one I just used some Hemp yarn, and old book (my Mom make purses out of books, so I took the insides of one of the books she tore up to make a purse) I cut some hearts out of the book pages. Then I strung a few together by poking holes into the hearts and threading the hemp yarn threw the holes, I took some mini wooden clothes pins and clipped the hearts to the “clothesline” that I strung in my window. I added the hearts that I had already made out of felt. Look how cute it is. And so easy to make! You can even take the really easy way out and instead of making the hearts out of felt get the “I Love You Felties” in the GingerScraps store, just print and cut out.

This one I just finished this morning. I saw this cute idea of the alphabet somewhere and thought it was so adorable. This is just a simple Hybird project. I used the Alpha from Happy New Year by GingerScraps(recolored), the Hearts, Wings and burgundy paper are from Angel Mail by, Wyld Web Designs and the craft paper is by GingerScrapsin the Life 365 paper pack.  Then I just printed and put it in a frame I got a Wal Mart forever ago.

So, there you have it! I made all three of those cute and fun Decorations with out even going to the store. LOL..They make my little home look so happy. Go make some for your self! Craft Time! Yea! See you next Thursday!

Let’s Get Crafty: Acorn Nativity

It’s time to get crafty! Who’s ready? OK…I’m not…hahaha. I haven’t had any time to craft in forever. But, I do have a really cute project to show you. It is my very favorite Christmas decoration. My daughter made this for me when she was about 11. She is 17 now. I pack it very carefully every year.

This is a project that you don’t really need any money for. When Kayla made this she just went searching around the yard at her Grandmas house. She found a few things in the craftroom and a little hot glue. She made this all on her own one afternoon. Came up with the idea in her own cute little brain. 🙂 I love it.

I know a lot of your kids would have fun making something like this. I know all my kids love Nature Crafts. You can find inspiration anywhere. Right in your own back yard!

Here is her “Acorn Nativity Scene”

And here are some close ups. Pretty darn cute isn’t it.

Now go out on a Nature Hike and make one for yourself!

Let’s Get Crafty: Halloween Crafts

Hi GingerScrapers! I know..I know..I have missed a few Crafty Thursdays…I’m sorry! I have been so busy. I am the team Mom for the Freshmen Football team…our games are on Thursdays. But, not only is it the games, we feed the team and caoches before each game. It’s a big meal and I’m in charge of it!  I have to be at the school at 7am to collect all the food from the players. Make sure the food all gets warmed up by the lunch ladies, then serve the food at 2…game time at 5. So, what I’m saying here is…I’m a busy girl during Football sason 🙂 This week my kids don’t have school. We still have a football game though, but I dont have to collect the food until noon:) So, I figured I would do a little Let’s Get Crafty post for you!

Halloween is in like 10 days. I went online to find some cheap and easy Halloween projects to do with my kids and I am going to share them with you!

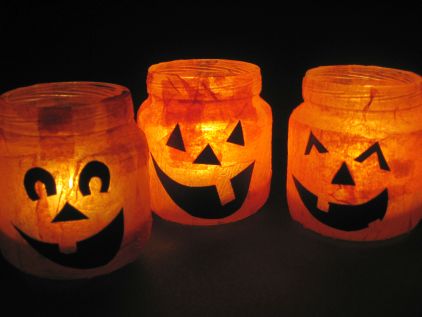
This first one is a great way to use up all those baby food jars you have laying around..

It’s super easy and fun to make with the kiddos. Go to Skip to my Lou for a tutorial.

How about a spooky tree…

You can get instructions and templates for this one here

How about a cute fabric banner…

You can learn how to make this on Running With Needles

How about making a “Hybrid Banner” Instead of fabric, use your digital scrapbooking supplies! There are so many cute Halloween kits at GingerScraps you could use! How about I give you a free template to make yourself a banner 🙂

I used the kit Gobblin Delights which is a GingerScraps collab that you will be able to get at our Halloween party next weekend! I use Statements by Jodis part for my banner:) Make sure you come to our Halloween Party at GingerScraps to get this kit and lots of fun games and prizes!

You can download your Free Template here!

I hope you make some time to get Crafty today! See you at the Halloween Party

Let’s Get Crafty: Scrabble Tile Necklaces

Thursday!! Let’s Get Crafty!! Woot!!

Let’s make some Scrabble tile Necklaces!

I was so lucky one day and found 2 scrabble games at the Goodwill! I love me some Goodwill! I have been searching for them! I really wanted to make some Scrabble Tile Necklaces!

So, this is my first of many to come. It was so fun and easy to make.

The first thing I did was drill a hole in the top of the tile, a tiny hole with a tiny drill bit.

Then is designed my necklace front in PSE. Printed it on matte photo paper. Covered it with Mod Podge to seal it. Glued it to the back side of the tile. (Wait for the Mod Podge to dry)

Then apply your Diamond Glaze, just a nice smooth coat. I goes on so easy!

Now you just have to wait for it to dry! When it’s nice and dry take a piece of beading wire make a loop in the top and stick it in the hole. Put a little super glue in the hole to hold it. Then put a split ring on the loop and put it on your chain! Your done! You can wear it both ways!

Check out these ones.  🙂 I like cherries. Aren’t they cute!

Have a great day! Go find you some Scrabble Tiles and get crafting!

Let’s Get Crafty: Old Jeans

OK..Wow, it’s Thursday! What a week! I am not prepared for this at all! LOL! I thought it was Wednesday! Ha Ha! Well, I don’t have a tutorial for you today. But, I’m sitting here thinking, what the heck can I post about. Hmmm…looking at both of my sons sleeping on the couches. I have some pretty cool couches…there is not one person in the world who has my couches.

Well, yes of course, they are “home made” It all started years ago, my Dad, he is funny about jeans. If he get a tiny speck on his jeans he won’t wear them anymore. But, my Mom, being the crafty queen of the family, thinks, I can’t just throw these away, someday we will do something great with all these jeans.

Then there is me, I love denim, my living room is blue and yellow. A few years ago I bought some denim couches. They were pretty cute when I first bought them, but after a while I realize, this is not very good fabric they used on these couches. It’s like the cheapest, thinnest denim. If you spill, it stains…not good for a house full of kids. Bummer…I was about to have my 4th baby. Company coming to stay, and these couches look like crap.

Mom..help me! My Mom, she is amazing. She can make something beautiful out of nothing. So, we start thinking, I really love the idea of my denim couches, but these need help. “Hey, Julie dear daughter, I have a huge box a your Dad’s jeans I have been saving for years, lets remake your couch with them!” So, we cut and pinned and stapled and sewed. Well, Mom did most of the work and I sat there huge as a house 9 months pregnent braiding the trim for the arms. 🙂

I love my Jean couches, there are even pockets on them. My little boys love to put their cars in the pockets. The cover zips off so I can throw them in the wash. They are indestructible…and that is saying a lot in my house!

So, I will stop babbling and show you….

Pretty funky aren’t they! I love them! We have a new coffee table and new desk, repainted the living room since we made these couches. But the couches live on! It’s like your favorite pair of comfy jeans…only bigger.

So, I hope this inspires you to reuse something you thought you might throw or give away in to something fabulous!

Of course, you can always start of with something simple like a purse.

Yes, even after making a whole couch, we still had enought jeans left over to make a few tote bags.

Let’s Get Crafty: Gone Hybrid!

Who is ready to get Crafty! It’s Thursday! Yea!

So, you all see all these awesome Hybrid project in the galleries. You are thinking, man I really want to try that. But…it’s got to be so expensive. i don’t have the money to buy all those fancy supplies. Well, I am the queen of cheap! LOL! I love making Hybrid projects…but I don’t have a bottomless wallet! So, lets chat! How can you get started in Hybrid with out breaking the bank.

Some basic supplies…

*Scissors, small sharp ones work best, but I have even used my kids scissors when mine go missing…which happens a lot! lol

*Adhesive of some sort, there are 100’s of different adhesives out there, but really to get started all you need is a trusty old glue stick. My fave is the Pioneer Extra Strong Glue Stick. I get it at Wal Mart for like $1.50 or so. And we all have glue guns laying around. Mod Podge is great. It cost a little more that you might want..but it lasts forever. I have had the same bottle for years. And that 3D double sided tape is great. But, you don’t have to pay a lot for it. I get mine at the dollar store!

*Speaking of the Dollar Store, I love to find things at the Dollar Store to Embellish. I got these frames at the Dollar Store…gave them a little Hybrid love and what a great gift! The wooden letters came form the craft store but they were only like $5.00 for a huge pack of all different letters. I’ve been using them forever.

The flowers on this frame are not from the store. They are digi flowers from the kit I used, I just cut them out and inked the edges! Fold them a little on the edges. They look great!

*I get frames at the Thrift Store too! I even find craft supplies like ribbon, embroidery floss, buttons,  glitter etc at Thrift Stores! You just have to look! Yard Sales are great too!

*Another great thing to have is distress ink. Start out with one color like black or brown. It’s only about $3.00. I actually only have those 2 colors and use them on almost all my hybrid projects.

*Distressing the edges on your projects really gives a nice finished look. You can go to the craft store and buy special “Distressing Tools” but, why not just go grab a piece of sandpaper out of the garage, a nail file works great too.  You just need something that will “rough up” your edges a bit.

*A lot of times if you want to make a card or use one of the nifty “Hybrid Template” you will need to “Crease before folding.” Your fold will turn out way nicer id you crease them first. But, of course you don’t need any fancy tools for this either. You can use a magazine for a mat, an envelope or book for a straight edge if you don’t have a ruler, and even a butter knife or credit card will work as a “bone folder.”

*Now of course you will need a printer, ink and paper. My favorite paper is Epson Matte Photo Paper, but you can use cardstock too.

Now just get creative! Think of things in a different way. If you see a project that calls for “Chipboard” use a cereal box instead.

Like I used on this project….

How about these…I made them from coasters. Yes, those coasters they give you at Restaurants. Check these out….

So, come on! Do some Hybrid! You know you want to! 🙂 How about starting with GingerScraps “Sweet Cards” Challenge! Greeting cards are a super great way to get started in Hybrid!

Let’s Get Crafty: Chalk Paint

Hi my crafty ladies! It’s Thursday, time for “Let’s Get Crafty” Did you miss me last week? Yes, I know…I forgot! These kids and all their friends are keeping me busy! And eating me out of house and home!

So, today I did a fun and easy project with the little boys. All without even going to the store to buy any supplies! We made “Chalk Paint” I got the recipe from “Family Fun Online” Love that site! Lots of great fun and simple project for the family.

Here is the recipe…

1/4 cup Cornstarch…..1/4 cup water…..few drops of food coloring…That’s it!

Now mix it up and get out your paintbrush and find yourself some concrete!

(Don’t you love my cute little glass bowls, .25 cents at a garage sale)

Now of course, my boys wanted a road painted with the Chalk Paint…it’s all about cars around here. They really loved it. Actually I am typing up this post and they are still playing on the chalk road right out my window!

(Notice the little bits of  Homemade Playdough still on my patio, maybe I will teach you that next time.)

Looks like fun doesn’t it! Now of course you don’t have to paint a road. Paint whatever your little heart desires. Oh and you might have to make up a few batches. My boys have asked me for a few refills. Don’t worry about a mess either. Just take your hose a wash it away!