Here’s a Little Clip!
![]()
Today’s tutorial is brought to you by a comment made by Glee on one of my layouts. She asked me what to do with paper clips. So I used the same clip, from Blue Heart Scraps‘ Be Mindful February Buffet kit. This layout also uses a terrific template from Heartstrings Scrap Art‘s Winter Freeze 3 collection.

When you want to use a paper clip on a layout, you need to first think what it’s going to clip together. I like to clip several items together with mine, as you can see in the images above and below. I also like to leave a little bit of a gap at the bottom of the paperclip so it looks like it really is holding those things together. Once I’ve positioned my clip where and how I want it, I copy (CTRL/CMD>J) the clip layer so I have two of them. The “why” will become clear as we go along.
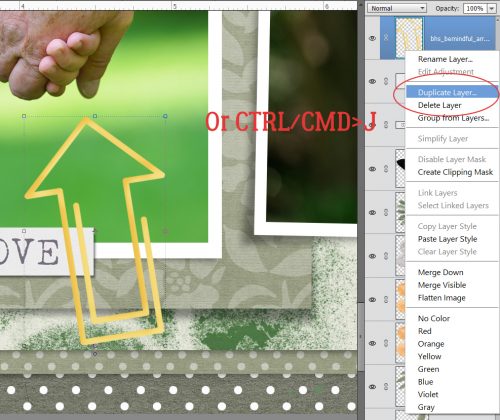
And…………..then I turn the visibility of the layer off.

I add a Layer Mask to the BOTTOM clip layer. (I forgot to select the correct layer for the screenshot below, so don’t do that!) If you’ve never used a layer mask I strongly recommend you start! They’re fantastic tools because if you remove something you didn’t want to remove, you can just paint it back. So make sure your bottom clip layer is selected, then click on the icon shown below.

This is what you’ll see in the Layers panel. Make sure you’re working on the MASK part of the layer – the blue outline has to be around the blank page. If you accidentally work on the thumbnail part of the layer, you won’t be able to paint back what you remove.

Then select the Eraser tool, and ensure white is the foreground colour. (White conceals, black reveals.) Carefully erase the part of the paperclip that will be behind/under your paper or photo.
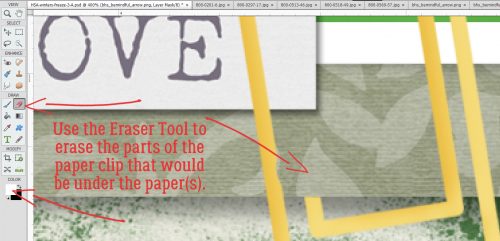
If you’re having a hard time figuring out what to remove from your image, get a paper clip and a piece of paper, then put the paperclip on the paper somewhere. Put the paper flat on your desk and you can see what is hidden and what is not.

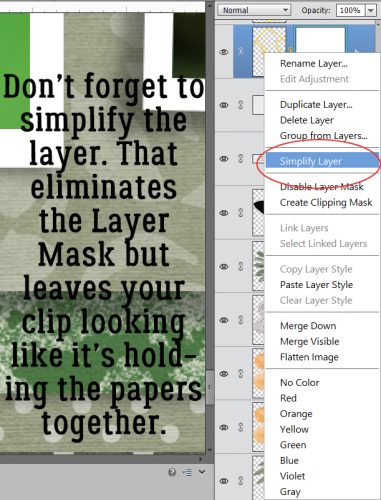
When you’ve removed the parts of your clip that will be hidden by your paper/photo, Simplify the layer. To do that you can right-click on the layer then select Simplify Layer. (No WSNH tip for that.) I know you’re wondering why all these steps are necessary, and it’s all about control. The Layer Mask is very forgiving, the Eraser tool isn’t. Simplifying the layer afterwards makes those changes permanent once you’re committed to them.
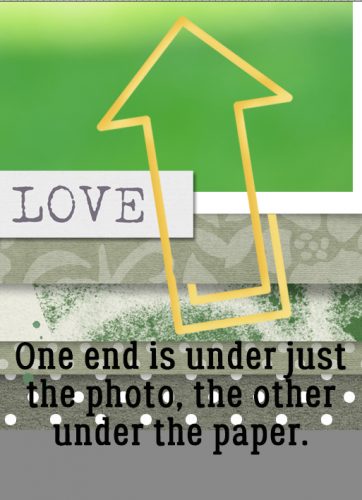
I like these shaped paper clips, both digital and real. There are lots of ways you can use them! Here I’ve tucked one of the free wire ends under the photo and the other under both the paper and the photo.
Now we can add a shadow to the BOTTOM clip layer that we’ve been working with. If you just go with a drop shadow style, you’ll have a shadow that runs over onto the paper and it’ll look odd. I don’t know who else has my problem, but those sorts of inconsistencies just jump out at me! So let’s avoid it. Create a new layer UNDER the visible clip. CTRL/CMD>click on the piece of paper icon to do that quickly. Then Select the outline of the clip by CTRL/CMD>clicking on the clip’s layer thumbnail. Then you’ll have those little marching ants. Using the Fill tool (paint bucket) fill the selected area ON THAT NEW LAYER with your shadow colour. I used black.

Once you have that shadow layer filled, you can shift the shadow to the angle where your layout’s light source is coming from. But then you’ll notice that shadow doesn’t actually touch the paper where it should. Use the Smudge tool to bring the shadow up to the paper. Just drop the cursor onto the black area near the edge, click-and-drag the tool to the edge of the paper.

Don’t worry if it’s overlapping the paper. It MUST touch the paper with no gap. Light can’t leak under wire , right?

Once you’ve got a good connection between your shadow and your paper edge (don’t neglect the other parts of the clip where some of it is hidden), you can carefully Erase the overlap. (Use a Layer mask if you’re unsteady.)

To soften the edges of your shadow layer, use Filter>Blur>Gaussian Blur. Look at the other shadows on your layout so you can make the clip’s shadow look natural. Remember that paper clips sit tight to the paper/photo, so the edges will be sharper than for other less-weighty items.

You want your shadow to look as real as possible. When you’ve got the Blur right, decrease the Opacity of the layer until it looks right.

Now, we could just call that good, but I think you know me better than that! I could get really technical here and start talking about Dodging and Burning, but I have a workaround that’s super-simple and that’s what you’re getting instead.

Now it’s time to turn on the second paperclip layer, the one we didn’t remove parts from. Then we’re going to add a Bevel style to it. Click on the Styles button down at the bottom right then select Bevel.

From the Bevel styles menu, I chose Simple Inner. The default settings will work very well, so no tweaking required. Can you see the way it makes the wire look round instead of flat?

The next thing is to add a shadow layer to this clip too. Make all the same lighting angle and Blur adjustment to it as you did for the first one. Here’s a WSNH tip: you can duplicate the degree of blur from your last action by simply clicking CTRL/CMD>F. After you’ve gotten those steps done, decrease the Opacity of BOTH the paperclip layer AND the shadow layer so that they’re barely visible.

Don’t be concerned that it seems really obvious when you’re zoomed right in tight. Nobody will see it that up-close but you.

See, here I’ve pulled out the zoom and there’s really just a hint of the wire showing through the papers.

Here’s my finished layout. I’m very pleased with it!

I hope you’ll give this one a try, unless you like your paperclips resting on top of your papers. There’s nothing wrong with that – paperclips and other things (dust!) can be scattered over other things. But now you can USE that paperclip to hold your goodies together!
![]()
nice tutorial, but way too complicated for me.
I just change opacity of clip to about 50%, delete what I don’t want to see (what will be under paper) and then change opacity back to 100%. Then I add drop shadow normally and it looks OK
Thank you, Jan! I always get a bit confused when trying to get the shadows look right when I’ve hidden parts of an element; especially when I’ve tried to weave 2 elements together. This does seem a bit complicated, but I love the outcome. I’ll have to give this a try…
It may seem really complicated but once you’ve done it a couple of times, it gets easier. Since I wrote that second custom shadow tutorial, I’m practiced and practiced until I reached the point where I almost never use a shadow style any more. Custom shadows make me really happy. But if you don’t want to try any of the things I show you, nobody’s going to make you! Your scrapping is YOUR scrapping and you SHOULD do it your way.
Thank you thank you, you’re the best!!
Aloha always!
Wow! What a great tutorial!! I’ve always done it the hard way: no masks, alleged steady hand. LOL Thanks!
You’re welcome, Glee!
Liz, I can absolutely relate. Until I was pushed into using a layer mask for the first time as part of a challenge, I did a lot of undoing and redoing and had no idea of the value of them. Now I use them all the time!