Blend Modes? Say What??
![]()
Photoshop Elements is considered the poor gal’s Photoshop because it has its limitations; there are lots of things Photoshop does that can’t be easily done in Elements. But that doesn’t mean Elements isn’t a powerful tool. I’ve mentioned Blend Modes before, mostly in passing; today we’re going to take a deeper look at them, but I’ll admit I’m still figuring out how to make them more useful to me, and to you. If you’ve ever used a photo-editing action set, like those available free from The Coffee Shop or for purchase from Paint the Moon, you might have noticed there are dozens of layers created by the action as it alters your photo. Many of those layers use Blend Modes to create their magic. So let’s go down the list.
In the image below, I’ve opened the Blend Mode menu in the Layers panel. It’s the oblong button at the upper left, underneath the icons and next to the Opacity slider, and it defaults to Normal. Take note of the divisions in the menu… they’re grouped according to the effects the modes have on an image. Modes in the first box don’t really visually alter your image. In the second box, they DARKEN something; white is the neutral point in this mode. In the third, the LIGHTEN something; here it’s black that is the neutral point. The fourth group produces effects on CONTRAST; it uses 50% gray as the neutral point. That fifth group is the INVERSION group, they cancel out something in the image. And the last grouping is the component section, where a COMPONENT of the image is blended in some way. All of these modes affect the layer IMMEDIATELY BELOW IT. The Opacity of the Blend Mode layer will also affect how the resulting image looks. In the demonstrations below, the opacity of each mode has been left at 100%. (WSNH tip: You can quickly scroll through all the modes by holding down the Shift key and clicking either + or –. Try it! It’s fun to watch the way the image changes.)

As you can see in the screenshot below, Dissolve produces a slight change in the image, and softens it a bit. If you were to copy your image and apply Dissolve to the copy, there would be a bit of pixelation created.

Darken is in that second box, and it does create a slightly darker image, but with a bit of lost contrast.

Multiply definitely darkens the image and improves contrast. This is a good mode for those cast shadows we’ve played with in other tutorials. Another really easy but very useful application for this mode is to improve those slightly overexposed photos we all have. Duplicate your photo, switch the Blend mode on the upper version to Multiply and then tweak the Opacity and you’ll be astounded at how much it improves your photo. When you love it, merge the two layers.

In the old days when photos were on film, post-processing was an art, and a science. Magic was created in the darkroom through manipulation of light. By hand. When an underexposed area of the photo needs to be made more visible, the photographer “burns” the area by holding a piece of cardboard with a hole in it over the photo paper, projecting the image through the film, through the hole and increasing the amount of light falling on that area. To keep the shape of the hole in the cardboard from being obvious, the cardboard has to be kept moving. It’s a labourious process, one that has been drastically improved with software like Elements. The Color Burn mode takes all the guess work and technical difficulty out of darkening areas of an image.

Linear Burn darkens the image even more, slightly changes the colour and maintains contrast. When you see “burn”, always think “darker”. This mode isn’t particularly useful for scrapbooking although it’s an option for those shadow layers.

Darker Color doesn’t produce a dramatic change at all. The colour is slightly darker and contrast is preserved.

Now we’ve moved into the third box, where the modes all lighten something in some way. Lighter Color does just that, it brings out the lighter shading in the image.

Screen mode produces a much less saturated image and lightens the colour as well, while preserving contrast.

Another darkroom trick photographers use to lighten up areas of over-exposure is called “dodging”. A circular piece of cardboard is held with tongs over the area that is too dark while the image is projected through the film and onto the paper. And of course, the cardboard has to be kept moving so there’s no visible image of the disc. Color Dodge takes away all the finickiness of that process. It also dramatically changes the colour.

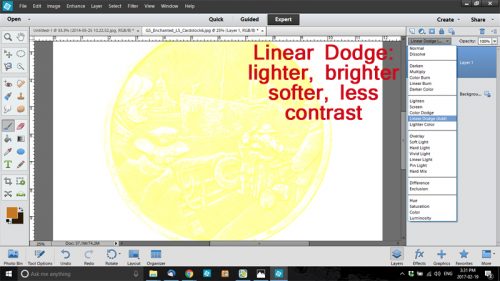
Linear Dodge produces even more lightening, with a change in colour and a loss of contrast.
Lighter Color simply does that. It doesn’t produce a huge change, and it does soften the image slightly.

Overlay is one of my favourite modes. It lets the texture of the background show through when used on text. It also sharpens the details a little. BUT… it changes the colour of whatever it’s applied to, so if you use it for text so you can see the paper texture, you might be unhappy with the colour you end up with. We’ll talk about Overlay again in another lesson when we get into photo editing.

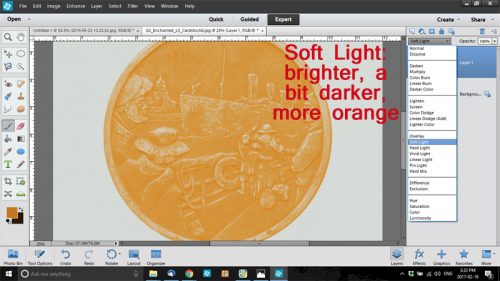
Soft Light mode brightens the image a little, while slightly darkening the colour and shifting the hue a smidge.
Hard Light is just that… hard. It makes the image darker, deepens the colour and improves contrast.

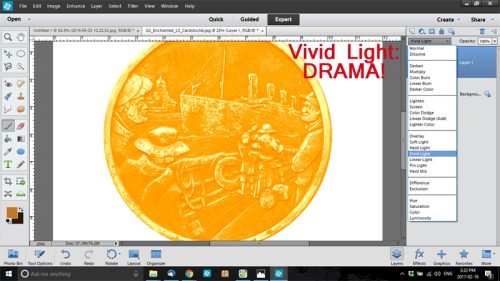
Look at how Vivid Light changes EVERYTHING!
Linear Light produces a brighter, more saturated image with greater contrast.

Pin Light creates a softer image with no obvious change.

This mode will have very limited utility for the average photographer or scrapbooker and would be more useful to the graphic artist whose work involves transforming images completely.

Difference is only used by very skilled Photoshoppers to create advanced edits of images.

Exclusion, when used on photos, will produce a negative effect. Whites become black, blacks become whites and everything else will be grayed shades. The colour wheel is essentially inverted.

Hue mode has very little effect on the layer below. It may be useful when blending in textures from an overly or a paper layer.

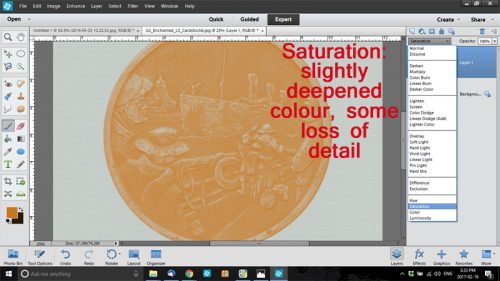
Saturation behaves in a similar manner and really doesn’t alter the layer below much unless that overlying layer is not a copy of the layer below.
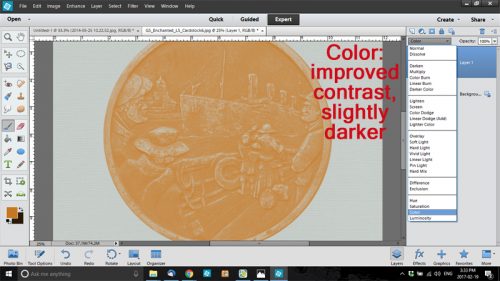
Color mode improves contrast over Saturation and slightly darkens the underlying layer, but isn’t really visually striking.
Luminosity brightens.

Now that we’ve looked at each mode individually, let’s see how they can be combined to really improve an image.
The steps I took are listed in reverse order. The base layer is Normal. See how The colour is darker, the detail is preserved, if slightly sharper, and the contrast is somewhat better too?

I hope you take the time to play around with these modes to see what great images you can produce.
Remember, if you’ve used a technique from these tutorials, post your finished layout in the GingerScraps Facebook Tutorial Tuesday Challenge Gallery for an opportunity to have YOUR chance to challenge me. If you’re not a Facebooker, you can post a link to the layout you’ve created with the tutorial you used in the comments section here on the Blog. I’ll get a notification and will then enter you into the draw. The first week of each month I’ll have a random draw of all entries and the winner will be announced at the end of the first tutorial of that month.
![]()