Reverse Stencilling with Brushes
![]()
Season’s greetings all you GingerScrappers! The countdown is on… This year Hanukkah and Christmas collide, making this week probably the busiest of the year for so many of us as we prepare for the celebration of miracles and love. So I’m bringing you another quick and easy technique for jazzing up your layouts, one that won’t take more than a few minutes to try. Let’s get going.
This technique is another digital version of a paper-scrapping and crafting one similar to the inked edges technique I showed you a couple of Tuesdays ago… without the mess. Reverse stenciling is super-simple digitally – the hard part is choosing your tools! For this tutorial I’ve used a gorgeous bundle called In the Frosty Air from the brilliant Katie of Ooh La La Scraps. I’m also using a fabulous template in the Christmas Steps 1 collection from the lovely Krisztina, aka Tinci Designs. The layout is for the Scraplift Challenge, hosted this month by Ginger of Dandelion Dust Designs.
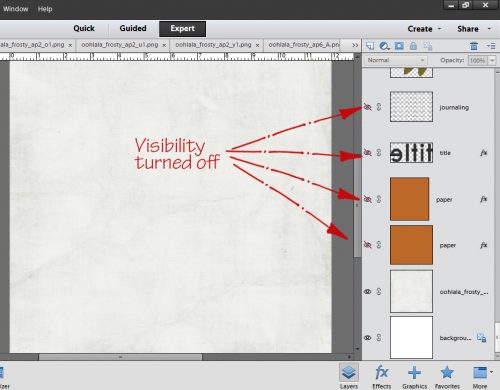
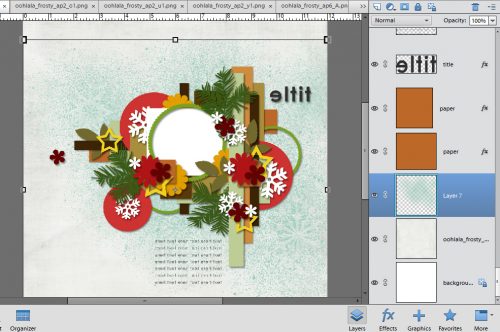
You might notice that I’ve flipped the template horizontally, because that worked better for my photo. We’re going to be working on the background layer, so I’ve turned off the visibility for all the layers BUT the background. That way I can see exactly what I’m doing. If you’re a faithful reader, you’ll remember how to do this quickly, but to review… Roll your cursor over the little eyeball icons while holding down the Left Click button and all the eyes will close.
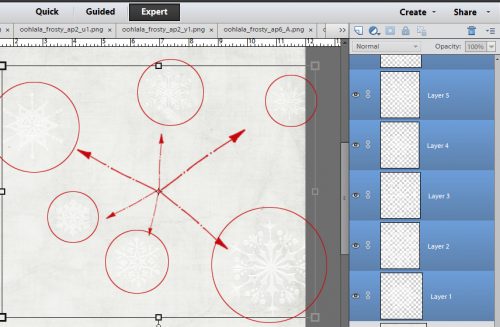
My background paper is a very neutral grungy gray and I’m using acrylic snowflakes from In the Frost Air, which means they’re VERY hard to see in this step. So I’ve circled them for you below. Squint really hard… there they are! As you might also notice, I have all the snowflake layers selected in the Layers panel. That’s because I’m going to merge the snowflakes into a single layer.
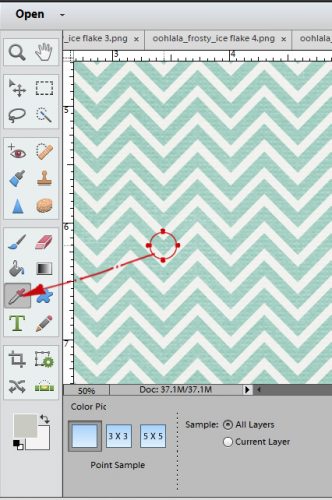
I wanted the paint layer to be this beautiful, cool minty green, so I used the Color Picker to select a spot from the chevron paper.
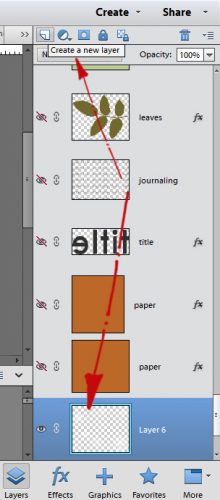
The next step is to create an NEW layer just above the snowflake layer. DON’T FORGET this step!
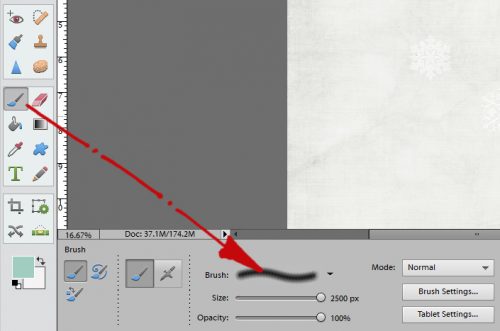
I selected a dirty spray paint brush from my collection of free brushes. (Don’t have a spray paint brush? I got mine from Brusheezy.) If you look closely, you’ll see that pretty mint green color I selected in the Foreground Color box, that I have the brush at its maximum Size of 2500 pixels and the Opacity is 100%. By doing this part of the technique on its own layer, I can later adjust both the size of the brush and the opacity later. I can also move it around!
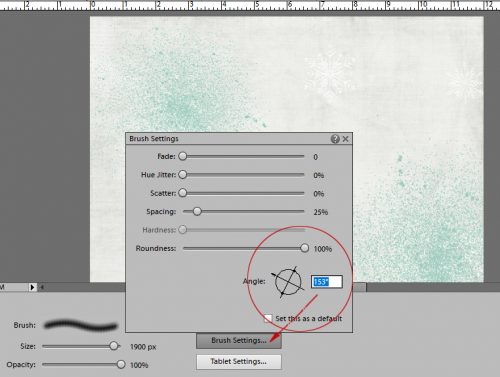
To keep the patches of spray paint from all looking exactly alike, I used the Brush Settings menu to change the angle of the brush. It’s also possible to adjust the roundness of the brush in this menu, but I kept it round.
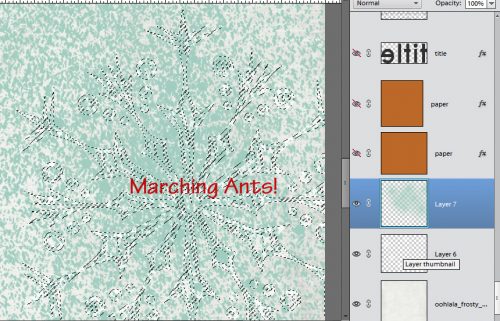
Once I’d applied some paint over top of each of my 6 snowflakes, I needed to Select the snowflake shapes ON the paint layer. To do that, I made sure the paint layer was the active one in the Layers panel, then I clicked on the snowflake layer thumbnail.

That gave me those delightful little marching ants, as shown in the screenshot below.
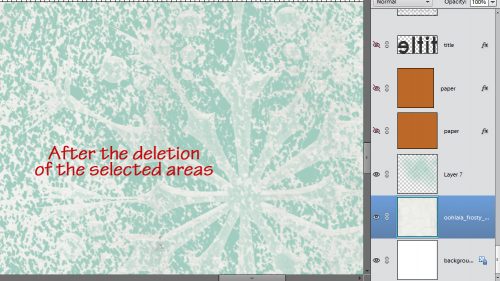
The final step to get that amazing reverse stencil look is to delete the areas inside the marching-ant boundaries. CTRL/CMD>X and it’s done. When I played with this using a more solid snowflake png, the difference was much more obvious, but I really liked the way this looked so I kept going. That’s the whole technique, in just a few easy steps.
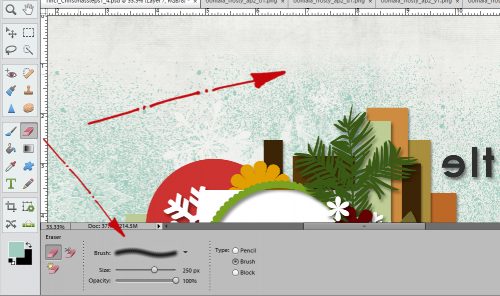
Now, if you have a few more minutes, I want to give you some tips on making sure the effect is as close to perfect as you can make it. I turned the visibility of my template layers back on so I could see where the spray paint actually goes – where it will be in the finished layout. It wasn’t quite where I wanted it to be – behind the cluster – so I moved the whole layer down a bit using the Move tool.
That created a little problem. Because my sprays went over the edge of the background paper at the top, I now had a pretty sharp line where the paint stopped. And that defeated the purpose! So I used the same spray brush at a much smaller size, and the Eraser tool to soften that edge.
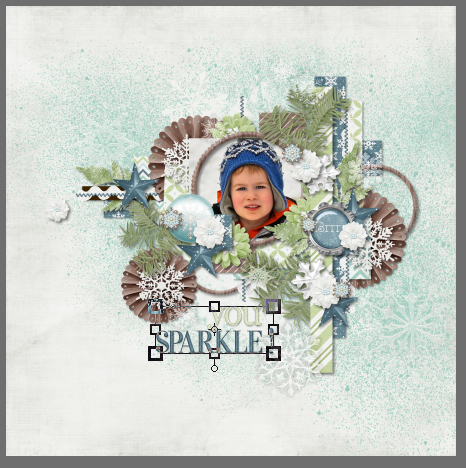
Then I went ahead and finished my layout. You can see the subtle stenciled snowflakes quite easily now, and if you look really closely at the gallery image I’ve linked, you might be able to see that I’ve also used every one of those acrylic snowflakes again in their unaltered form.
Some of you might remember that I told you I always save a PSD form of my layouts until I’m SURE I’m not going to change anything. Look at the screenshot below and you’ll see why! I substituted a piece of ric rac for two paper strips. But in my excitement at how awesome I thought my layout was, I forgot to delete one of the dark brown paper place markers. You can see it, about halfway down on the left side. I didn’t notice it, or the fact that I’d forgotten to shadow the ric rac layers, until I’d posted to the Gallery, the Challenge thread, my Cookie Jar and to the GS Facebook page. Urk!! All was not lost… I fixed it and edited my posts so everyone would think I’m perfect. 😀
I hope you liked this lesson; I’ll be looking for your reverse stencil layouts in the gallery. One more tutorial before the year ends. What shall it be??
Merry Christmas, חג חנוכה שמח (Chag urim sameach), Happy Kwanzaa, Meán Geimhridh Sona Duit… Happiest Holidays!
![]()
[…] Tutorial Tuesday (Photoshop Elements) – 1 freebie(s)? […]