The ART of ILLUSION
![]()
Last week I promised you a technique to really rock the January Inspiration challenge, and I hope you agree that this is it! Ivonne, the brilliance behind Craft-tastrophic, gave us this photo as the platform around which to build our layouts.

I tend to be pretty literal in my adaptation of this kind of challenge, so my goal was to find some photos of balloons, a girl in a pink dress and the Paris skyline. There were also some requirements in addition – the girl had to have an outstretched hand to attach the balloons to, the photos had to be lit roughly equally and the light source had to come from the same direction. Now, those last two can be fudged sometimes, the former by tweaking the exposure and the latter simply by flipping the photo horizontally, but lucky for me the photos I found at Pixabay ticked all my boxes without any major fuss.
Early in my tutorial authoring “career” I showed y’all two different ways to extract an image from its background. I used both of them for the final result. The first I used on two photos of hot air balloons (you can see them below in the Layers panel); it’s the Magic Wand method, quick and easy, and especially suited for images with few finicky details. The second, using a Layer Mask and the Eraser tool, was used for the photo of my girl in her pink dress. The screenshot below is a refresher on adding and using a Layer Mask. Remember, black reveals, white conceals. If you make a boo-boo, click on the X key to toggle between hiding and uncovering to undo whatever needs fixing.

Zoom in as much as necessary to keep your edges clean and to avoid removing something you’ll miss later.
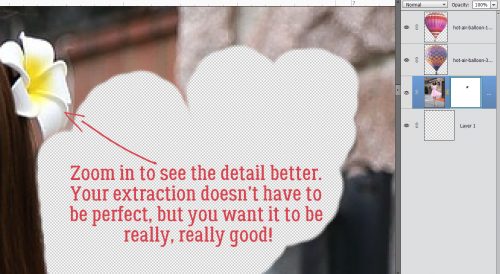
I like to work my way around the edge of my image all the way, making a good-sized gap between the superfluous background and my detail so that later I can increase the size of my eraser to enormous and quickly remove the rest of the background.

Here are the three images I’ve extracted to add onto the Paris skyline.

I plopped my extracted images onto my Paris skyline photo and moved them around, adjusted their sizes as needed and positioned them where they’d make the most sense. Once I had the balloons positioned so the shadows in the original images were in the right direction and the perspective looked good, then I had to make the balloons look like the girl is holding them. So I made some “strings” on a new layer.

With the Pen tool I drew two perfectly straight lines from the baskets of the hot air balloons to the girl’s hand. To draw a straight line, all you have to do is decide your starting point then click there. Holding down the Shift key move your cursor to the end point and click again. That’s it, that’s all! I used a 5 pixel pen tip and a light gray colour for the strings. Then I made some little tails inside her palm just for an added touch of the possible.

To turn those straight lines into something resembling string, I used the Texturizer Filter: Filter>Texture>Texturizer

The defaults in this tool are Brick, Burlap, Canvas and Sandstone. The one most likely to look like string is Canvas, so that’s what I used. Adjustments you can make inside the Texturizer menu are Scaling – how big your texture will look, Relief – how “high” it will lift off the image, and the Light source. You also get a preview without the background there so you can actually gauge what’s happening in real time. You’re going for a realistic look here.

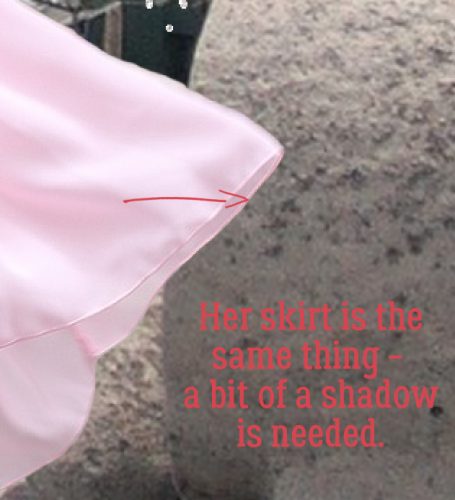
I moved on to look at the girl. I wanted her to look like she really was standing on the roof. And she didn’t…

I created a custom shadow on its own layer, which we’ve covered a number of other times in other tutorials. She won’t cast a shadow anywhere but where she touches the roof, so I used the Smudge tool to achieve that.

There, now she looks like she’d touching the stone. But it still isn’t quite right. Her skirt should also cast a bit of a shadow, so I Smudged my shadow layer there too. All that was left was to adjust the Opacity and Blend Mode and I was thrilled with how it looked.


My finished layout was created with Heartstrings Scrap Art‘s The Bigger Picture 3 Winter’s Frost template B and her Time Traveler kit.
You know you’re only limited by the boundaries of your imagination!
![]()
great tutorial (as always), thank you! i’m always extracting and it’s great to get some helpful tips! my only criticism is that you should have extracted a photo of YOURSELF to put there in Paris! love it!!
I’ve also done many extractions using both methods. I’ve never placed my extraction on top of another photo though; just background paper, so thanks for those shadowing tips. I’ve also never used the pen tool (I’m not very good at drawing, let alone trying to do it on the computer. I love that tip on making the line straight! 🙂 I especially like how you made your lines look like string with the textures.
You are the Master! I will practice! Great tutorial!!
omg you are crazy! I’m way too lazy for this kind of lifting. But it’s wonderful to see nonetheless. You remain the master Obiwan; we are proud to kneel at your feet.
Wow that is an amazing finished product!
And once again you’ve cracked me up after a brutal day at work. I can always count on you.
Thanks! I have to say, writing these tutorials for GingerScraps has really pushed me to experiment and to think outside the box. It’s making me grow in so many ways.
Easy, peasy, right?!
I only wish I had a cute photo of myself I could overlay on a Paris backdrop!