The EYES Have It!
![]()
A number of notable thinkers through history have said the eyes are the windows to the soul, or some variation of that. That might be true, but when we’re talking about photographs, portraits in particular, the eyes are the focal point to which all attention is drawn. Am I right? I did some photo editing for Terri in South Africa over the weekend and one of the things I did was to bring the eyes of her subjects out of the shadows. She wondered if I could use her photos as the basis for a tutorial, but the adjustments I made to them were a little too complicated for this forum. But I thought a quick, easy little tutorial on brightening eyes might be in order. Let’s look at this really cute photo I found on Pixabay.

Yeah, she’s as cute as a bug’s ear. But think how much cuter she’ll be with brighter eyes! Zoom in on your photo so the eyes almost fill your workspace. We’re going to use the Dodge and Burn Tools again. The Dodge Tool looks like a lollipop, or that plastic wand the eye doctor uses at the beginning of an eye exam when he asks you to cover one eye. Dodging selectively lightens an area on a photo. We’ll start there. Select the Dodge Tool as shown, then make adjustments to the settings. It will automatically go to the software’s preset default, or if you’ve used it, to the last settings you used. Because I used this tool on Terri‘s photos, the brush size is huge. Not gonna work now! For this part your settings are: Dodge>Range=Highlights>Exposure=20>Brush=15 to 20 or whatever size will fit between the outside of the iris and the edge of the pupil. Brush your Dodge Tool over the iris of each eye, concentrating on the area right under the pupil. Don’t go overboard, you want the colour to remain, just lighten and brighten.

The effect will be subtle. But if you look back and forth between this image and the one above, you can definitely see it. Now switch to the Burn Tool, the one that looks like a hand with the fingers and thumb making a circle. Burning selectively darkens an area of a photo. Your settings for this step should be Burn>Range=Shadows>Exposure=20>Brush size 10-15. You want the brush to overlap your dodged area, but only a little. Then brush the Burn Tool over the outer edge of each iris, with a little extra attention to the area just below the upper eyelid.

See the change? The eyes are so much brighter, but not bash-you-over-the-head-brighter. They still look natural and real. You could stop here and have made a great improvement to the way people perceive your photo.

So let’s amp up the brightness factor by adding to the catch-lights already there. Again we’ll use the Dodge Tool. (It seems like a LOT of steps but it really is an intuitive technique after you’ve done it a few times.) The settings I used are Dodge>Range=Highlights>Exposure=60>Brush=5. Then just hit the catch-lights with that tiny brush to brighten them some. The brush needs to be very small; catch-lights that are too big and prominent make the person look like they’re under the influence… not their best look!

Wowsers! It looks so good!!

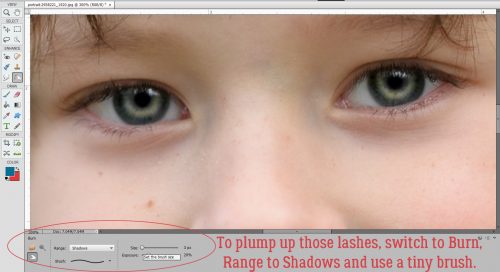
Again, you could stop here. Or you can switch back to the Burn Tool and using the same settings on Shadows, plump up those eyelashes a bit. I lined her upper eyelid then brushed over each lash to add some weight to it.
And when I was done, she looked like this. Now her eyes are much more noticeable and magnetic. It literally took me longer to do the screenshots than it did to brighten her eyes. I could have gone on to eliminate the freckles (why?? I LOVE freckles!) and even out her skin but I don’t think she needs it.

Will you try this one on one of your almost-perfect portraits?
![]()