Gentle(wo)men, Start Your Ovens!
![]()

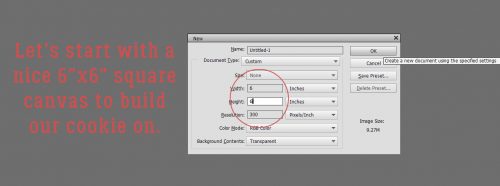
The inspiration for today’s tutorial came from a Facebook post by one of my coworkers. She had spent the day making and decorating sugar cookies. (The photo above isn’t hers, it’s from The Girl Creative‘s blog.) As I was looking at her cookies, it occurred to me that I could probably make digital sugar cookies (bonus – NO calories!) and so I gave it a shot. It worked well, so I’m going to share the recipe with y’all. I started with a 6 inch by 6 inch square blank canvas. (P.S. Don’t be thrown by the number of screenshots in this tut. I’ve included practically every step, although we’re using a lot of techniques I’ve already shown you.)
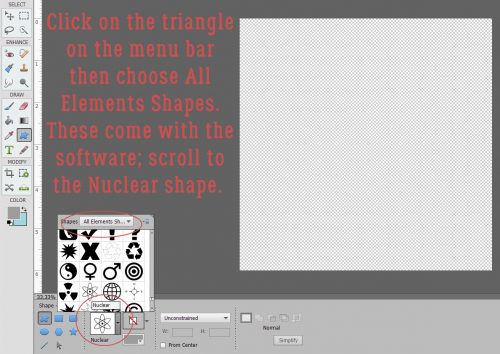
I looked through all of the Custom Shape tool‘s menu – it’s the one that looks like an amoeba. The menu has a lot of options for shapes, most of them geometrical. But that won’t make this technique easy, so I only looked at the amoeba menu.

If you click on the triangle along the right side of the box I’ve circled below, the amoeba Custom Shape menu opens. I chose to look at them all to find the one that would work best, so I went with All Elements Shapes then scrolled until I found the one named Nuclear.
Because snowflakes in nature are perfectly symmetrical, I changed the settings for this tool from the default, which is Unconstrained, to Defined Proportions. If you’re into Working Smart Not Hard, you can also Simplify the shape by selecting that in the settings.

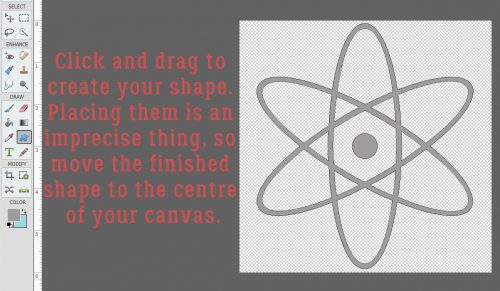
Getting these shapes in the exact spot you want them isn’t easy. But you can click-and-drag out your shape then move it to where it needs to be. Once it has been Simplified, you can easily resize it too.
If you didn’t Simplify in the Shapes menu, do it now. Right-click on the layer in the Layers panel and select Simplify Layer.

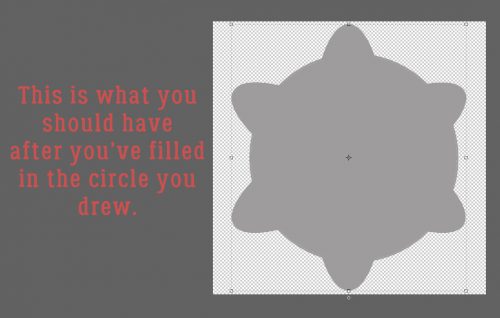
Not looking much like a cookie cutter now, is it? We’ll have to fill in those open areas using the Paint Bucket tool.

There we go! I could go ahead and just use this shape, which is more like a flower than a snowflake, but would still totally work. But if you know me at all, you’ll know I’m going to do more.

There are two ways to do this next step. I’m going to use the Elliptical Marquee tool. The other way would be to use the Custom Shapes tool and choose the Circle.

Because symmetry is still important at this point, I changed the settings to Fixed Ratio. This is handy for making perfect circles, but also can be set to make perfect ellipses too.

It’s possible to perform this on the same layer as the original shape, but I choose to put the outline on its own layer.

So I added a blank layer above the shape and made my Stroke outline here.

The stroke can be any size. Once I’d made my circle I filled it in with the Paint Bucket.

This is my cookie cutter. It needs a little adjustment – look closely and you’ll see the circle isn’t centered on the nucleus shape. I need to fix that!
Now that both layers were aligned properly, I Merged the layers into one shape. (CTRL/CMD>E)

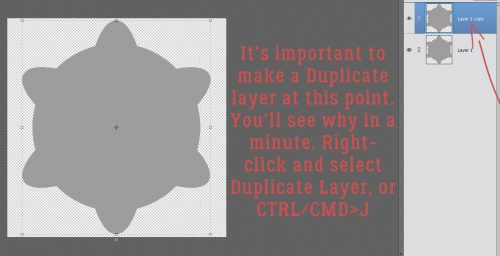
Then I Duplicated the shape layer and set it aside for later. Right-click on the layer then select Duplicate Layer, or CTRL/CMD>J.
I didn’t need to see that duplicate layer at this stage, so I closed the eye and made it invisible.

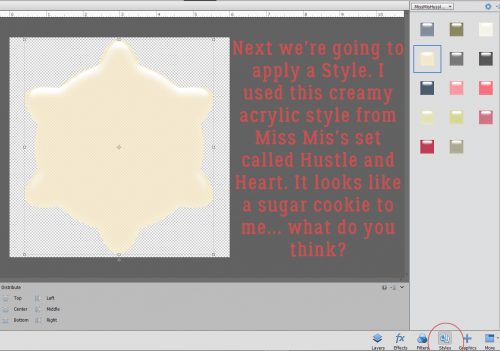
To turn the shape into a cookie, I applied a Style. I used this creamy acrylic one from Miss Mis‘s Hustle and Heart layer styles set. Another option for this step would be to use a chipboard Style, such as one of Just So Scrappy‘s Cabin Fever chipboards (included in the GingerBread Ladies December 2017 Challenge Reward collab of the same name). That would allow you to condense this step and the next 9 into just a SINGLE WSNH step!
The only problem with this is that the cookie is too shiny. The colour looks good, and there’s a nice dimension to it, but I changed the Style settings, essentially turning everything off and shifting the light source. To adjust a Layer Style, rignt-click on the fx symbol on the layer in the Layers panel and this menu will open up.

Now it still has some dimension but the shine is gone. I’m still working on the bottom, original layer.

I picked a nice, toasty golden brown to “bake” my cookie.

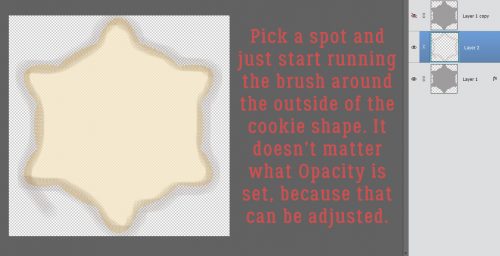
Then I opened a new layer above the base layer, and selected a brush from one of the presets that came with my software. It’s called Pastel Light 118 pixels and I used it with the default settings that opened with the brush menu.

I picked a spot on the edge of the cookie, then clicked and dragged the brush all the way around the shape.
Remember this from when I showed you how to do digital inked edges? Same technique exactly. I CTRL/CMD>clicked on the layer thumbnail of the cookie layer while working on my brush layer. That selected the edges and the inside of the cookie.

Next I Inverted the selection – moving the chosen area of the layer outside of the cookie. Select>Inverse or CTRL/CMD>SHIFT>I.

Then I simply Cut away the brush that falls outside the cookie. Edit>Cut or CTRL/CMD>X.

Voilà! My cookie is baked to golden perfection!! Now to add the Royal Icing. (Or Royal Frosting, if you prefer.)

Here’s why I had you Duplicate the shape layer. I’m going to flood that top shape with my Royal Icing. But first, I resized the shape so some of the cookie layer is visible. The easiest way is to click on one of the little boxes at the corners of the bounding box then go down to the menu and type in a number less than 100. I chose 92%, which exposes some of the cookie layer but not too much. You can also just move the corner you’ve clicked on inward until it looks right.

I used another Style, this gel blue one from Just So Scrappy‘s Lucky Me. [GingerScraps is lucky to have designers who create layer styles, like Misty (Miss Mis Designs), Katie (Just So Scrappy/Ooh La La Scraps), Aimee Harrison, Marina (Magical Scraps Galore), Lina (LDrag Designs), Jo (JoCee Designs), Natasha (Ponytails Designs) and our lovely guest Karen (Snickerdoodle Designs).]

I made some tweaks to the layer style to make it look more like a flood of Royal Icing.

Then I got to the good part! I changed my foreground colour to pure white (which can be quickly selected by typing “ffffff” into the box at the bottom right of the menu).

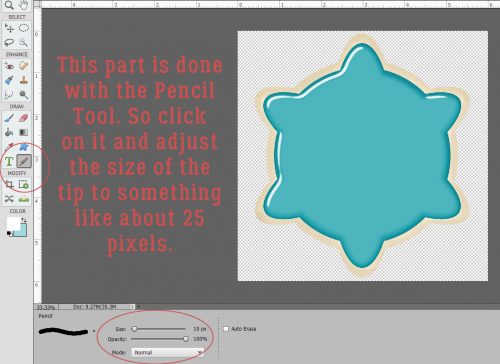
Next I chose my Pencil tool from the Toolbox and adjusted the tip size to about 25 pixels.
If you’ve been adding realism to your stickers and overlays, you’ll already know how to draw a line with the Pencil. But if you haven’t read that tut, or you need a refresher, all you have to do is click at the starting point of your line, hold down the SHIFT key and click where you want the line to end.

You can turn on the Grid as shown below to help figure out where to start and stop your lines. View>Grid or CTRL/CMD>’
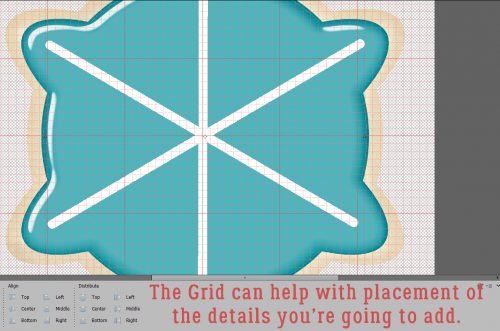
I used just the Pencil tool, but you could also use Brushes for adding detail to your snowflakes. Don’t worry about precision; if you were making real sugar cookies you’d be doing all the piping freehand, right?

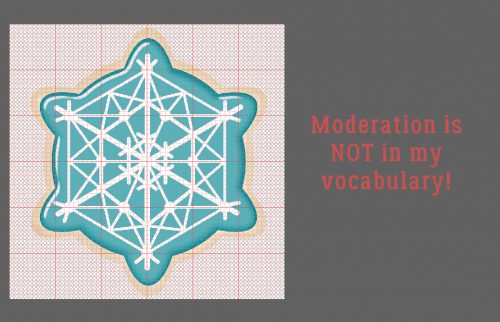
You can make your snowflake as complex as you like. I played around for about 10 minutes, using the Pencil and changing the tip size.

No comment.
Now to turn all those lines and dots into Royal Icing. I applied a basic Style from the presets in Elements to add a Bevel. I experimented with all of them until I got the look I was after. In the end I went with the Simple Sharp Inner bevel.
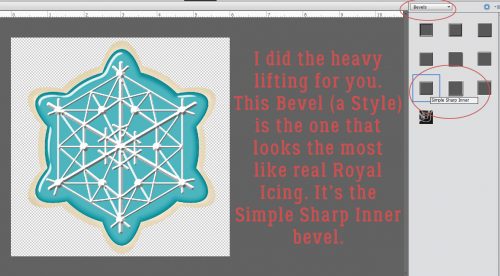
It looks pretty good as is, with the default settings for the Bevel style menu.

Now, I could have stopped here and called it good. But again, anyone who has read my tutorials before know I had to experiment some more. But I’ve learned to do my experimenting on a copy layer… CTRL/CMD>J

Then I cleared the Layer Style (Bevel) by right-clicking on the layer in the Layers panel and choosing Clear Layer Style.

Then I hit that top copy layer with another of Katie’s Styles from Lucky Me, the gel white.

Then I decreased the Opacity on that layer to 46% (after some waffling). Now the sharp edges are a little softer, and so are the shadows. Much better!

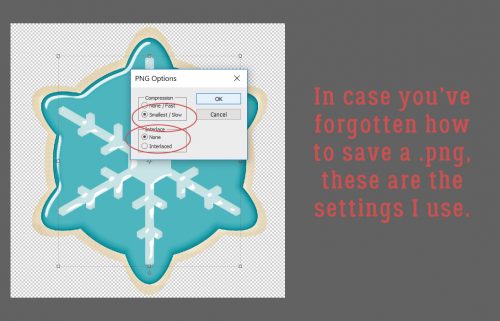
Once I was happy with my finished product, I Saved my cookie as a .png (which preserves the transparent background). Now I can use the cookie on a layout!

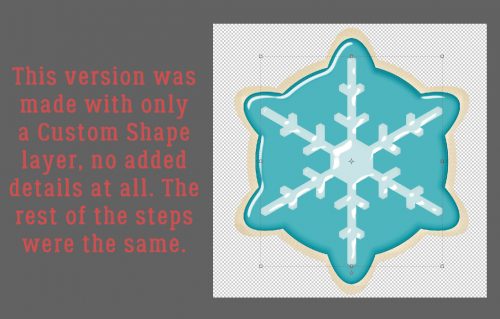
Of course, I didn’t stop there. I went back and deleted the snowflakey layers and started fresh. This time I stayed really basic. I just used one of the preset snowflakes from the Custom Shapes menu! The Styles I used were exactly the same.
If you’ve never saved a creation as a .png, or if you’ve forgotten how to do it, here are the settings I use.
And again… one of the Custom Shapes snowflakes, but with some personality.

Are you hungry now?
![]()
Wow! Such beautiful cookies & they don’t look too hard to make! Thanks for another great tutorial — I never realized that there were so many things I can create with PSE!
They took a lot less time to make than real ones would! They really AREN’T hard at all. I wonder what else my imagination can conjure up?
Akkk! No way! I’d rather make total icing than do all that digi work. You’re imagination however, is very inspiring!
Cool tutorial Jan !! Thank you 🙂
FunFunFUN!! What a terrific idea! Can’t wait to play!! TYVM!! =D ♥
Love this tutorial. I am going to have to play and save this! Thank you so much!!
OH!!! I love this tutorial. I am going to try it tonight. TY so much for taking the time to teach us this one.
I think this has been my most popular tut yet! Thank you ladies, for your continued support and approval. I deeply appreciate it!
All I can say is WOW! That is a fun tutorial. But I have a question. How would you give your cookie some”depth / dimension”? Like the cookie in your photo?
Are you talking about the real cookies? I would add a custom drop shadow (created on its own layer) so that I could pile the digital cookies and then shadow them to match the contours of the layers underneath. Does that make sense? I would use the Smudge tool and Skew to change the shadow so it is thinner where the cookies are touching, and thicker where there’s space. When I use my digital cookies on a layout I’ll demonstrate that and link back. Sound good?
Yes, I am asking how you would shadow your digital cookie to make it have a dimensional look like your real cookie.
I understand needing a custom shadow. I would love to see a bit more detail in the “how do I do that?”
Thanks.
Steph
I did not see your reply until I went looking for something else much later. Is there a way to get a message when a reply is added?
Steph, there are some plug-in apps that will send you an email notification if there are replies to your comments, and WordPress has some settings for that, but I don’t have the authority to use them.
As for the sugar cookies… well, I never did manage to get a layout put together with them so I haven’t got anything to show you. I’m putting a reminder on my phone to email you personally when I get in gear and actually do some scrapping. I have some cute photos of my grandchildren making Hanukkah cookies that will work brilliantly.