Guided Edit: Saturated Film Effect
![]()
PDF Version : https://bit.ly/3NFN4x8
My sister recently took her first real vacation in about 10 years. She and a friend took a driving trip around the Maritimes. My sister was born in New Brunswick, but hadn’t been back there since she was 2 years old… she’s 51 now. So she was more than thrilled to see where her very first home was. She took a MILLION photos, and has given me permission to use them for scrapping purposes. I think you know what I’m going to do with them, right? Anyway, when I was looking for a likely photo for this tutorial, one of hers lent itself to the task.
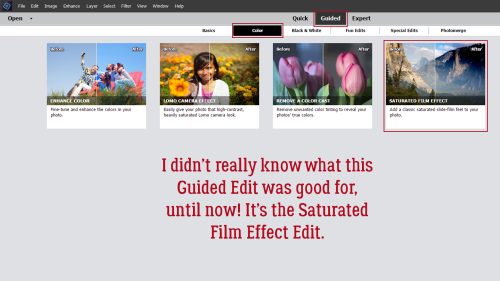
I’ve played with Guided Edits before and found some I really like to use. I never could think of a use for the one I’m going to show you today – until today. The Saturated Film Effect Edit may be a real game-changer! As you can see, this photo is a bit insipid, but I’m going to fix it.

OMG! I JUST noticed the seagull on the far right, after staring at this photo for hours!
This is the path to the Guided Edit: Guided>Color>Saturated Film Effect.
The text on the screenshot is verbatim from the instructions for the Edit. Each time you click the Add bar, the effect will be increased.

Here’s what it looks like after one click. Give the result a quick but thorough look before you click again.

After two clicks, I’m seeing a nice deepening of the blue of the water, but a less-pleasing change in the colour of the grasses in the foreground.

Yeah… no. The grass after three clicks looks ghastly!

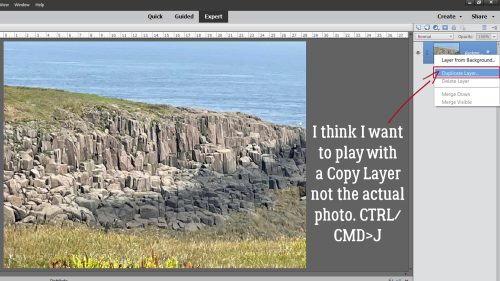
So I clicked on the Cancel button. I’m working on that Copy Layer (the original layer is turned off) and I’ll Mask off the grass and try again.
I opted to use the Selection Brush set to Mask, with a 75 pixel hard round brush. The Overlay is set to 50%. I could go a bit lower and still see my Mask well, but let’s leave it. I’m not going to be too fussy about the individual blades of grass. Here’s what the Mask looks like.

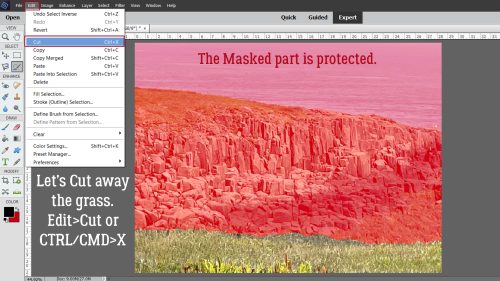
I want the grass to be untouched going forward, so I’ll Invert the Selection by Select>Inverse or CTRL/CMD>SHIFT>I before moving to the next step.

Now that I’ve protected the rocks and water, I can Edit>Cut or CTRL/CMD>X the grass away from the Copy Layer.
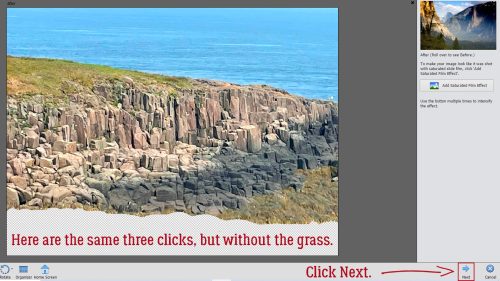
Okay, let’s run the Guided Edit again.

Aha! That seems to be the ticket! There’s good definition in the rocks and the shadowed area, the water is a beautiful blue and the seagull is just hanging out. So I’ll click Next.
This is another fork in the road. I need to decide if I’m happy with my results so I can Save As the image, or if I want to keep tweaking in Expert. Y’all know me, so you know where we’re going…

I expected Elements to add a new layer with each click, so I’m not sure where these extra layers came from. But I’ll go with it.

I think I want just a bit more punch so I’ll change the Blend Mode on the topmost layer to Multiply.

Oh. Maybe not that much! But since I have so many other layers, I’m sure I can figure it out. Maybe an Opacity drop will help.

It’s better at 75%, but maybe still not quite there. What happens if I change the second layer there to Screen? Remember, Screen lightens.

I adjusted the Opacity on the two Blended layers until I was satisfied I hadn’t ruined my image. There’s good contrast, the rocks look sharp and the grass looks natural.
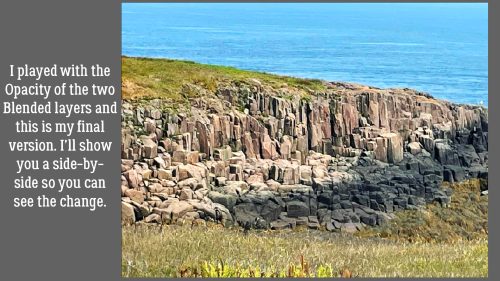
Here are the two versions side-by-side. I’m definitely going to use this Edit again!

If you’re planning to watch some fireworks tonight, I have a tip for you for getting the best photos from your phone, courtesy of Chari at Persnickety Prints. Turn off the HDR mode and use Live Photo instead. For Android users that’s called Single Take. Essentially, you’re taking a very short video which will allow you to choose the perfect image. Turn the flash OFF. Hold the phone as steady as possible, then tap the screen to lock the focus. Make sure you have some landscape or monument of some sort in the frame to give you a sense of scale and to add visual interest to your composition. If you’re using a DSLR, make sure you’re using a tripod to eliminate camera shake. Again, no flash. If your camera has a fireworks setting, choose it and the camera will take care of the other settings. If not, set it to Manual, ISO 200, Aperture F/8 and shutter speed at 5-15 seconds. Check the first couple of images and adjust the speed as needed. And have fun!!
![]()
Thank you! I love this! So many of my pictures just aren’t quite what my eyes saw. I’ve tried adjusting the pic in the past, but this looks so much more real than what I’ve been able to achieve.
I was so impressed by how simple it was to get natural-looking results with this. It’s much too easy to take edits too far and end up with something even worse that the original. I’m going to use this a lot!