Many of you have expressed the desire to learn more about Blend Modes, so today let’s take a look at this powerful Photoshop tool.
Blend Modes are available both in Photoshop and Photoshop Elements to assist you with your creativity. But what are they and why should you care?
Blend Modes change the way that layers interact with each other, allowing you to create a variety of looks with the same supplies, depending upon the Blend Mode you choose.
Screenshots in this tutorial are from Photoshop CC2019; however, you will find that Blend Modes work exactly the same in Photoshop Elements.
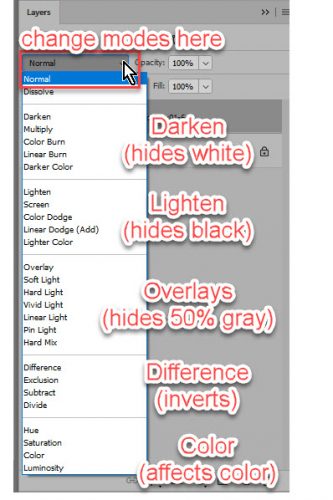
You will find the Blend Mode option at the top of your Layers Panel. The default is set to “Normal.” Click on the down-pointing arrow to the right and a drop-down menu will open with all of the options you see in the image below.
Because the result of a Blend mode will depend upon the colors you are working with, there is not one formula that is perfect for every situation. However, if you have a general understanding of how Blend Modes work, you will be able to have a good idea which Blend Mode to start with when experimenting, depending upon what result you want to achieve.
There are 5 main Categories, each their own use and options. First listed is Normal. “Normal” is an unaffected image, and “Dissolve” can give your image a “frayed” look. I don’t know if I’ve ever used that category myself.
What I consider the “real” first Category is the are the options which will darken your images. Within that category, your options are: Darken, Multiple, Color Burn, Linear Burn, and Darker Color.
Moving onto Category #2, which lightens images, you also have 5 options, as shown in the image below. Categories 3, 4, and 5 also have their own options.
The best way to see how Blend modes work is to fill a layer with color, place an overlay on a layer above it, and just experiment. Try each Blend Mode to see what it does and how it affects your image. This will give you a good feel for the results of each option and you will be on your way to understanding what you can expect with each option.
Here is an example using a pink colored cardstock, with a grayscale Vintage Book Texture. Overlay and Soft Light are my favorites here, and those are always good options to start with when you are using a grayscale texture.
 Time Saving Tip:
Did you know that you can cycle through Blending Modes without using your mouse? Here’s how:
- Select the layer that you want to blend. In this example, I want to Vintage Book Overlay with a piece of colored Cardstock.
- Click on the down-pointing arrow in the Blend Mode box to make it active.
- Click on any Blend Mode to make it active.
- Use the Up and Down or Right and Left arrows on your keyboard to cycle through the different Blend Modes
I hope you have found this helpful! If you would like to download a PDF of this tutorial, you may do so here.
![]()