The EYE-lets Have It!
![]()
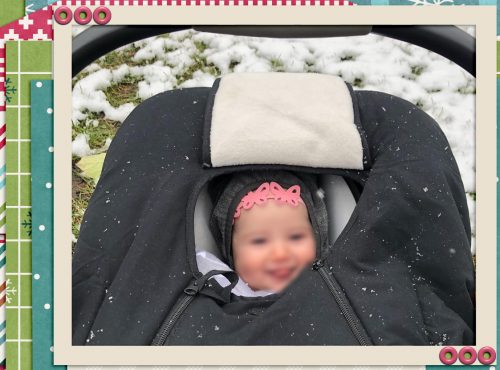
I’m still working my way through years worth of scrapbooking magazines trying to figure out why I kept them in the first place. While I’m at it I’ve been looking for more paper-scrapping techniques I can translate into digital ones, and finding some solid inspiration. Today I want to show you how I’ve used an eyelet from the GingerBread Ladies‘ collab It Comes with Spring to secure my photo and frame to my paper stack… just like I would have when I paper-scrapped. (This collection was the Free-with-Purchase gift in March 2016.) The rest of the layout is created with Connie Prince‘s Snowflake Kisses , LDrag Designs‘ Jolly Holidays alphas and Aprilisa‘s Picture Perfect 177 templates from the December Buffet for the Buffet Challenge.

Once I had my eyelet in position and resized to fit within the edges of my paper frame, I clicked on the Elliptical Marquee tool.

I set the tool’s settings to Fixed Size, then experimented with the dimensions until I got a circle the correct size. Both dimensions for width and height must be the same. 50 pixels by 50 pixels works.

I made sure the frame’s layer was my active layer and clicked just inside the edge of the eyelet to make my circular selection.

Then I used the arrow keys to nudge it into place with the hole in the eyelet in the center. Once I had it positioned properly, I used the Edit>Cut command (CTRL/CMD>X) to create a hole in the frame paper.
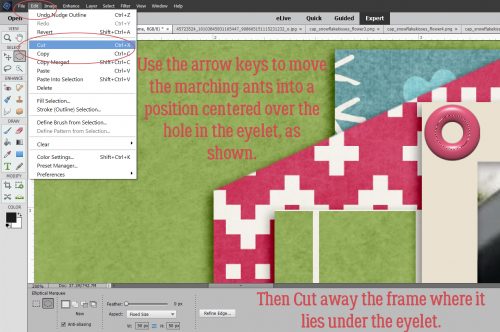
There! Now I can see the corner of the photo. On to the next step.

I repeated the same steps, only moving my active layer to the photo layer.
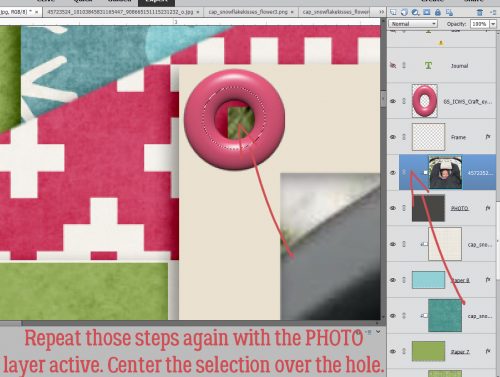
I cut the corner of the photo off…

but, because I’m using a template, the photo clipping mask is still there.

Oh wait!! There’s a Work Smart Not Hard lesson here! If I make the CLIPPING MASK layer the active layer, I can cut BOTH layers with one click.

I kept repeating the layer>select>cut steps for each paper layer until I could see my background paper.

You’ll notice as you go along that the drop shadow from each paper layer is visible, but there’s no shadow on the actual eyelet. I used the default drop shadow styles to apply a narrow shadow with the light source coming from the same direction as the template’s layers.

I could leave it with just a single eyelet, but that doesn’t work for me. So I Copied the eyelet layer (CTRL/CMD>J) and nudged it over, then followed all the same steps as before to make a nice hole all the way to the background paper.

Then I did it all one more time to create 3 eyelets lined up along the top edge of my frame. To quote my friend Sandy, 3 is an esthetically pleasing number.

For balance and symmetry, I decided to put another 3-eyelet set in the diagonally opposite corner.

In this corner, there are different papers in the stack under the frame, so I had to pay attention to the paper I could see in the hole. It’s really not that time consuming to copy and cut three more eyelets.

There it is! The background paper!

I have a feeling the eyelets in the lower right corner won’t be visible on my finished layout, but I’ll know they’re there!
If you can think of a paper-scrapping technique you’d like me to translate, please let me know!
![]()
Nice tut! I was thinking, sometimes you need a tut thats quick and easy because you get busy. So, You have been doing these for a while now and have quite a few here for us. A quick tut would be an index for the items. such as
Templates – lesson & date
lesson & date
Making eyelets – The EYE-lets have it – Dec 4 2018
masks – lesson & date
lesson & date
It would help make it easier to look for something specific and you could make the list any time having it ready for one of those extra busy weeks. Ellen
That’s a FANTASTIC idea, Ellen!! I’m not sure how “quick” it’ll be… that’s a LOT of cross-referencing! Stay tuned.