The EYE-lets Have It!
![]()
I’m still working my way through years worth of scrapbooking magazines trying to figure out why I kept them in the first place. While I’m at it I’ve been looking for more paper-scrapping techniques I can translate into digital ones, and finding some solid inspiration. Today I want to show you how I’ve used an eyelet from the GingerBread Ladies‘ collab It Comes with Spring to secure my photo and frame to my paper stack… just like I would have when I paper-scrapped. (This collection was the Free-with-Purchase gift in March 2016.) The rest of the layout is created with Connie Prince‘s Snowflake Kisses , LDrag Designs‘ Jolly Holidays alphas and Aprilisa‘s Picture Perfect 177 templates from the December Buffet for the Buffet Challenge.

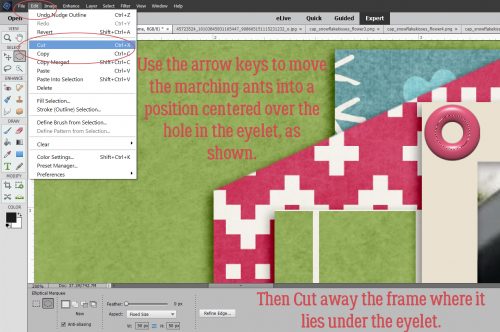
Once I had my eyelet in position and resized to fit within the edges of my paper frame, I clicked on the Elliptical Marquee tool.

I set the tool’s settings to Fixed Size, then experimented with the dimensions until I got a circle the correct size. Both dimensions for width and height must be the same. 50 pixels by 50 pixels works.

I made sure the frame’s layer was my active layer and clicked just inside the edge of the eyelet to make my circular selection.

Then I used the arrow keys to nudge it into place with the hole in the eyelet in the center. Once I had it positioned properly, I used the Edit>Cut command (CTRL/CMD>X) to create a hole in the frame paper.
There! Now I can see the corner of the photo. On to the next step.

I repeated the same steps, only moving my active layer to the photo layer.
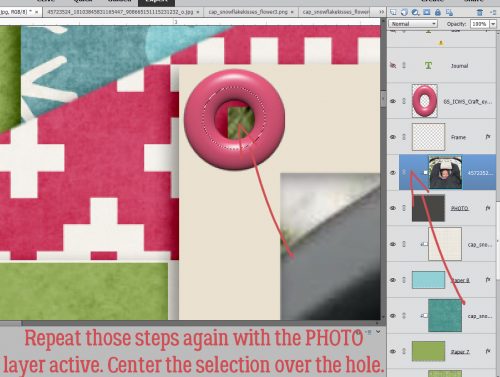
I cut the corner of the photo off…

but, because I’m using a template, the photo clipping mask is still there.

Oh wait!! There’s a Work Smart Not Hard lesson here! If I make the CLIPPING MASK layer the active layer, I can cut BOTH layers with one click.

I kept repeating the layer>select>cut steps for each paper layer until I could see my background paper.

You’ll notice as you go along that the drop shadow from each paper layer is visible, but there’s no shadow on the actual eyelet. I used the default drop shadow styles to apply a narrow shadow with the light source coming from the same direction as the template’s layers.

I could leave it with just a single eyelet, but that doesn’t work for me. So I Copied the eyelet layer (CTRL/CMD>J) and nudged it over, then followed all the same steps as before to make a nice hole all the way to the background paper.

Then I did it all one more time to create 3 eyelets lined up along the top edge of my frame. To quote my friend Sandy, 3 is an esthetically pleasing number.

For balance and symmetry, I decided to put another 3-eyelet set in the diagonally opposite corner.

In this corner, there are different papers in the stack under the frame, so I had to pay attention to the paper I could see in the hole. It’s really not that time consuming to copy and cut three more eyelets.

There it is! The background paper!

I have a feeling the eyelets in the lower right corner won’t be visible on my finished layout, but I’ll know they’re there!
If you can think of a paper-scrapping technique you’d like me to translate, please let me know!
![]()