Fooling Around With Gradients: Graduated Filters in Elements+
![]()
As someone with Irish heritage, March and St Patrick’s Day always makes me think of Ireland. And that makes me pull out the photos I took during my two trips to the Ould Sod. And perusing them makes we wish the sky wasn’t completely blown out in every. Single. Outdoor. Photo. You know what I mean… that almost white, totally featureless sky that definitely didn’t look like that to the eye. Why does that happen? Well, as sophisticated as today’s digital cameras are, they’re still not great at filtering the bright light from the sky while keeping the foreground properly exposed. Landscape photographers understand this principle and carry a selection of neutral density filters they can pop over their lens to improve their shots. Neutral density filters have a section of the glass coated with a smoky transparent film that gradually gets lighter as it approaches the centre. This means that the section of the frame behind the smoky part will see less light than the part of the filter that’s completely clear, making the exposure of that part of the frame less bright. They can be positioned so that the dark section is where it makes the most sense; the resulting image will have a balance between the brightness of the sky or water and the remainder of the scene. So what if you’re not a famous landscape photographer and you have a bunch of photos that could be great, if that balance was there? Elements+ to the rescue!!
For those unfamiliar, Elements+ is an add-on application that allows Elements to do a bunch of things found in the more-versatile-more-expensive-and-more-difficult-to-learn Photoshop. It costs $15 or so and is version-specific. I use Elements 2019, so the version of Elements+ I have is the 2019 one. I wrote a tutorial overview of it last year that you can find here. So let’s see how it can take the place of a neutral density filter.
This photo of the bridge over the River Erne in Beleek, Fermanagh is one that I’ve played with before but I was never totally happy with the outcome. (A little trivia: The border between Donegal, Ireland and Fermanagh, Northern Ireland runs right down the centre of the bridge! It’s one reason Brexit has been so contentious for those living in Northern Ireland and why a hard border would be so difficult to re-establish.) The day I was at Beleek, the sky was cloudy, but not as it looks in the photo.
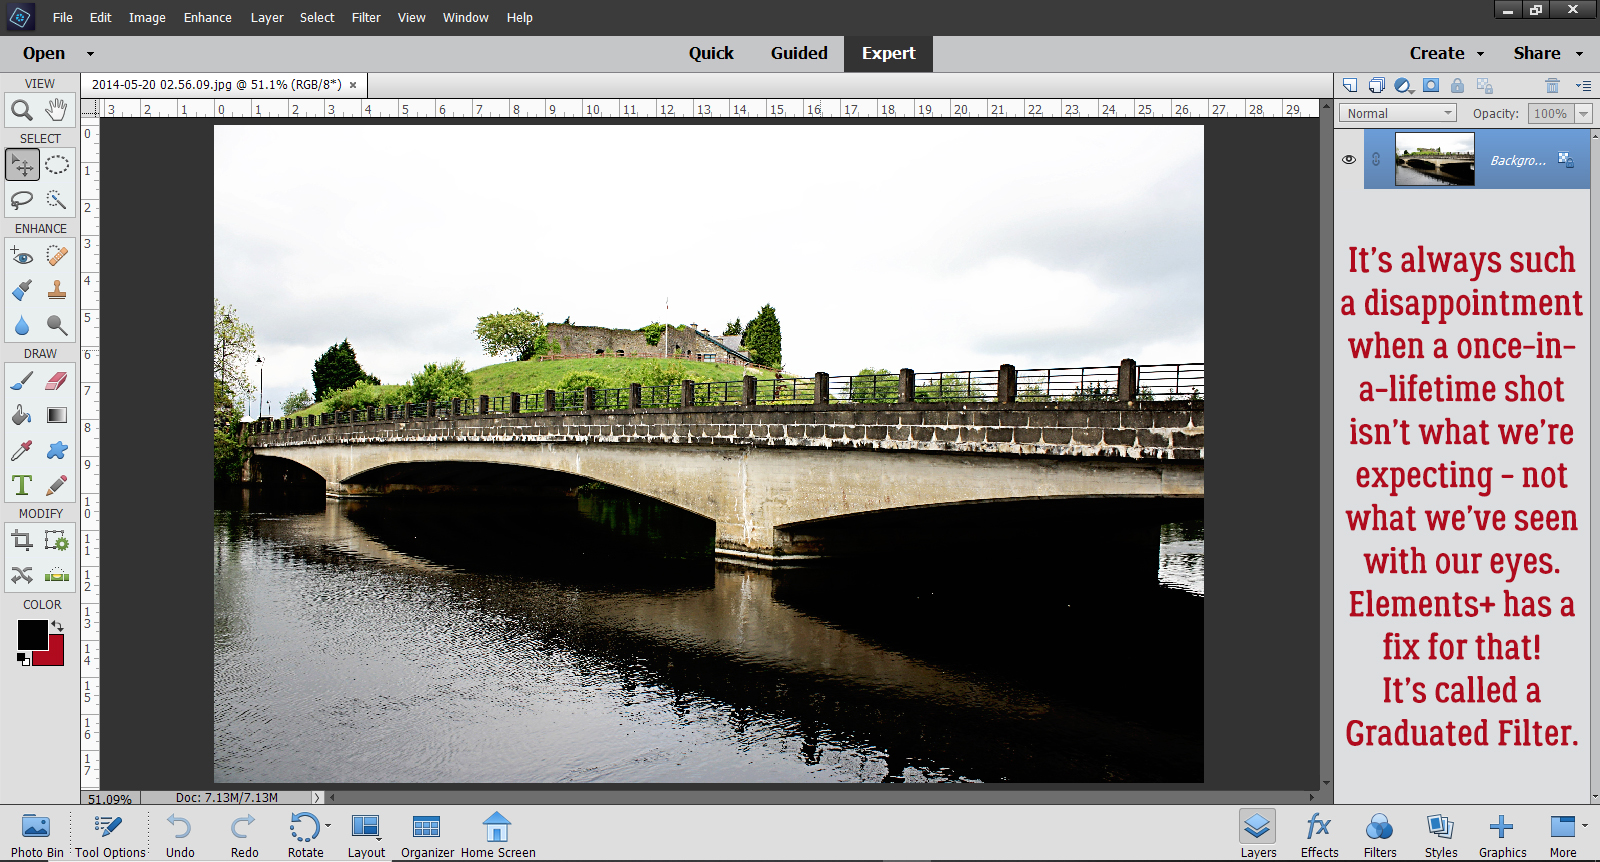
Once you’ve installed your copy of Elements+, all its awesome power can be found under File>Automation Tools. The graduated filter tool is in the RAW Corrections set, so I went ahead and clicked through.

The Graduated Filter tab is the second one from the left as shown. You can click on the tab, or the icon just above it. Then click on New.

The filter creates a mask over the photo on a separate layer. Click on the Mask tab and you’ll see which part of the photo is being filtered. Those boxes with green sections show you the orientation of the filter, with green being the darker part. The default setting is to place the darker part of the filter over the top half(ish) of the photo. You can already see how the default setting has changed the image. The green line with the big green dot at one end and the red dot at the other is how you control where the filter is actually applied.

My first goal is to make the sky as interesting as possible, so I moved the top slider labeled Zero Effect to the left, past midline, and the red dot moved up past the railing on the bridge.

Now to make some adjustments. I played with the sliders in the Adjustments menu, moving them just a little in one direction or the other and watching my preview image to see what changes. Not surprisingly, the Exposure slider has been moved a good bit to the left, or lower, and I also darkened the Highlights a smidge. All of a sudden, there are layers of clouds in the sky! Clarity adds a hint of detail, while Dehaze changes contrast and overall sharpness. Sharpness adjusts focus and Noise Reduction can minimize pixelation. These two adjustments need a very light touch, because they’ll make your image look really phony if you go too far. The changes should be quite subtle to the eye, but make a big impact all together. I wanted the grass on that little knoll to be a tiny bit more vivid so I added some more Saturation.

The neatest thing about these filters is that you can layer them one on top of another and adjust whole areas of photos quickly and easily. So now I’m going to add a filter to the bridge and water. I clicked New then clicked the second left filter with the darker area at the bottom. The default setting for this filter is as shown.

As you can see, I moved the red dot up so it sits directly over where the other red dot was, using the Zero Effect slider. Then I moved the bigger green dot down to the very bottom of the photo with the Full Effect slider.

These are the adjustments I made to the lower half. Can you see how much brighter and sharper the reflection of the bridge looks on the river? I really cranked up the Shadows.

Here’s the final image. The ripples in the water are much more visible and the reflection of the trees is brighter.
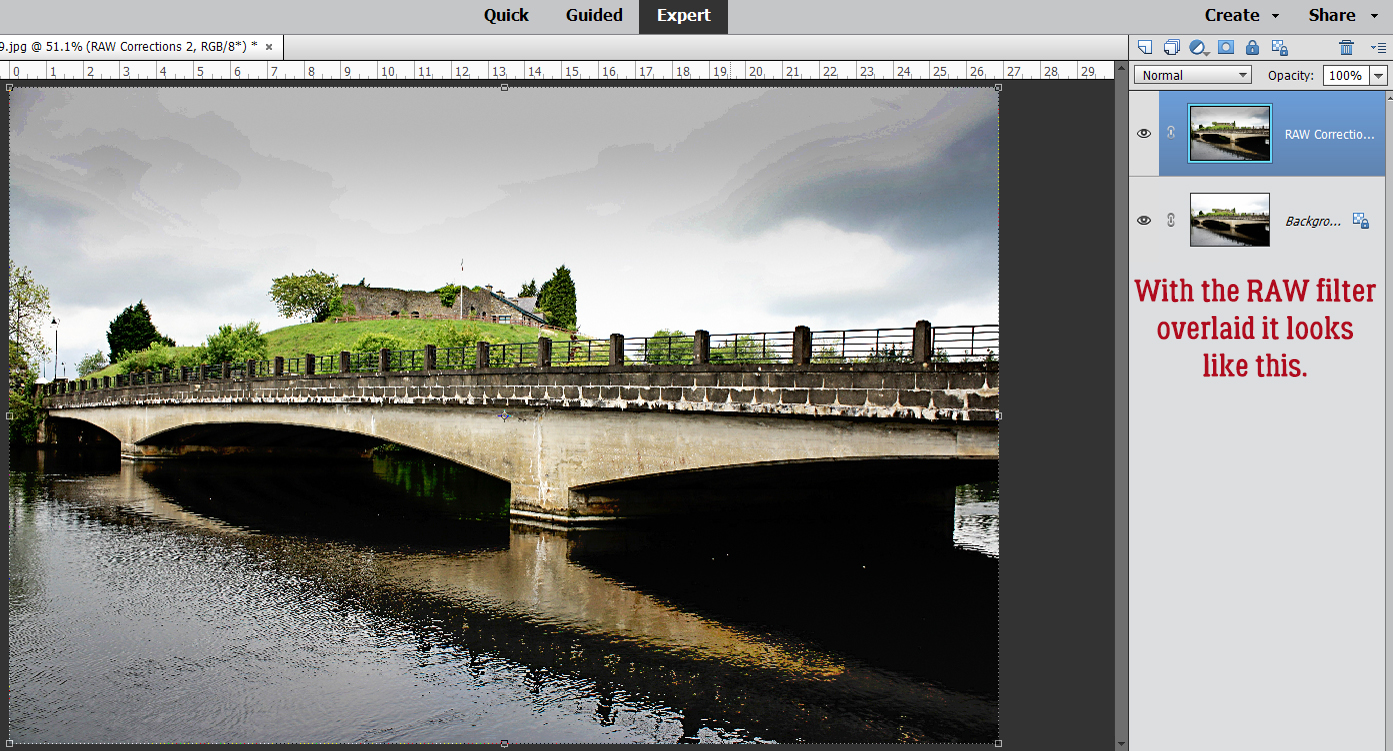
Check out this difference! This is the original.

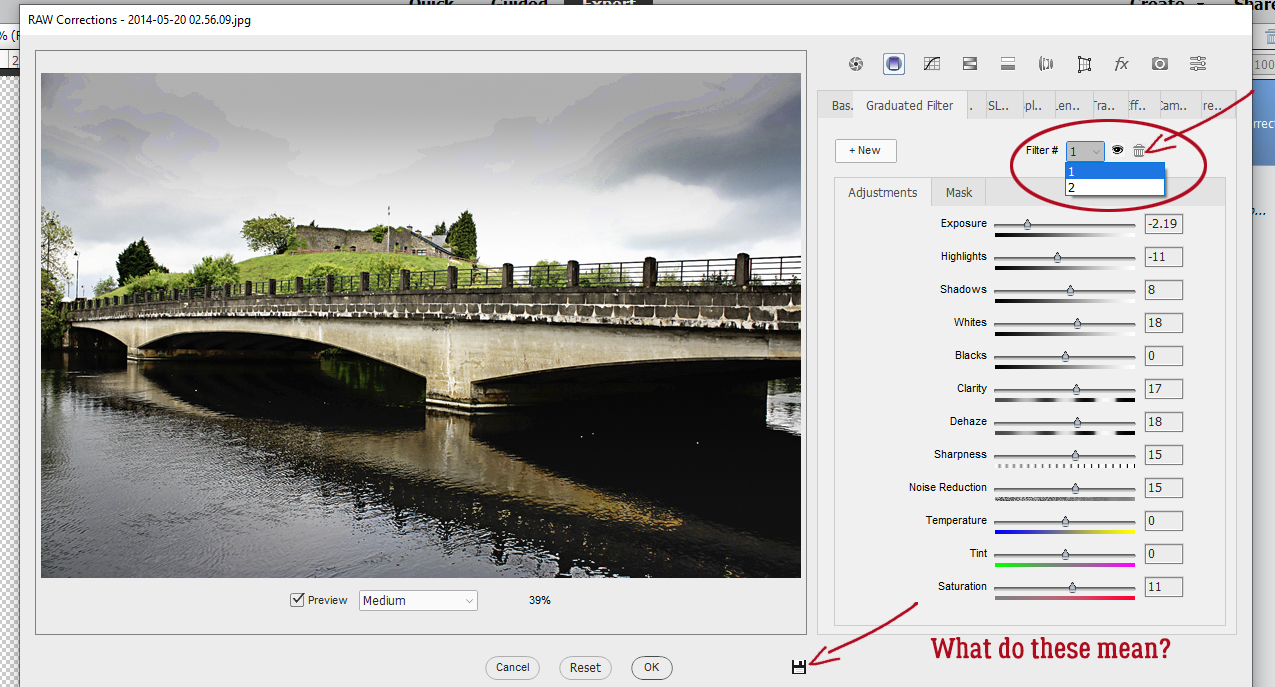
Let’s talk a minute about some of the other icons on the menu. Up at the top right there’s a drop-down that will show you how many filters you’ve added and which one is currently active for further adjustment. The eye icon lets you turn on and off the filter to better assess whether you’re getting the look you want. And the garbage can – self-explanatory. If you don’t like it and aren’t interested in tweaking any more, just toss it! But… if you have a bunch of photos you’d like to apply the exact same settings to, if you click on the icon I’ve pointed to at the bottom, you can save them as a script and have them readily at hand later!
Let’s do another one. You might look at this photo of Ross Castle in Killarney National Park and wonder what I could possible find faulty with it. Well, maybe I can punch up the blue in the sky a bit more, maybe add a bit more detail to the clouds and to the trees.

So let’s get into the RAW Corrections menu again.

We’ll add a New Graduated Filter. The sky already looks bluer!

Now the sky is closer to the blue Lough Erne is reflecting. But I feel like the centre of the photo is too dark now, so I’m going to adjust the area the mask is covering.

Here’s the default. I want to move that red dot up so that it sits right were the grass meets the castle wall.
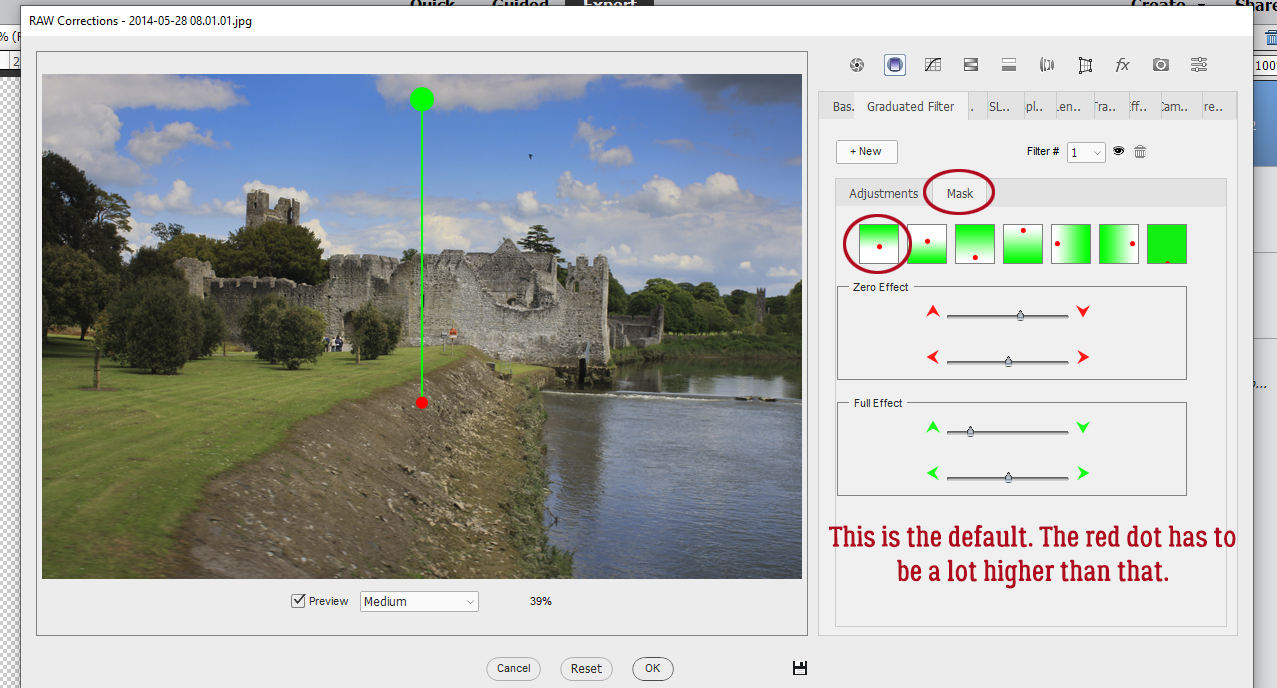
There!
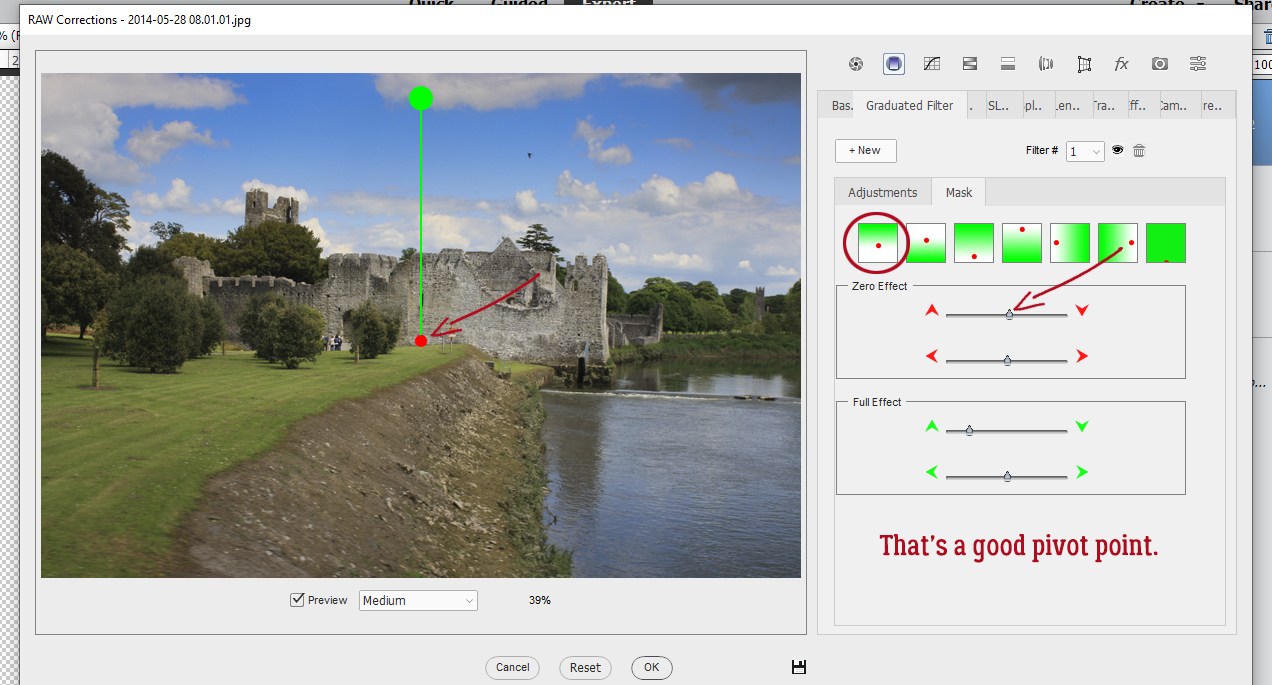
After I played with the various sliders, there’s more detail in the clouds, the sky is deep blue, the trees in the background are sharper and so are the stones in the castle walls. I wish the bird in the sky was clearer though!
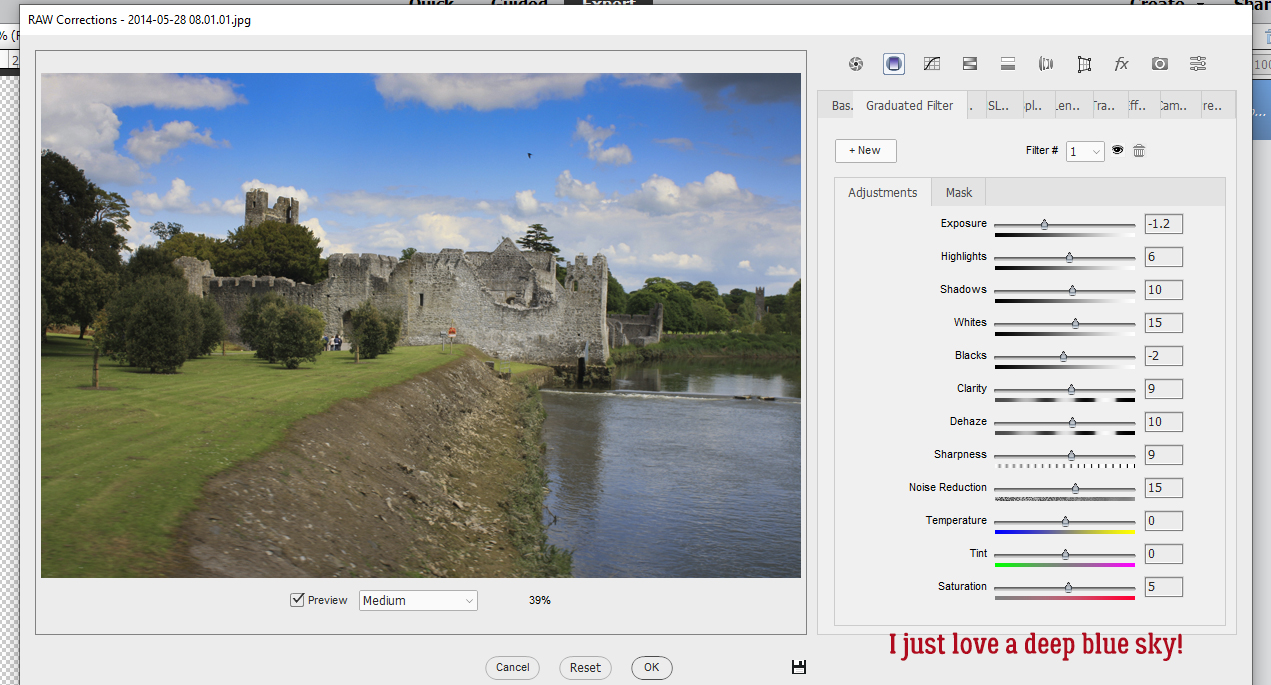
I added a second mask to the lower part of the photo. It looks pretty awful right now, but I’m going to fix it.

I moved the red dot down to my original pivot point. Isn’t it so accommodating of Elements+ to save that for me?

After looking at it a bit longer, I decided the red dot needed to be lower on the grassy area. And look! I’ve swung the green dot over to the left so the dividing line hugs the edge of the grass better. By pulling the lower slider for the Full Effect mask adjustment over to the left, I can section off just part of the lower half of the photo! All that really needs to be adjusted is the grass, so this should work!

Now the grass is brighter and there’s more detail in the foreground trees and shrubs. Apparently, these last adjustments were made on a thrid mask. Somehow that slipped past my notice!

The final version:

And the original:

What do you think? I know I’m going to be doing this a LOT!!
Have you seen the announcement for the Season 11 of Digiscrapping Survivor? The new destination theme will be announced and sign-ups start March 5 and I’m so excited!! The prizes are insane. Simply INSANE! I haven’t ever been in a place in my life where I could join in the fun, but this year I am, so I’m going to get my feet wet. I’d love to write a tutorial but I’m a babe in the woods here. If you’ve played along in the past and have any advice for me (to share with the rest of the GS community), send me a private message. I’ll compile all the hints and tips into a post and we can all hit the floor running. You can find a teaser for Survivor here. It’s the sign-up thread for Season 10, and gives a good overview of the competition. But I think the tips will be very useful, so bring ’em on!
![]()
Link to PDF download of this tutorial: https://bit.ly/2Oi6w80