Quick Trick: Transform a Selection
![]()
PDF Version: https://bit.ly/3BgqBlm
August 2022 is one of those rare months with five Tuesdays. That means there’s still one more Tutorial Tuesday before we move into September. (I can hear the shrieking… yes, this year is flying by!) It still feels very much like summer here, with temps in the 80s or 90s and thunderstorms – which aren’t typical here even in high summer. Last night’s storm was intense! Hopefully there weren’t a bunch of new wildfires created. But enough chit-chat. Let’s look at today’s Quick Trick.
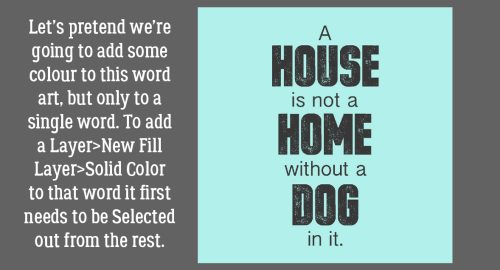
One of the most common reasons I have for Selecting something is for recolouring word art. I do it a lot and the method I like most, which gives the best results, is to add a Solid Color Fill Layer.
I can’t be the only one who has this issue – sometimes my mouse/trackpad just stops responding (or let’s be honest, my finger slips) while I’m using the Marquee Tool to Select something, causing the area I’ve Selected to be not what I wanted. And until I learned this trick it meant I’d Select>Deselect (CTRL/CMD>D) or Undo (CTRL/CMD>Z) and start over.

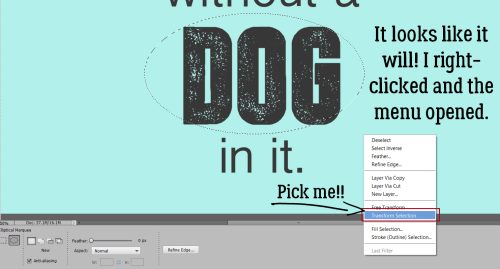
Then one day I learned it’s possible to make the bad Selection box into a good Selection box! (This has streamlined editing my screenshots dramatically.) Rather than abandon the too-small/too-big/just-not-right box, right-click somewhere on the canvas. This magical menu will appear. Click on Transform Selection.

Now the marching ants are a Bounding Box. When you Commit current operation, it morphs back into marching ants. Crazy! Now you can Cut/Paste, apply a Stroke, rotate or whatever you had planned to do when you chose the Marquee Tool.

But will it work with an Elliptical Selection?

Seems like that’s a YES!
Here we see one of the limitations of Elliptical Selections when you’re playing with word art. If I make the ellipse big enough to get everything I want inside it, I also get stuff in there I don’t want. Because I can’t help myself, I tried Image>Transform>Skew. If it wasn’t going to be an option, those choices would have been grayed out. They weren’t! But the question still remained. Would the Skew only apply to the marching ants Selection?

Answer? Affirmative! But… the dots from the two “i”s in the line below are also being bitten.

I was so pleased, but shocked, to see that the Selection was still a Bounding Box and I could still tweak the contours of the ellipse. I tested the result by Cutting DOG out of the image to see if the whole word was inside and the dots on the two “i”s weren’t. It was perfect, but I didn’t think you’d need to see a screenshot of that.

Feeling quite accomplished now, I took it all one step further. Could this trick work with the old CTRL/CMD>click-inside-the-thumbnail-to-Select thing?

So I gave it a whirl.
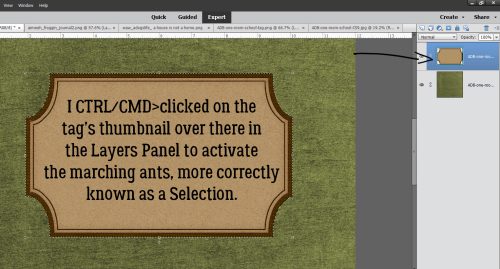
Well, darn. Right-clicking only brought up options that would apply to the LAYER the tag is on, not the Selection. Is there another way? I clicked the Select tab and there it was! Transform Selection is right there!

The Selection turned into a Bounding Box and I could Resize it without a problem. Pro tip: If you want the original shape to remain centered in the Selection, don’t grab a Bounding Box handle and pull. Instead, change the size in the Tool Options dialog box.

You may never decide to use this trick, but I’ll tell you, I’m using it a LOT now that I know how it works. See you next week!
PDF Version: https://bit.ly/3BgqBlm
![]()
Cool tip, Jan! Like you, I’ve often started & then had to undo because my mouse went wonky. This will be so much easier!!
Awesome tip Jan !! This is going to save me a lot of time and frustration 🙂
Thanks Jan! I think you just saved a lot of people a lot of frustration! Awesome tip and thanks so much for finding it and sharing!