Quick Trick: Guided Edit – Pattern Brush
![]()
PDF Version : https://bit.ly/3OXkpUV
Hey, GingerScrappers! Thanks for all the kind thoughts and support for those of us in the fire zone. For me, the crisis is over, at least for the time being. Fire season won’t end until we get some snow, so we can’t really relax. But we didn’t have to evacuate, like so many of our community did. The tally on structures lost is ongoing and most of the people who have lost everything have been notified. They’ll need so much in the coming weeks; I can’t even imagine.
But enough of that. Today I’m building on our paper-making lesson from a couple months back. I’m using a Guided Edit only available to those using Elements 2020 through 2023, so if that’s not you, I apologize.
I’ve created a solid black 12×12 paper on my workspace. Black is a good background for this tutorial since it makes the patterns much more visible in the tiny screenshots I’ve been forced to use.

Click on Guided up at the top of your screen and Elements will take you to this interface.

Click on Fun Edits, then on Pattern Brush as shown.

There are 15 Patterns to choose from in Elements 2020-2022. There were a few more added for Elements 2023. Here, you can see 9 of the Patterns. There are 2 ways to use this Edit and I’ll show you samples of both. If at any time you’re not happy with what you’ve done, you can Undo (CTRL/CMD>Z) back to your background paper, or click the Cancel button at the bottom right. Cancel takes you back to the Guided menu and you can start again.

First, I’m using the Fill edit. I chose the random hearts and clicked Fill. The Pattern is at 100% Opacity against the black. I like it!

In the Fill option, the Opacity slider is active. So here I’ve decreased to 85% just to show you what you can do. I’d probably leave it at full bore.
Oh, and… you can Erase some of the Pattern!! Using the Pattern Eraser Tool, I removed some of the bigger hearts from my sample. There’s also a Blur option that I didn’t play with. You can try it and see what it does. I think it would be perfect with the bokeh Pattern.

I Undid my way back to my plain black and this time I chose Paint using the default settings to Paint a diagonal from the lower right to upper left. See how the positions of the hearts randomly shifts?

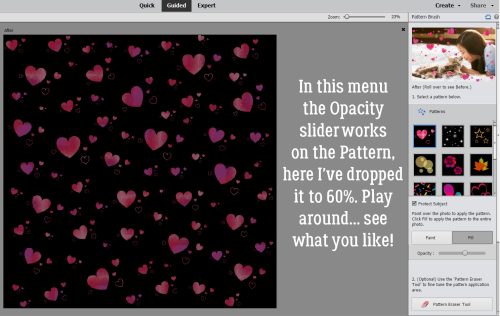
I played with the settings, decreasing the Size from 150 pixels to 75, increasing the Scatter from 25% to 50% and dropping the Opacity to 85%. Then I Painted all over the black to create a tiny, overall pattern. There are so many ways this can be customized!

For this sample I used the random stars and Fill. If you don’t like the colour of the Pattern as Elements provided, you can definitely change it once you’re back in Expert mode.

Here’s a glimpse at the other 6 Patterns. I love this confetti cannon look!

Yet another Pattern… but really, who wants red, gold and brown snowflakes? Let’s click Next down at the lower right and move out of Guided mode.

Here, I chose Continue Editing In Expert and clicked Done. If I was happy with my paper at this stage, I could choose to Save it As a .jpeg and use it again and again.
 In Expert mode, you can see the new layers Elements has added to the paper. The top and bottom layers are the only ones that matter. You can activate that pattern layer at the top and add a Layer>New Fill Layer>Solid>Clip to change colour, or you can play with the Blend Mode for that layer to see what works best for you.
 Here’s a close-up of the pattern so you’ll easily see the Blend Mode change.

Switching to Luminosity took all the colour out of the snowflakes, but not the shadowing! I could increase the Opacity of the pattern layer to 100% to brighten the white. And that’s all there is to it!

Sorry for the formatting glitches. When I mix up my screenshots and have to move them around, WordPress plays with me, hard!
This is a bit of a milestone for me. My very first Tutorial Tuesday Blog post appeared August 30, 2016 – SEVEN years ago!! Today’s Tutorial is #315… that’s a lot of words! No wonder I’m hoarse. (Although that could be the smoke…)
It just started raining here for only the second time since July 24th. Rejoicing!!
![]()
Wow! Seven years already. Can hardly believe it! Happy Anniversary. Todays tut is really cool. Thanks for the ideas. Stay safe. Ellen
First of all, thank you so much for the PDF version! (and i noticed the link inside the pdf that leads back to here) … i actually love printing out to follow along. PSE isn’t the program i use to design BUT i need it for certain things and this is one example! i use PSE11 a lot because the later version i have (2020), i just can’t figure out how to merge down a pattern from a kit onto a shape as easily as PSE11 (i.e. when using a PSD template and filling the shape with a paper from a kit). that being said, the 2020 version has a lot of nice extras .. never saw this one and i already love it! adore using scatters in my LOs and this is just wonderful! thank you so much! kind regards, lisa
Thank you so much for the PDF versions. They are so useful!
Thanks so much for another great tutorial! I have a request for a tutorial (maybe you have already done this one…?) I am trying to learn how to do text inside a shape. I’d like to take a shape that I create and have the text inside. As an example, taking the state of Washington and making the text inside the state lines. Or taking a photo of my house and putting the text inside of it. I have PSE 2021 and can’t figure out how to do it. First creating the shape from my photo and then inserting the text into that shape.
I’m glad you like this week’s tut! I think it has lots of potential.
I have done text-inside-a-shape before. You can find it here: https://gingerscraps.net/gsblog/2021/02/tutorial-tuesday-photoshop-elements-138/
Lisa, I only just read this comment… I think I understand what you’re having trouble with when clipping papers to template place-holders. Somewhere along the line – I think it was around Elements 15 – the usual command for attaching to a clipping mask – CTRL/CMD>G – was changed and it now Groups objects. The “new” keyboard shortcut is CTRL/CMD>ALT/OPT>G.