Digital Zen Doodling (Part 2 of ???)
![]()
Okay… has your brain had time to process Part 1? I hope so, because Part 2 is on its way! Now, where did we leave off? Oh, right… we were getting ready to make those white dotted rings around our big coloured dots. Onward!
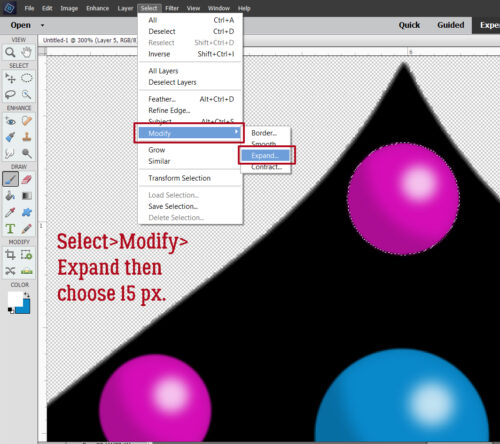
I needed quite a few runs at this until I figured out the easiest, smartest way to accomplish it. Free-handing and eyeballing weren’t cutting it. Once I settled in with the method below, it really got a lot better. I created a guideline – a circular placeholder on which to apply my white dots. I started with the topmost pink dot, Selecting the edge by CTRL.CMD>clicking on it in the Layers Panel. The longer route would be to click Select>Subject with that layer active. You should see a line of “marching ants” around the outside of the dot. The screenshot isn’t good for that. 🙁

Now, that little path isn’t going to be useful in its current size, so next I went to Select>Modify>Expand then when the pop-up appeared, I typed in 15 px into the Expand by: box. Sorry, I don’t have a screenshot of that menu, I was on a tear and completely forgot! (Multiple times!)
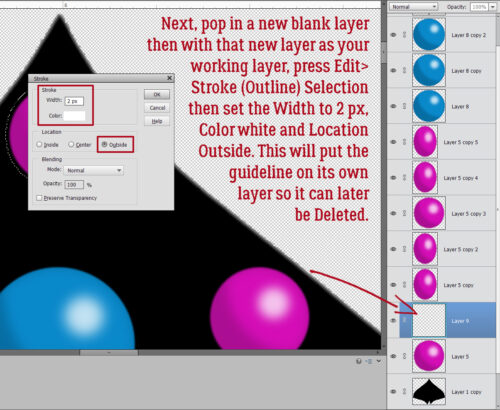
I want the guideline to disappear and reappear at will, so it will have its own layer. Pop one of those in there above the pink dot by clicking on that sheet-of-paper icon at the upper left of your Layers Panel. Then click Edit>Stroke (Outline) Selection. Set the Stroke Width to 2 px, Color white and the Location to Outside.
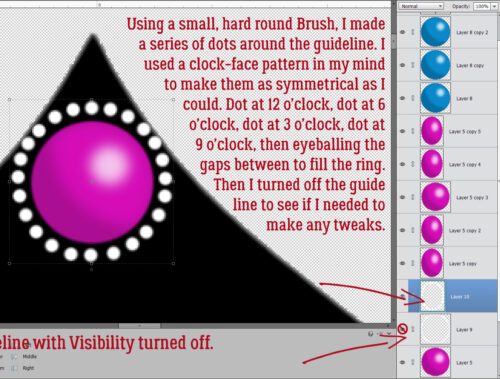
With the Foreground Color still set to white (Hex Code ffffff), I went back to my Brush Tool and chose a small (5 px) hard, round Basic Brush. Each click of the mouse on the guideline gave me a dot; I pictured a clock face to space them, starting at 12, dropping to 6, back up to 3, over to 9. Then I split the spaces between those dots as evenly as I could until I got this lovely string of pearls around my pink dot. I turned Visibility for the guideline off so I could see if I needed to make any fixes. Remember CTRL.CMD>Z will Undo something you’re not happy with.
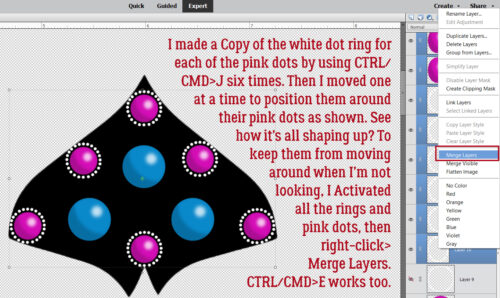
Now, this is where digital Zen Doodling really makes sense. I didn’t have to make a pearl necklace for each of the pink dots, like I would have to with paint. I could just make Copies!! Six pink dots, six Copies. CTRL/CMD>J is that keyboard shortcut. Then I moved each one into position around its respective pink dot. Looks pretty cool already! To prevent any accidental mess-ups, I Activated each pink dot and each white dot ring layer, then right-click>Merge Layers (CTRL/CMD>E). That gave me a single white-encircled-pink-dot layer.
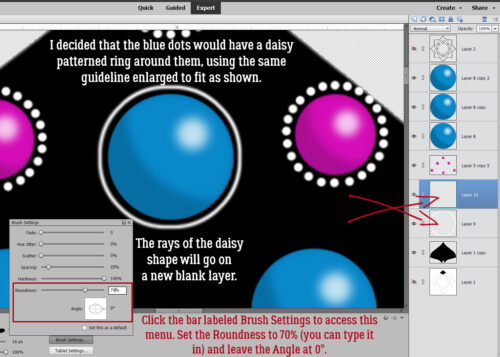
I didn’t want to be too uniform with the white accents so for the blue dots, I decided on more of a daisy look. I turned Visibility for the guideline back on, moved it over to a blue dot and Enlarged it as shown. Again, the accents will go on their own layer. To achieve a more elliptical shape with my Brush, I clicked the Brush Settings bar and typed in 70% into the Roundness box. You could instead push on one of the “handles” in the diagram box to achieve the same thing. Leave the Angle at 0°.
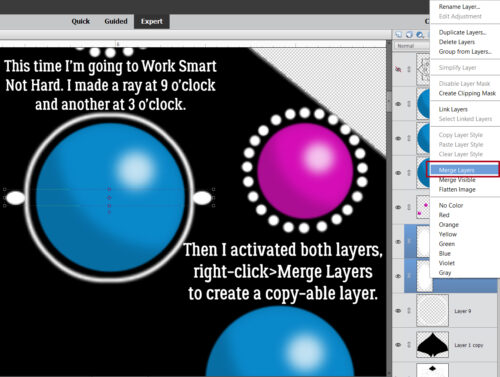
This time, I opted to Work Smart, Not Hard. I clicked a “ray” at 9 o’clock and another at 3 o’clock. (Somehow they ended up on separate layers. Yours shouldn’t. But if they do… Merge the two layers.) With both rays on the same layer, I can make a bunch of Copies!
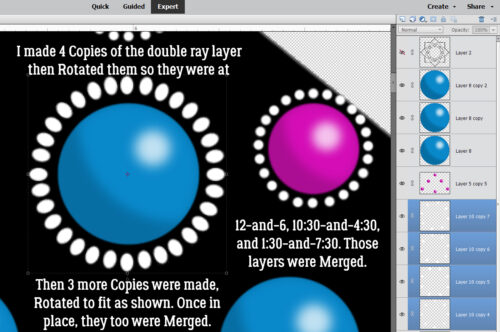
I made 4 Copies, CTRL/CMD>J x 4, which gave me 4 separate layers. Again I used an imaginary clock face to arrange my Copies. I Rotated each one so that they were fairly evenly distributed around the dial. Then I Merged (CTRL/CMD>E) those 4 layers. That gave me a total of 8 rays on a single layer. Another 3 Copies of THAT layer, rotated into place and I had a complete ring around the blue dot. Then I Merged all those layers too. The advantages to doing it this way are that I didn’t have to change the Angle on every. single. ray. So, after you’ve read all the way through, if you choose to use this method for your pearl necklaces, I’ll cheer you on!
Back to good ol’ CTRL/CMD>J to make daisies for each of the blue dots. Slide ’em into position, Activate all the Layers and Merge. Easy peasy.
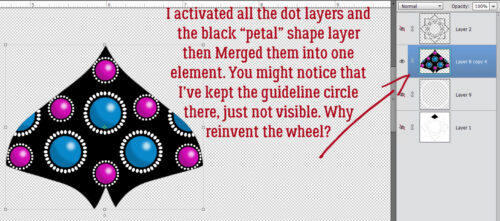
Are you tired of Merging? I’m not going to lie and say this is the last time, because it clearly isn’t! But let’s Merge the black layer with the Refined Edge, and all the pink and blue dot layers together. That affixes everything so nothing can be shifted unintentionally. Now we have a pretty “petal” that can be replicated as many times as necessary.
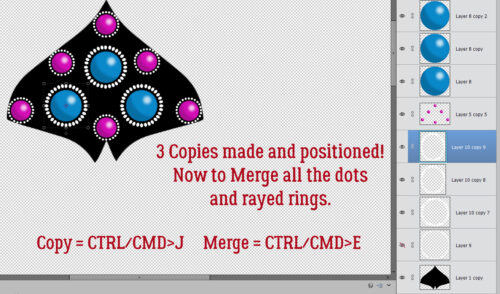
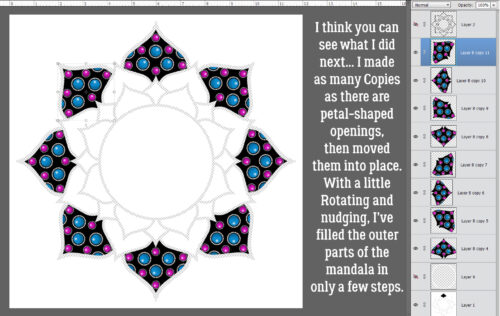
Did you catch that? I made 7 more Copies of the petal and arranged them as shown. I think it’s shaping up really nicely!
We’ll stop here. The next set of screenshots will involve the diamond-shaped openings snugged up to the notches in our petal shapes. We’ll be making lines inside them, and doing a bunch more Copy-Pasting. Next week is Challenge Spotlight Tuesday, so the next part of this odyssey will have to wait a week. 😉 I personally have done ZERO Challenges so far this month… too many other things going on. But maybe, if I squeeze out an hour or so, I can at least update my Signature. 😀
![]()
Do you have any classes on how to make paper look like ribbon on the ends? Like its cut in a “V” or how to make the paper look torn at the bottoms?