Michelle: Finding Font
![]()
At long last, the tutorial Michelle (belis2mi) has been waiting for! (It IS still May, right?) She didn’t have any burning learning needs for Photoshop Elements. What she really wanted was some tips on managing all her fonts. Can you relate? In the process of setting this tutorial up I discovered I have nearly 1700 of them!! No wonder it takes me forever to find the one I want to use. So I set out to test drive font management software. I had NexusFont on my old laptop but only made it a short way through my list of fonts (which has exploded since then) before I got burnt out with the sorting process. So I knew I wanted something a bit more user-friendly. And it had to be FREE. That led me to check out MainType by High Logic. They have a free version which will handle up to 2500 fonts, and a paid version for professional/commercial users. The version I’m going to show you is the free one. Be observant when you open the software, because it will ask you if you want to upgrade, and it moves the “leave me alone” button around. So pay attention and only select the free option.There is a pop-up that appears every so often while you’re working on tagging, asking if you want to go pro. I just X out of it. There is no Mac version, though, so if you’re using Apple, you can save yourself some time by skipping this one.
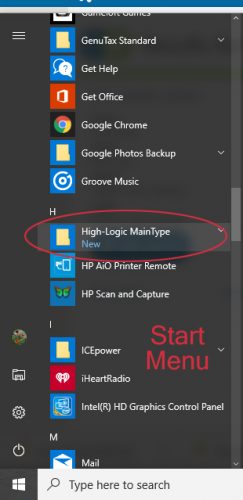
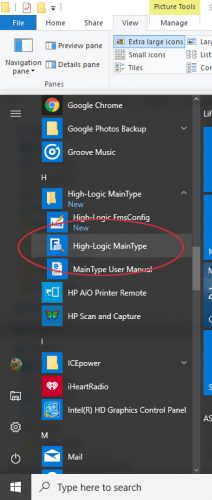
This is where you’ll find the link to the software on your computer. (Shown in Windows 10) Open the folder view.
You can choose to pin it to your Start toolbar along the bottom if you think you’re going to use it regularly. Right-click on the name in the view as shown and select “Pin to Start“.
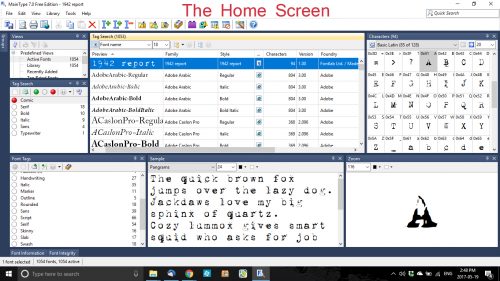
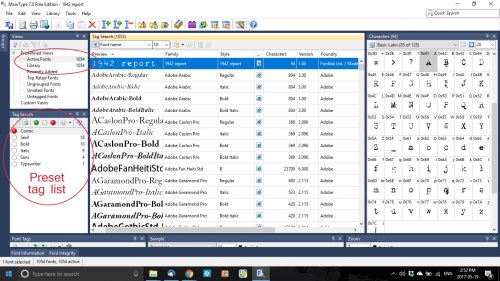
This is the Home screen. It’s completely customizable. You just click on the little pushpin icon at the upper right corner of any of the panels and it’s removed to the little strip to the left of the screen. Click on the tab to make it reappear. This is where you start. The software will automatically find the fonts that have been installed into the Windows font directory. You may have fonts in another folder, as I did. I had to manually find the folder, which was found on this path: C:\Program Files (x86)\Common Files\Adobe\Fonts and then add it as a new folder using the Tools menu. If you hover your cursor over the various icons on the screen, the software will tell you what they do. There is also an extensive searchable Help section, which I only had to use a couple of times because the software is really quite intuitive.
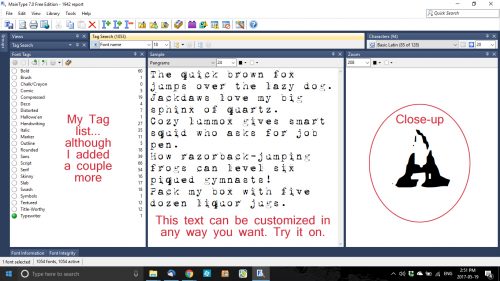
The panel in the upper left corner has a list of font folders in it. The centre panel is a list of the fonts. You can change the order of them by clicking on the headers. I went in alphabetical order… it’s easier and it’s the default setting. This is also the panel where your Tag Search results will show up. The far right corner panel is a Character map of all the various characters in the font. You can look here to see if there are numerals or punctuation marks included in the font. The centre-left panel is the Tag Search box. It will have a list of all the tags you’ve selected for the software to use for searching. Just underneath that is the Font Tags panel. This is where you choose the tags you’re going to give each of your fonts for later searches. In the lower centre is a Pangram. That’s a fancy word for a preview panel. You can put whatever you want in that box. More on that later. And last is the Zoom panel. You can select any letter, number or symbol from the active font by clicking on the character in the Character map.
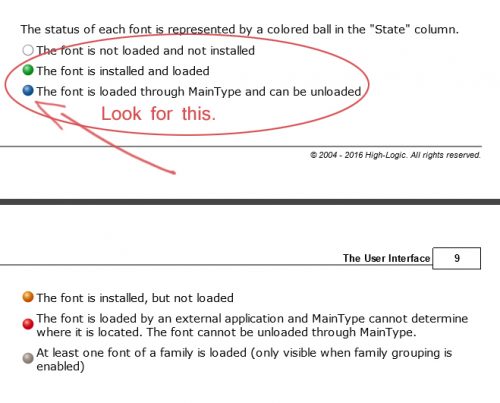
MainType will find all the fonts you have on your computer, whether you’ve installed them onto the hard drive, or simply put them in a folder. These fonts are available to any and all software that uses fonts. There is an advantage to NOT installing all your fonts. When you activate the Text tool in your software, you’ve probably noticed it takes a while before you can actually use it. That’s your computer finding and generating the list of your installed fonts. If you load the font you want to use from the folder it’s stored in when you’re ready to use it, the time lag is only a couple of seconds. There’s an easy way to know which fonts are installed and which are just in folders. When you look at the preview panel in MainFont, right ahead of the font name there’s a little bubble. The colour of the bubble tells you if the font is installed on the hard drive (green) or loaded (blue) and accessible. The caveat to this is that when you turn off your computer, the loaded fonts are reset to not loaded. But as I say, it takes maybe 2 seconds to load, which still is less time than it takes Elements or whatever software you’re using to build the font library with installed fonts.
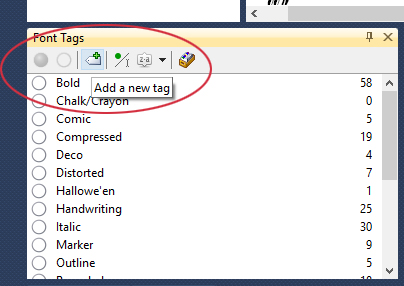
So let’s talk Tagging. This is how you’re going to find the exact font you’re looking for later. There is a preset list of tags in the software, including Comic, Serif, Bold, Italic, Sans and Typewriter. You can add as many different tags as you can think of to make your searches easier. As you’ll see, I’ve added quite a few. Tagging is the time-consuming set-up phase. Here’s your obligatory WSNH tip: Don’t tag all of those system fonts you can’t remove from your machine. You know the ones I mean… the ones you’re NEVER going to use on a layout, greeting card or holiday newsletter. Like Courier, Myriad Pro and Times New Roman and the rest of them. Generally speaking, if there are 24 different versions of the same font, it’s one of those and you can just skip them all. It’ll save you a lot of time, some repetitive stress on your wrists and some small measure of sanity. This is a case of “don’t do what I did”! I was already through the first 1000 fonts before I decided I would untag the system fonts. Hours later………..
You can use the usual Windows tools to expand or shrink a panel. I made the top panel very small so there would be less scrolling between all of my custom tags.

You can use as many tags as you want for each font. The more tags you use, the easier it will be to find them later. Be descriptive. I added a Tag called Marker so I could find those fonts that look like they’d been done using a felt pen. I added Brush for the same reason. As you work through the list of fonts, you’ll see the name of the font in the top centre panel, and an example of how it appears in the lower centre as shown. Bubbliest is tagged as Bold, Handwriting, Marker and Slab. If I want a heavy, handwritten font for some purpose, I can just select those tags and MainType will find this one and any others that fit the category.

To add a new tag, click on the icon shown.
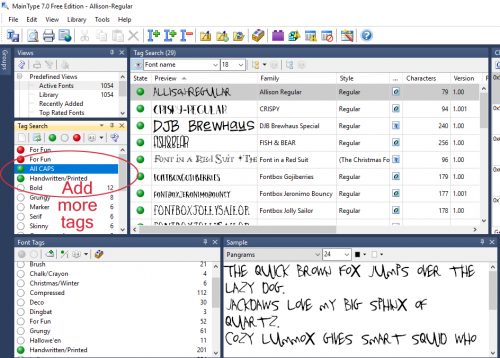
I have a number of fonts that are all upper-case, so I added a tag called All CAPS. In the image above, you can see I’ve added a lot more!
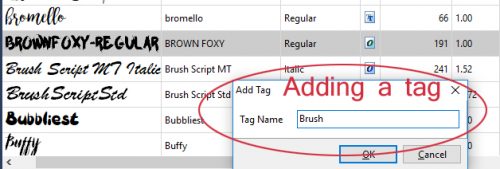
When you click on the Add Tag icon, this menu opens up. Just type in whatever you want your new tag called.
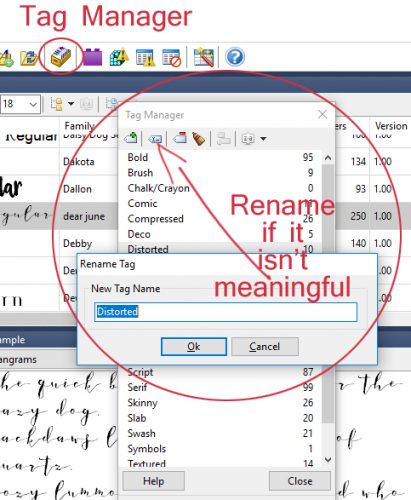
If you don’t like a tag, or don’t find it something you’d use, you can rename it. Select the Tag you want to rename, click on the icon shown below (or F2 if you’re into Function keys) and wait for the drop-down menu to open.
![]()
I don’t really have any Distorted fonts. At least in the sense I would use the word. So I chose to rename that one.
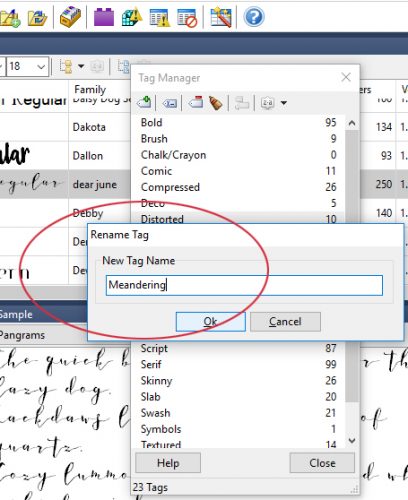
Distorted didn’t really work for me so I changed it to Meandering. I use that tag for those fonts that don’t sit on a baseline but wander all over, as you can see in the image below. Kind of like torsades-de-points… a little medical humour there.
You can change the text in the Sample box to whatever you want. If you’re trying to see how a certain phrase will look in a variety of fonts, pop it in here and then run a Tag Search.
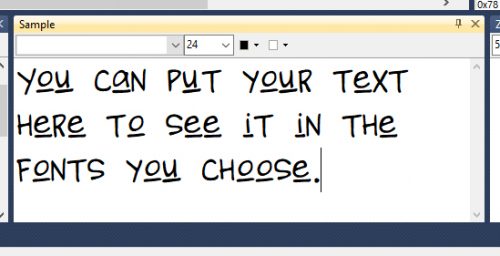
It’s really handy to be able to see your own text in the fonts you’ve searched for, and to see a close-up of individual characters too.
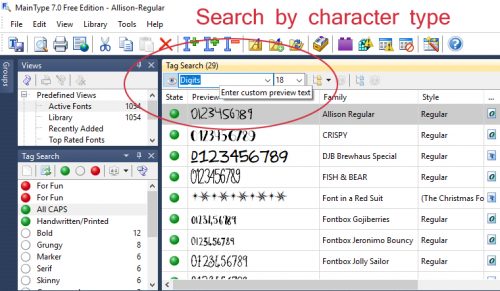
Here’s an example of a Tag Search. I selected For Fun (a tag I used for whimsical fonts, the ones I’d use for layouts with kids for example, and Handwritten/Printed (a renamed tag that meant more to me than Handwriting did) and this is the list the search produced.

In the box at the top of the Tag Search list panel, you can change the search terms to any of the ones in the drop-down menu: Font Name, Characters in font, Digits, Alphabets (upper), Alphabets (lower) and Alphabets up and low. You can adjust the preview size here too. If you select Characters in a font, it will show you a number, which can help you narrow down your choices to fonts with foreign characters, for example. Or you could select Digits if you knew you were going to be putting a date into your journaling.

You can also change the search terms to whatever you want.
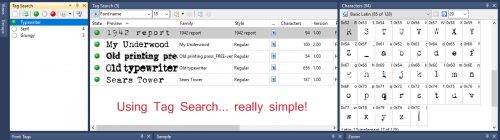
Here’s an example of a Tag Search I did for Typewriter fonts. It’s so easy!! It literally took seconds.
What makes this software more user friendly than NexusFont for me was the easy tagging system. I didn’t have to drag-and-drop my fonts into different groups, which made a big difference to my satisfaction with the software. If I would have skipped over the system fonts from the start, I think tagging all my useful fonts would have taken me about 3 hours of continuous work. It’s easy to break up into shorter stints and your work won’t be lost. Another feature is automatic syncing. Every time you open the software, it will search for new fonts on your computer and automatically add the new ones to your database. How awesome is that?!! You can control how often the software refreshes itself in the Tool Options tab. I think you’ll find this software to be simple and effective for most average-digiscrapper purposes. If you give it a try, let me know how you like it.
Remember, if you’ve used a technique from these tutorials, post your finished layout in the GingerScraps Facebook Tutorial Tuesday Challenge Gallery for an opportunity to have YOUR chance to challenge me. If you’re not a Facebooker, you can post a link to the layout you’ve created with the tutorial you used in the comments section here on the Blog. I’ll get a notification and will then enter you into the draw. The first week of each month I’ll have a random draw of all entries and the winner will be announced at the end of the first tutorial of that month.
![]()