Slaying the Green-Eyed Monster
![]()
Well, as you can see, I’m more or less back in business. It has been a week from hell, I won’t lie. My new laptop is a different brand, and there are some things I’m still getting used to with it. The left touchpad button is really stiff, which means it doesn’t react the way the old one did, and requires a lot more effort on my part. Saving screenshots isn’t a one-step action on it and it took me a bit of experimenting to find the method that will work best for me. But… when is screenshots, it only captures what’s inside my Elements workspace, so I don’t have to crop them. So I guess it balances out. But… When I open them in WordPress, they’re very small and I’ve had to manually enlarge them, which made them blurry. So next week I’ll be doing something different! More details on the disaster my life has been later. For now, I’ve done a test-run tutorial to work out some of the kinks. It’s short on steps therefore short on screenshots. But it’s getting us back on the road and that’s a good thing.
Flash photography and retinas. They aren’t compatible! The aperture our irises have set is for the level of light in the room, so when the flash goes off, the irises can’t react quickly enough to shut down, and the flash bounces off our retinas, making us look like demented monsters with red eyes. (Considering this is October, it could be a desirable state, but that’s a personal thing!) Human eyes go red in flash photos, animal eyes go a really ugly green-yellow. (If you’re wondering why, animals don’t see the full spectrum of colour, and have very few cone cells in their retinas; they’re the ones that reflect red.) Of course, neither looks particularly attractive. Until Photoshop Elements 12, adjusting pet eyes was a multi-step process and a bit tedious. With PSE 12, all that changed.
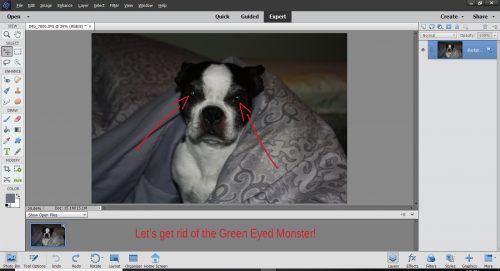
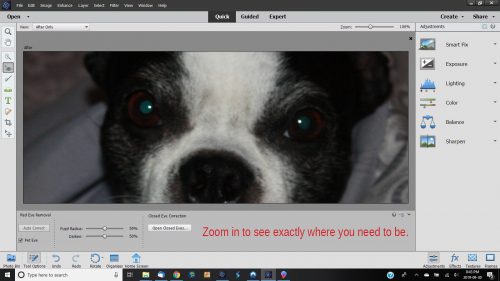
Here’s a photo of my grand-dog Lucy. It’s not horrible, but I don’t think I’d scrap it without fixing her eyes. This is such a simple, Quick Edit!
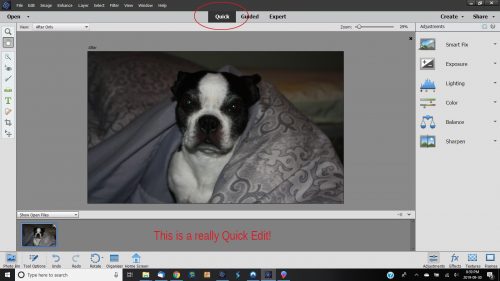
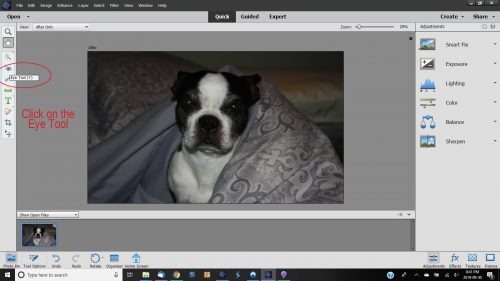
This is the basic workspace for Quick Edits. If you need to make simple adjustments, tweak for red eyes or not-quite-white teeth, this is where you’ll go. Click on the Eye Tool.
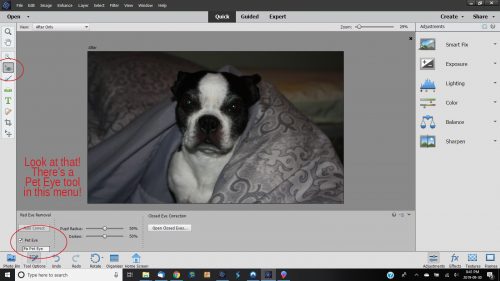
Woohoo! There’s even a single-click Pet Eye button that tells the software it’s looking for something other than red.
I like to zoom in so I can really see what I’m doing. (New laptop = 17.3 inch screen!) But look at Lucy… that’s ugly!
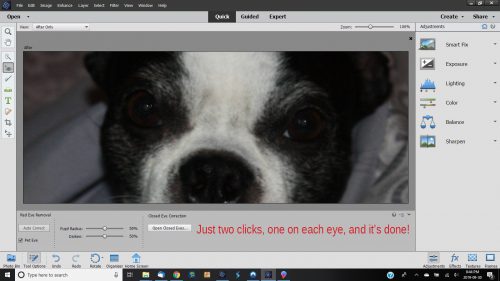
One click inside each eye and Elements has eliminated the green-eyed monster! It really is that simple!
Okay, now to get serious again for a minute. My faithful readers will know that I had over 2,000 fonts on my old laptop. When I was able to access the files on it and make a backup to move to the new one, I copied my font folder, along with my styles, brushes and actions, onto my external hard drive. But I didn’t verify that the fonts were actually copied. I discovered THIS MORNING that the folder on the EHD is empty. So I spent several hours re-downloading and reinstalling a bunch of my paid fonts from the Font Bundles website. I’m far from finished – then I have to track down the free fonts I had too. What I’m trying to impart here is that when you’re finished reading this, you should immediately go to your font folder and copy it onto some form of stable storage and then back it up occasionally from now on so you NEVER find yourself following me down the rabbit hole. After you’ve copied the file, make sure the fonts are actually IN the folder! You know I’ll be doing just that later when I’ve recreated my font collection… and backing up everything else too. Time to make some good habits.
![]()
Hi Jan
One of my tasks at work is to create procedures and training materials so I use a lot of screen shots in my procedures and best thing I’ve found to capture screen shots is the Snipping Tool which is a Windows app. Perhaps it will work for you? It does say it’s going to move and that I should be using Snip & Sketch. But it’s been saying that for months now. I haven’t tried that because I like the Snipping tool. And I don’t like change 😉
I didn’t try the snipping tool this time, but I will next time! The process I used today was way too involved! My old laptop was a one-click deal, with the screenshot sent to a folder as a .png. The whole click>open an app>paste the shot>edit and enlarge was a real hassle!
Good to hear that you are slowly getting things up & running!! How nice that you have a 17.3 screen. When my laptop died, I went from that down to a 15 — my eyes wish I still had that bigger laptop; but the upside — so much lighter! Thanks for the tip about copying the font folder … I didn’t realize that you could copy a folder & the contents might not get copied. I generally check to see that everything is in a copied folder by checking the properties of the original folder & the copied folder … but now I am going to make sure that I check it!!
I got really lucky with this new laptop. Because the old one was a gamer, it was SO heavy. This one is actually lighter.
Like you, I didn’t realize it was possible to copy a folder without copying the content. It took me literally all day and evening to locate, download and install most of the fonts I had before. Again, it also was an opportunity. There were a few that I didn’t install after taking a good look at them, and there were a few new ones that I grabbed.I ended up having to pay for a copy of King Basil that I’d gotten free from the Hungry JPEG; I have some commercial canister labels using it, and I need to be able to create some custom ones for my new pantry… Now I’m just working on dingbats, then I’ll be making a verified backup of all of them. I’ve got to say, I hate being the horrible example!