Which Template Format is Best for You?
![]()
Let’s see how smoothly this goes. The new laptop is all set up but I’m still getting used to how it works. Forgive the haphazard formatting of my screenshots, I’m also learning to use a new version of Photoshop Elements. One thing I was thrilled to learn is that I can screenshot the little pop-up messages I see when I hover the cursor. That’s going to be helpful with tutorials going forward. You’ll see a couple of examples today!
Tanya posted this comment on last week’s tutorial:
Jan, I was wondering about template files and if you could answer my questions on those because designers list many different formats and I don’t know which is best to keep. TIFF, PSD, PNG. If you can do an upcoming article on the differences and I guess advantages or disadvantages of each type. Since it’s basically the same information, I want to optimize what I actually use storage space for. If you have already done this sort of tutorial, can you link up in the comments instead.
First, why are templates so popular? Easy! They make Working Smart Not Hard so easy! They give you a roadmap to build your layouts upon and tell you where everything goes. You can whip up a beautiful layout in very little time and if speed’s your thing, templates should be in your arsenal. But templates are NOT engraved in stone and they don’t stifle creativity, because you can do whatever you want with them.
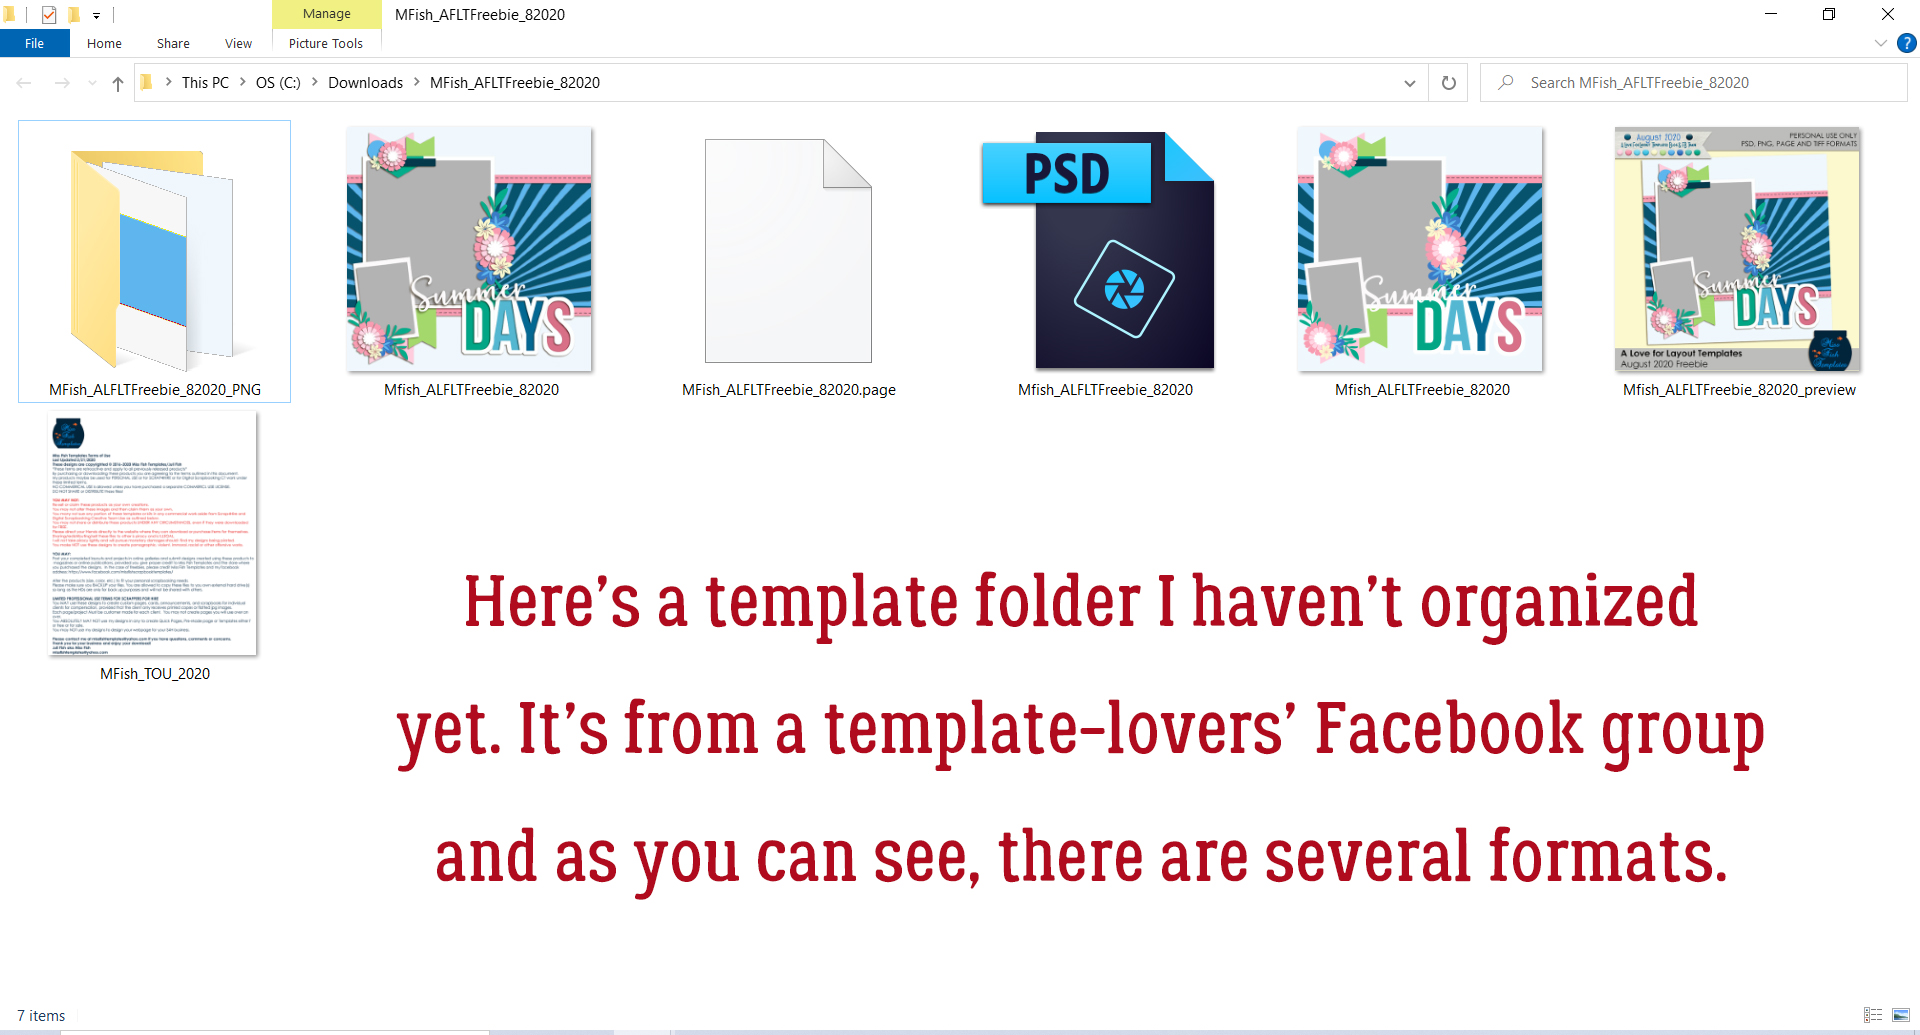
I know I’ve talked about template formats before, but mostly in passing rather than directly. So today we’re going to look them a little more closely. I’m sure when you first started digi-scrapping, you opened up a template download and just looked at the contents in confusion. Below is an image of a template download I haven’t yet organized with my own preferred method (and yes, I DO realize it’s a year old). The only thing I’ve done with it is to extract the contents. As you can see there are a bunch of things in it: a folder labeled with the file tag PNG, an image of what the template looks like, a blank sheet of paper with the file tag .page, a Photoshop icon, another image of what the template looks like and a folder label/preview. We’ll start with the PNG folder and work our way through the template download left to right.
PNG refers to Portable Network Graphic. You’ve seen that tag on literally every element in your digi stash. PNGs are on transparent backgrounds and can be manipulated in a lot of ways. When talking about templates though. this is the most versatile format in that it’s usable on any platform. About the only thing that matters is that they show the location of an element on the finished page. Look below; each of the PNGs in the folder is on a 12×12 transparent background. And there are LOTS of them. In this template they’re numbered in reverse order from the top down. The very last PNG is the background. This method of layout building would be a real challenge for me because a) I work from the background out and b) Elements needs a “pin” for layers, something that tells it where in the layer stack a newly added item goes. It would be quite frustrating for me to have to continually reorder layers but if it’s what I had I’d make it work.
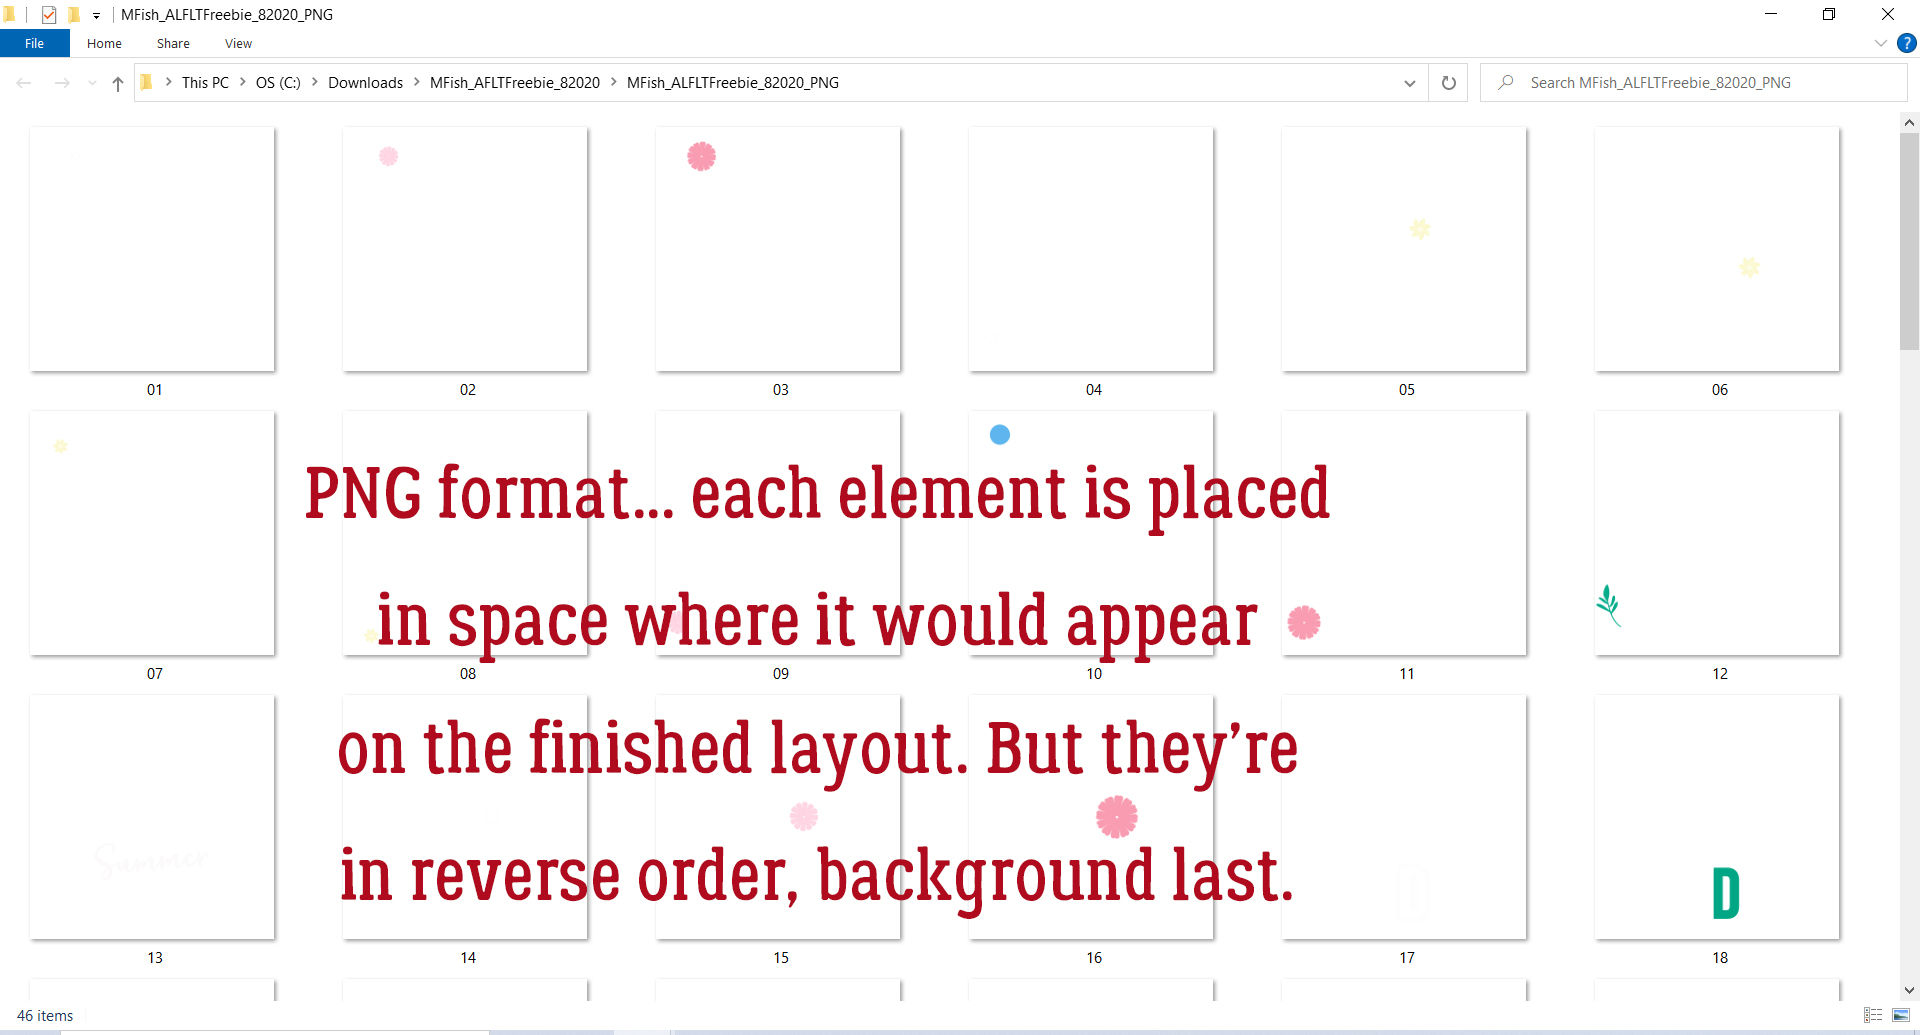
Here you can see what I mean about order. This is PNG #1, but it’s the very top item on the page – the centre of the flower in the upper left of the layout at the top edge of the larger photo. The PNG layer shows the use where on the page to put the element it’s a placeholder for.

Here you can see a couple of the layers I’ve created from the PNG files. Some layers aren’t visible, as you can see. Using the PNG method of layout building, you’d stack all of them in the correct order into layers, then replace each object with your chosen object. Then the PNG layer you’ve just replaced is either turned off or deleted.
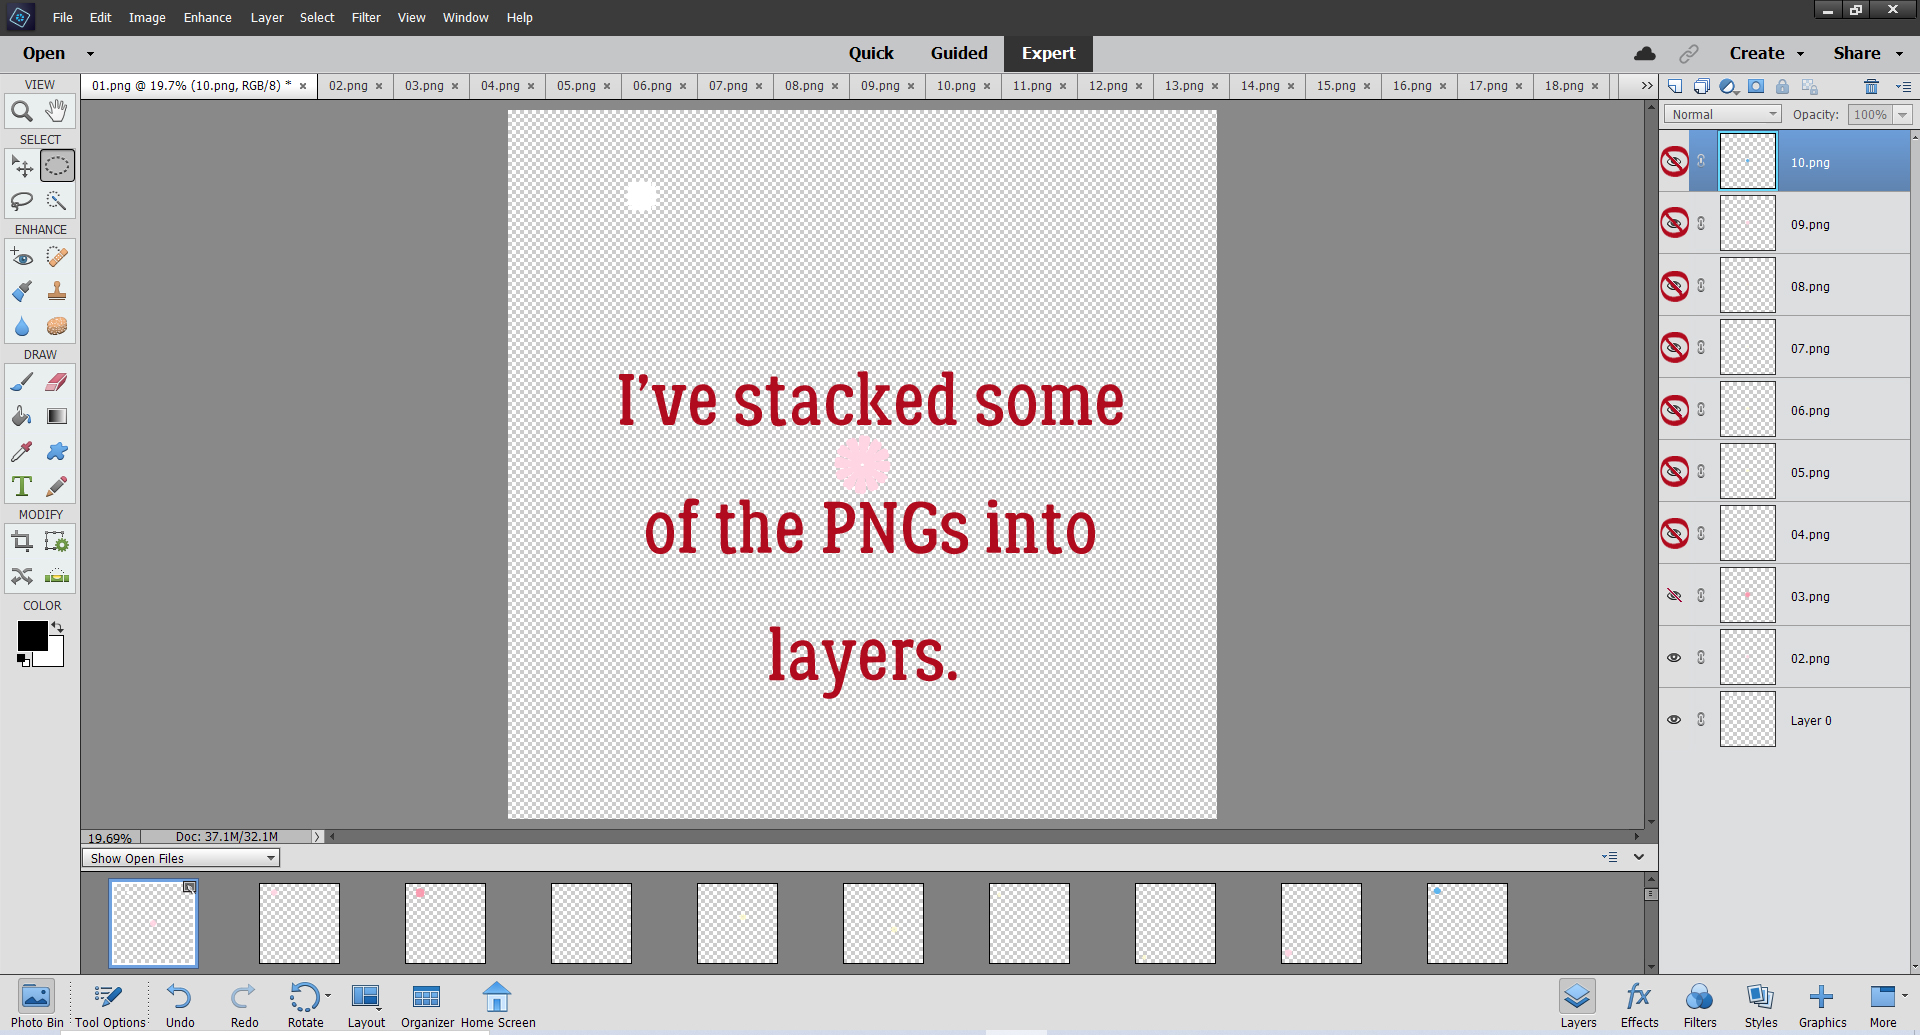
There are more layers visible in this image. As the text describes, I’ve reordered them in numerical order to have them layering properly. In retrospect, what I’d do when using PNGs as a template would be to just stack them in reverse order to begin with, starting at the end of the queue and layering as I go. That may eliminate some of the “pinning” issues. Having a transparent background behind each of the PNG elements means PSE has no sense of how to layer things; it needs some sort of fully opaque reference or pin to orient itself.

Next in the folder is an image of the template. It’s basically a preview of the template in JPEG format – Joint Photographic Experts Group. (Don’t ask me how they came up with that as a file name. I don’t know!) It’s how we most commonly save our photos and finished layouts; one thing to bear in mind when using this format for any purpose is that it’s a “lossy” proposition. This format compresses images somewhat, and in compressing, some of the detail is lost. Each time you make adjustments to a JPEG and save it again, you’ve lost a tiny bit more of its clarity. I do like to have a 600×600 pixel JPEG of my templates to use as a “shopping list” when I’m deciding what I want to include in my layouts. For that purpose I’m not worried about sharpness.
The next item in the template folder is tagged as a .page. This format is supported by a very limited number of applications, like Storybook Creator and Artisan. I won’t pretend to know anything about this format, so I’ll link you up with a tutorial if you’re just learning either of those applications. Kate Hadfield has a good one here.
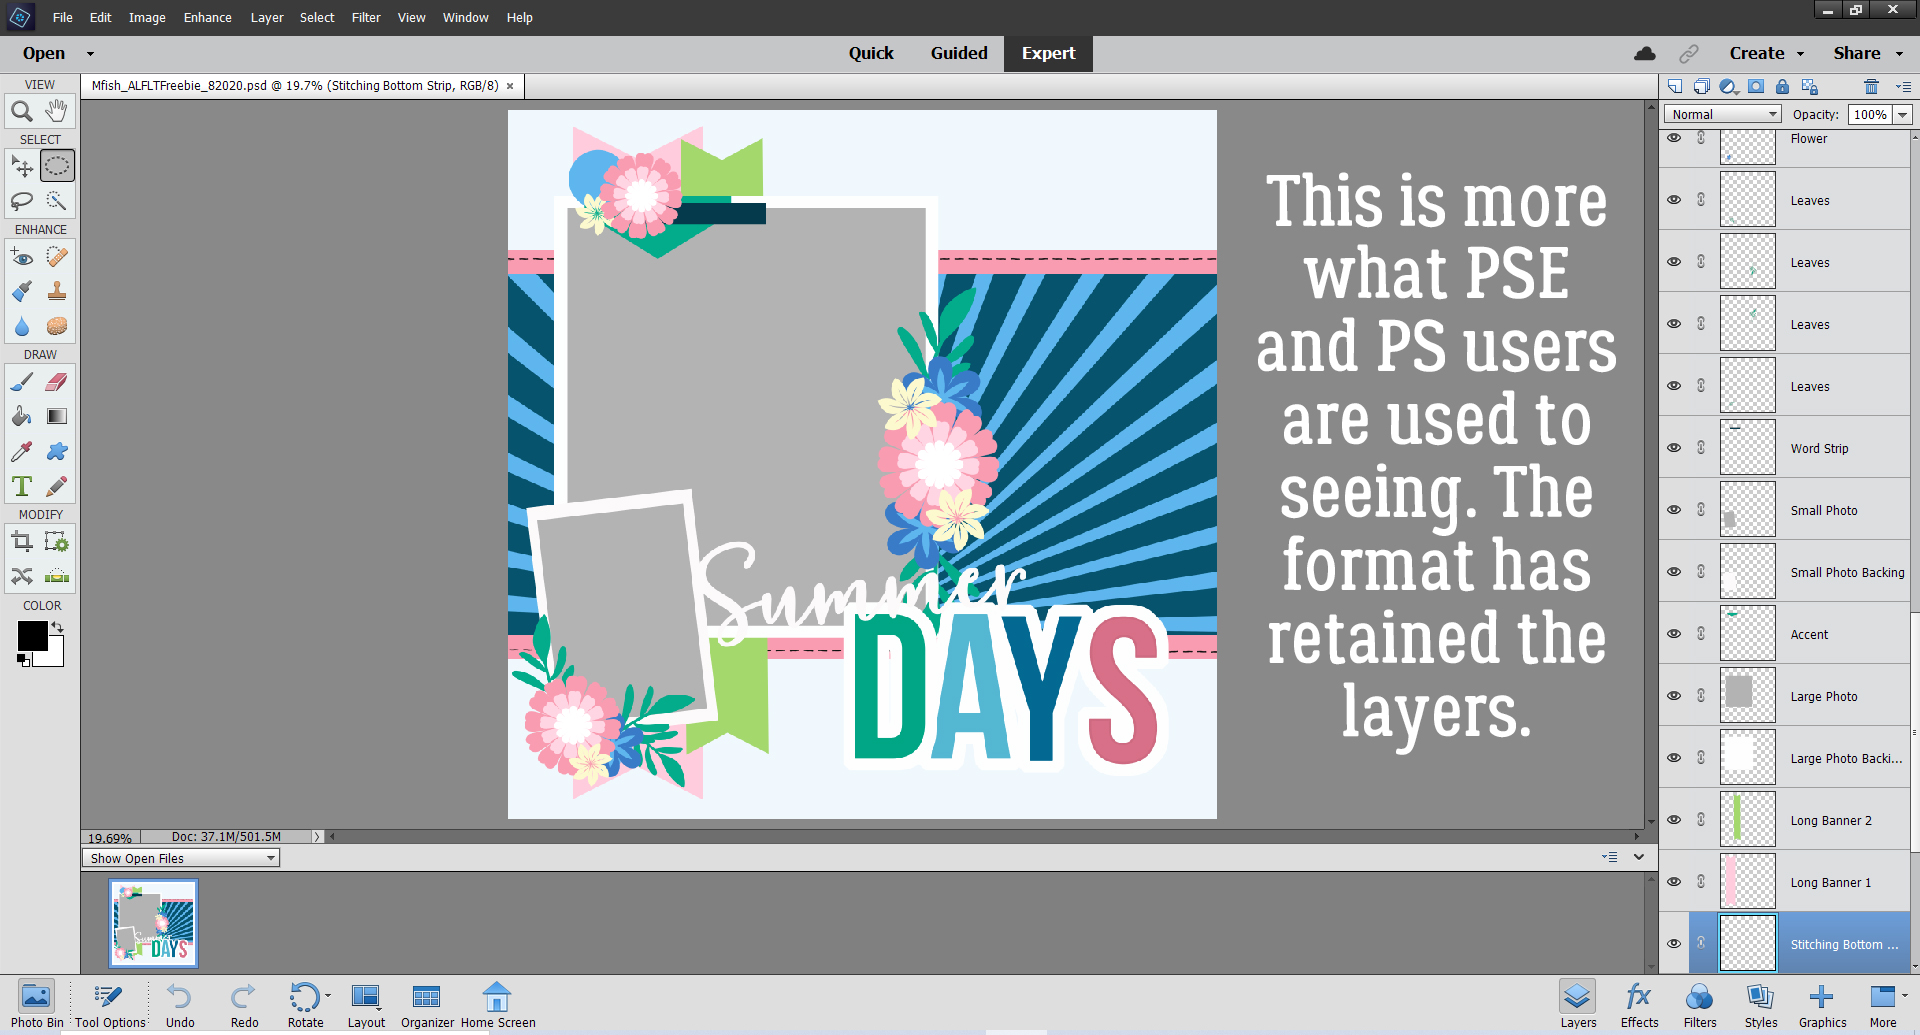
Ah. Now we can talk about the format I use ALL the time! PSD – Photoshop Document – is an Adobe Photoshop/Photoshop Elements proprietary file type that won’t open in other applications. It creates a fairly large file, in this case it’s 7.04 MB.
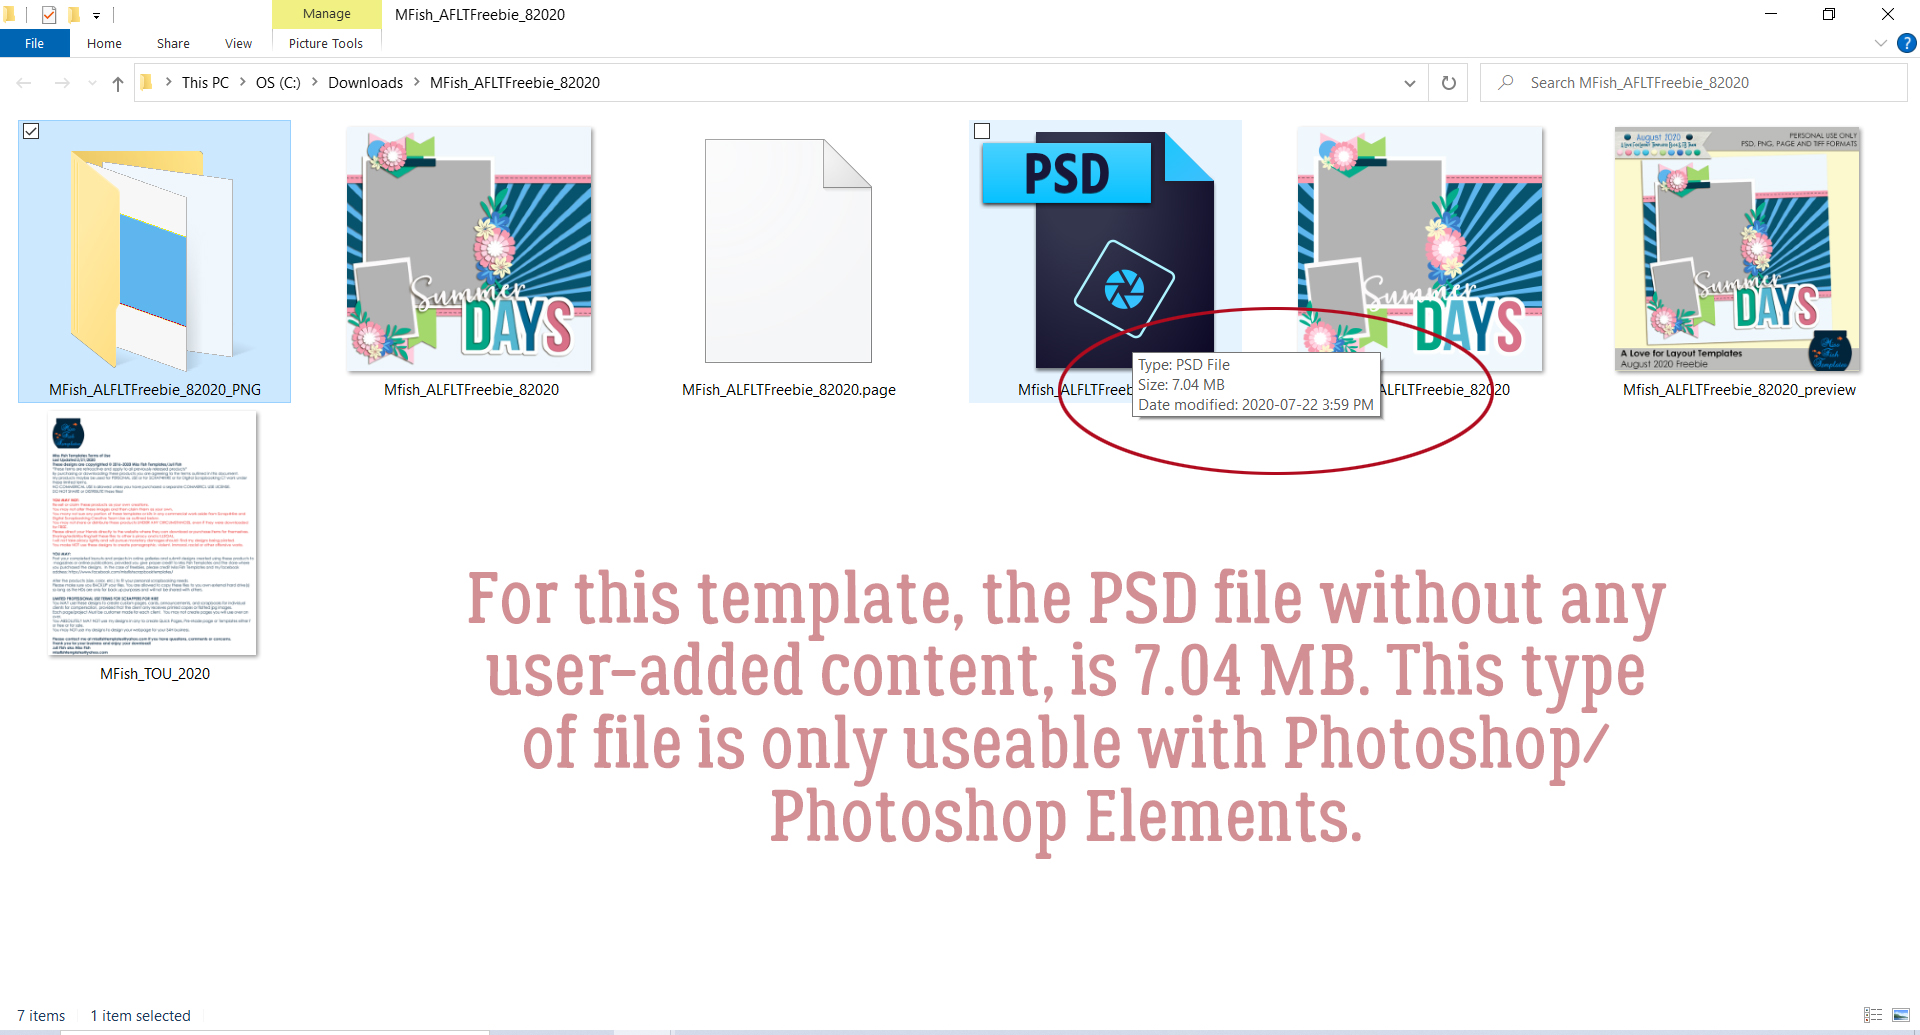
This format preserves all the layers and all the adjustments that have been made to those layers; this includes layer masks, fill layers, blend modes, opacity changes and layer styles, including drop shadows. That’s why the files are so weighty. When you save your layout in this format, you can go back any time and make changes – let’s say you’re planning to print your layout and you see a huge, obvious spelling error that you CAN’T leave. No problem. Open up the PSD, correct your spelling and save the corrected version in whatever format you want.
Okay, I’m going to admit I had to do some research on TIFF files. TIFF stands for Tagged Image File Format. These templates are considerably smaller files than PSDs; this template is slightly less than half the size at 2.91 MB. Many scrappers choose to only keep and use the TIFF format to save space on their hard drives.
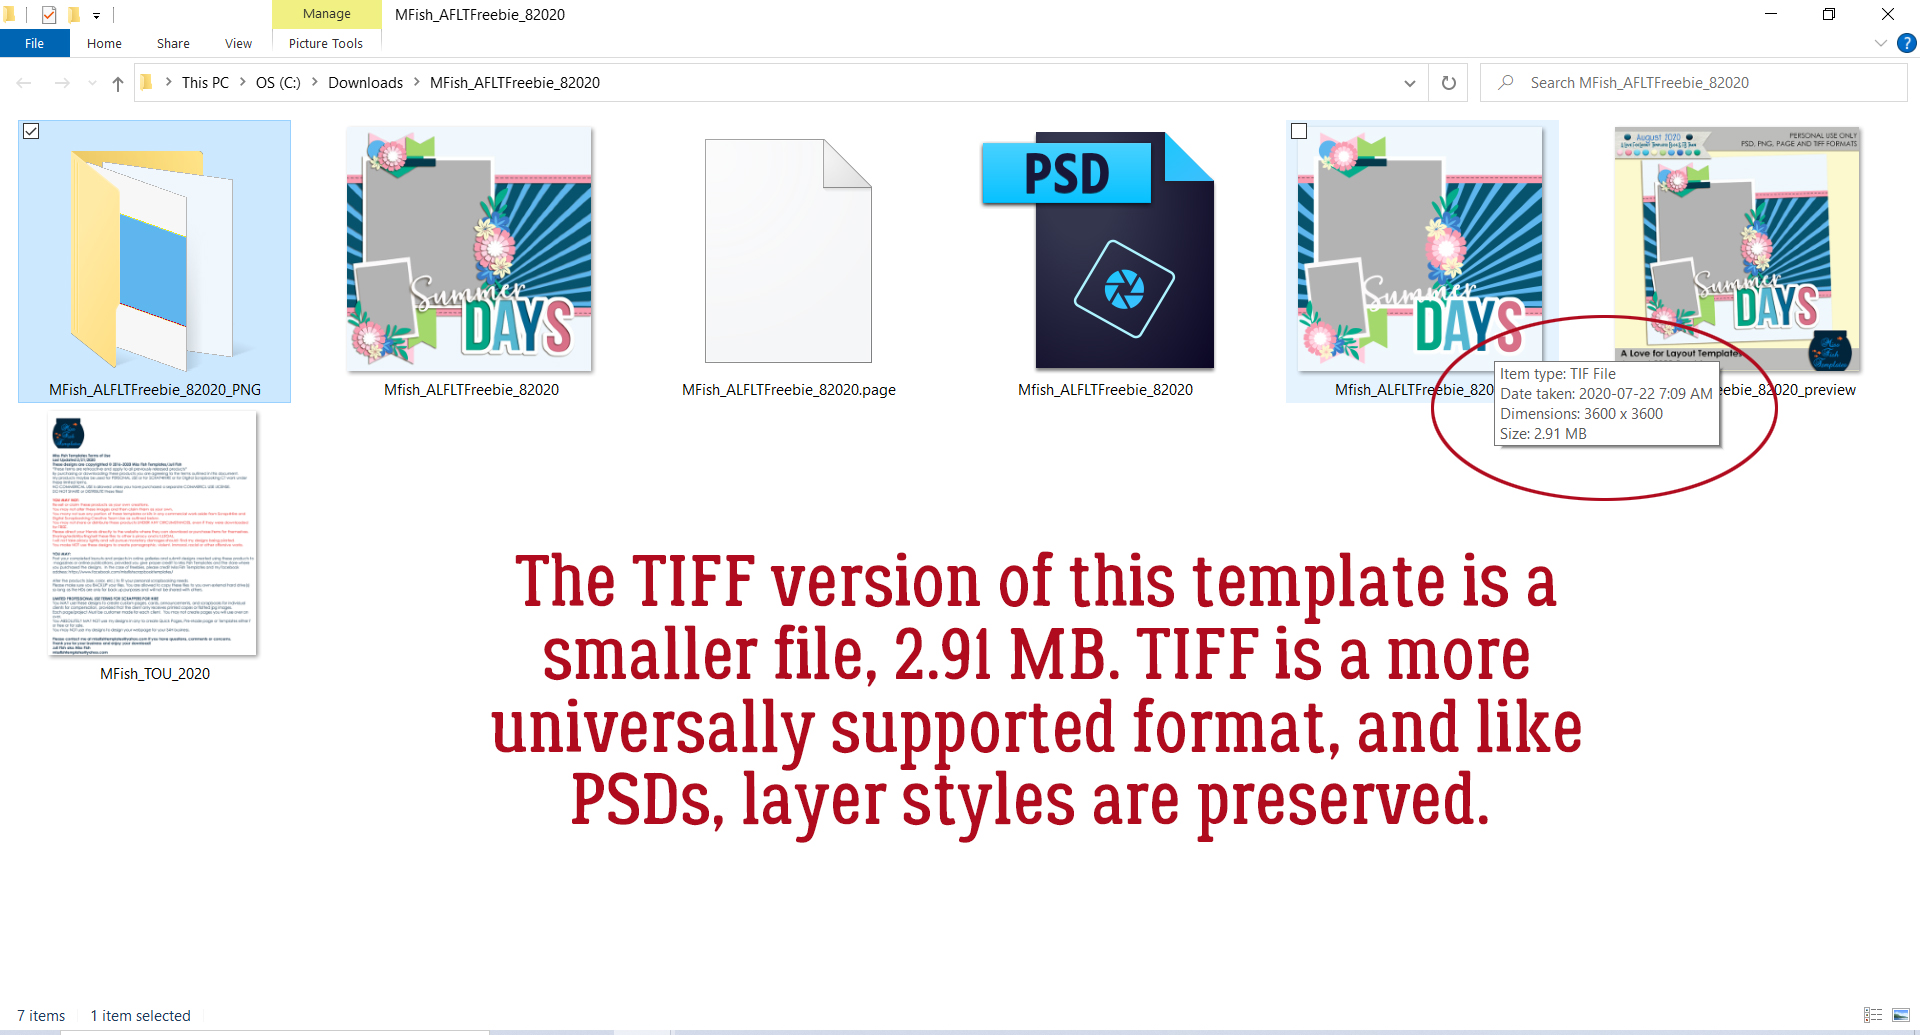
In some ways they’re like PSDs, since they can also preserve layers and layer styles, you use them in a similar way to create layouts and neither format can be displayed as is on web platforms. UNlike PSDs they’re not proprietary and are supported by a broad range of graphics applications.

When saving your layouts as flattened (all layers merged) TIFFs rather than JPEGs, using LZW compression doesn’t result in a loss of image data, thus maintaining more sharpness and detail. This is the best way to save your layouts for PRINTING, but not for online posting because, as I said a moment ago, this format isn’t compatible with online display.
The second-to-last item in the folder is a cover page/folder label preview image. I usually don’t hang on to them but I know there are a lot of scrappers who use them. (I’d rather save the hard drive space for my PSDs.)
Last, but not least, there’s a terms-of-use document where Juli (Miss Fish) tells people how they can (legally) use her templates. Very important information!! I typically only keep one copy of each designer’s TOU, since they don’t change much over time.
So there you have it. File formats in a nutshell. I hope these descriptions help you understand them better and help you decide which format will work best for you. Happy scrapping!
PDF Version: https://bit.ly/3lpO22x
![]()