Guided Edit: Perfect Landscape
![]()
PDF Version : https://bit.ly/3GDI35u
By popular request! Let’s get this one off on the right foot from the start… this Guided Edit wasn’t available until Elements 2021 launched. If you’re using an older version of Elements (2018, 2019 or 2020), you’ll have to use the old-school method I showed you here. Anything older than that and you’ll have to manually extract the sky, find a sky overlay and add it on. Much more work. 🙁
Landscape photos can be stunning, or they can be kinda blah. Uniformly gray skies can provide great saturated colour to objects in the foreground, but overall, they can make for a pretty boring image. Most of the photos I took while in Ireland have a blown-out almost white sky. But now, with the Perfect Landscape Guided Edit, I can do something about that, fairly easily too! I’d already used my usual editing arsenal on this image – there was a car in the original photo! – but that sky drags the whole thing down. Let’s fix it!

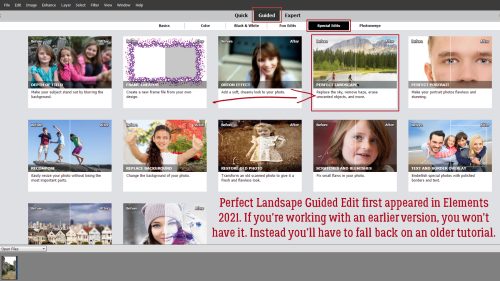
You’ll find this marvel on this path: Guided>Special Edits>Perfect Landscape. Elements uses Artificial Intelligence for this Edit. It seems to be fairly competent at it too.
This is what the Perfect Landscape interface looks like. Because I’ve already edited the photo before, I’ll skip over the Crop, Straighten and Remove Haze tools. They’re pretty much self-explanatory and/or have been featured in other tutorials. I’m going right to the Choose a new Sky toolkit. There are 16 different sky options here. Experiment with them to see what will look best with your particular photo. To undo your choice, just CTRL/CMD>Z.
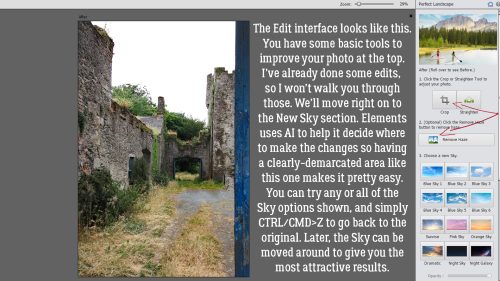
What do you think of this one? I know, right?! [Please ignore the typo in the image. Ta!]

This is the progress bar for the analysis part of the Edit, while AI is working. It’s deciding where the sky is and judging how bright to make the replacement sky.

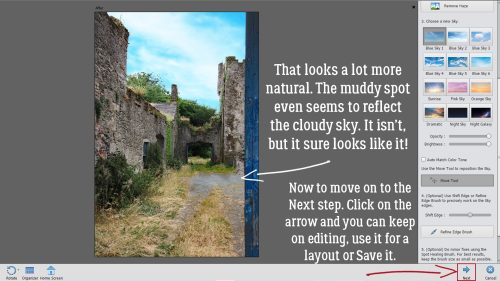
Here you can see I’ve chosen the very first option from the palette with the Opacity and Brightness at 100%, and the photo looks better. But not quite right. There are a few adjustments that can be made manually, so let’s look at them.

Watch closely when you make adjustments. Every time. You need to see what’s happening so you can decide how much of a change the action is creating and if it actually looks better or worse. Ticking the Auto Match Color Tone box made the entire image darker and the details less visible. It’s a no for me, dawg.

When you hear about how much it rains in Ireland, it’s not an exaggeration. They have a lot of “soft days” – when it’s drizzling. In my photo there’s a muddy area just in front of the opening in the back wall. So maybe I should move the sky around so there are a few more clouds, to give the impression that a storm has blown through and the ground is drying. The Move Tool button activates the layer with the sky on it so I can do that.

That’s better. Because the AI worked flawlessly, I don’t really need to make any more changes to this one. So I’ll click Next down at the lower right corner of the canvas to the next menu.
I’ll Save As this image as an edit of the original, but I’ll do it in the Expert editing area. I might decide I want to use the photo right away on a layout.

I wanted you to see all the steps Elements took in the background. You can see the first thing it did was to isolate the sky area. Then came a gradient layer, the sky image layer, a brightness adjustment layer then a mask that concealed all but the sky area. Last is a composite of all the layers. Because the top layer is a composite, adjusting any of the other layers makes no change to the end result.

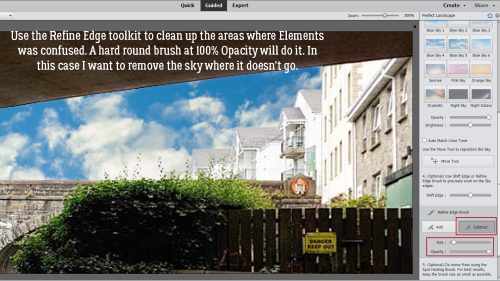
So. What happens if part of the photo is mistaken for sky by the AI bot? In this photo, the buildings along the upper right are bright white, just like the sky. So our AI bot was confused and added sky to them. How can that be remedied?

Easy! Use the Refine Edge toolkit. I want to remove the sky from the buildings, so I clicked on Subtract and using a smallish, hard, round brush at 100% Opacity I erased it from view. if you’ve used any other brush just prior to doing this edit, you’ll run into trouble so click through to the Expert Edit, check the brush and then click back to the Guided Edit. I could pretend that I did this on purpose so I could tell you it works, but that would be a fib… I had the arrow brush I use on my screenshots active and it was a MESS!
There are still a few things I want to adjust on this image. For example, the water under and in front of the bridge should reflect some blue and cloud, and the area under the arch in the foreground would probably be a bit lighter and brighter with a blue sky. But I think it’s all doable.

My tip for making this easy and quick: Choose a photo with an easily identified sky and let the software do all the work!
![]()
I changed the sky the “old fashioned” way in a photo of my daughter & family in front of the Eiffel Tower. It was about 9 or so years ago, the sky was gloomy gray, and parts of the Tower blended into the gray sky. It took a bit of work, but I extracted the Tower to contrast with the cloudy blue sky (my own photo) I subbed. I think it all looks authentic! Thanks for this tut. I may find the original picture I changed and use this method to see how it works!
Oh, I hope it works for you!
Nice tut! I have a lot of landscape with washed out sky. I have 2 observations for anyone trying this.
1. if you have a few trees in the photo you may loose branches in the sky. They will either be “thinned” out or completely gone if the branches aren’t thick.
2. If there are a lot of trees, like a winter scene or something like that, double check the tree outlines. I got a lot of halo around the trees. (the sky wasn’t changed at all)
Best to find landscapes with limited trees or “lacy effects”)
Good points, Ellen. The missing branches issue can be overcome by using the Refine Edge Brush and “adding” them to the selection. Lots of Zooming and careful brushing will preserve them. As for the halos, using the Shift Edge tool will help with that. I’d shift the edge a few pixels so the selection is inside the outline just a teeny, tiny bit then see what it looks like. If the halos are worse, then reverse the shift!