Going Right Back to Basics: Preferences
![]()
PDF Version : https://bit.ly/3OFlCRH
I’m glad I showed you all how to make your thumbnails actually work for you. Now I think it might be worth it to walk through ALL the settings that might make your scrapping more fun, less frustrating and you more productive. So let’s talk about Preferences.
To make this tutorial as useful for beginners as possible, I reset all my Preferences back to the Elements defaults… which don’t work for me in any way. You’ll have to Edit Preferences when you upgrade to a more recent version of Elements, or when you change computers, so maybe bookmark this for the future. 😉 We’re going to work our way down the list.

These are the basic or General settings. You have control over what Elements will use as a Color Picker, the keys used for Undo/Redo (CTRL/CMD>Z and CTRL/CMD>Y) and a host of other options. You can change any or all of them, but be careful. If you change something you end up not liking, you might have trouble remembering what it was.

These are my preferences. As you may already know, I really don’t love Smart Objects, so I Disabled them. On the other hand, I DO like to have the Move Tool activated when I commit to my text so I can position it properly. A lot of people DON’T like that so here’s where you get to decide. The other settings depend on your level of comfort with your computer, what you’re used to with other software and how you manage your workflow. One tip I can offer is about Enable Soft Notifications. This setting will give Elements the ability to warn you if you’re making a mistake, but it can be a PITA when it keeps asking you if you’re sure you want to delete a layer or resize an element. Lastly, only click on that Reset Preferences on next launch, because it’ll literally put you right back on Square One. For EVERYTHING.

Saving Files is next. Here’s where you decide how much you want Elements to do automatically when you’re Saving a layout or a photo. The headings are reasonably self-explanatory. Remember that if you Save Over Current File, you’ll end up losing the original, and that’s not a good idea. Especially with heritage photos. Also pay attention to where the files are being saved. If you’re a folder person like I am, but sometimes open a template from its original folder, when you go to Save your finished layout, you might never find it again! Elements will put it in the template folder, not the layout folder. Don’t ask me how I know these things.
Here you can decide if you want to save your Image Previews. Consider how much storage you have when you make this choice.

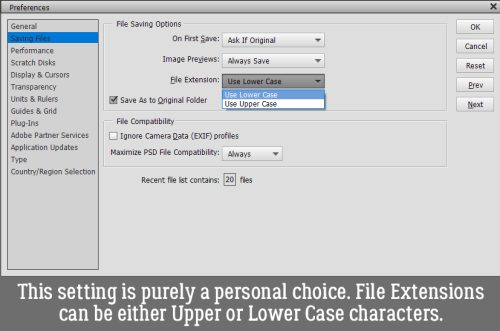
This setting may not be one you care about at all… whether the file extension (JPEG, PSD, PNG) is in upper or lower case letters. Feel free to skip it.
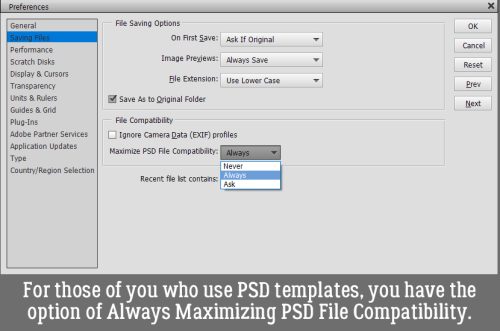
I do think this setting matters though. I ALWAYS want to Maximize PSD File Compatibility.
Most of what happens on this screen will depend on your computer. Elements will analyze your your system and set defaults according to the size of your hard drive. Graphics use a LOT of hard drive resources. You can decide how much you want to sacrifice speed for utility. Personally, I like those 50 History States and 6 Cache Levels so that I can UNDO a ton when I’m working on these tuts! But for that I pay the price.

Most of you will have no idea what a Scratch Disk is, but you should know at least what they’re for. Most software needs somewhere to store temporary files created as it’s used. If you have multiple drives on your computer, you can opt to have your scratch disk go to whichever one is NOT your system drive. If you only have a single drive, like I do, there are no choices to be made.

The Display & Cursors menu gives you a lot of choice over how you see things while you’re working. You choose what your Painting Cursor, your Color Picker Cursor and your Crop Tool Shield look like.
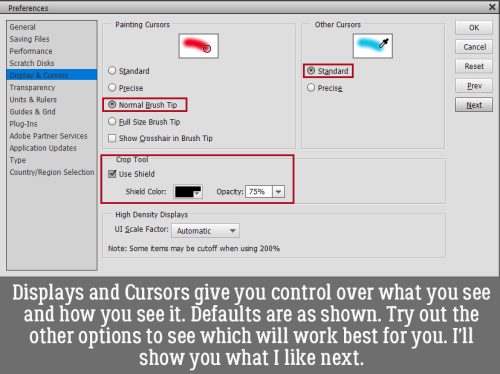
I like crosshairs! When using the Color Picker, I want to choose the exact part of an image that I’m sampling, so my eyedropper is set to Precise.

Just in case you have trouble seeing what I mean, here’s a close-up.

Transparency is a term you’ll remember me using a lot. It’s an important aspect of digiscrapping.

Don’t let anybody tell you Size doesn’t matter! It definitely DOES. Your Transparency Grid should be visible but not intrusive. And Small is going to give you that. Think about the embellishments in your favourite kits. They all have white space around them that is filled with tiny gray squares, right? That’s how you know there’s nothing in the background, and that when you layer them with other embellishments, there won’t be any unnecessary junk in there.

You can also control what you see in living colour! If you’re content with gray, you’re good to go.

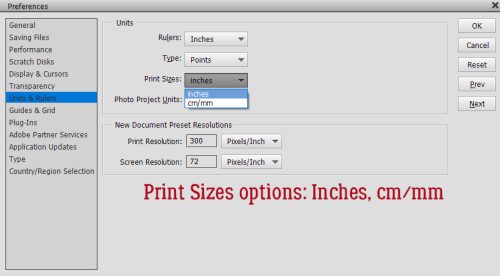
Okay, so this is one of my MUST-FIXes. Canada has been using the metric system since April 1, 1975. I was living in Minnesota then, and obviously, had gotten to my late teens using the good ol’ standard system of measures. Am I comfortable with metric measurements? Sure. But do I THINK in metric? Not usually! So my Units & Rulers can’t be metric.

<insert image that speaks for itself>

Type Units are a bit um… weird. I’m most comfortable with Points, but if you’re used to Picas, or would like a Pixel count, have at it.

Print Sizes isn’t really a choice that needs thought, considering most print processors in North America still function in inches.
For the digiscrapper, Photo Project Units is another meh! thing. But Print Resolution is an ESSENTIAL factor. Always have it set to 300 pixels/inch so you’ll have the crispest, sharpest prints possible. Home printers typically can’t produce that kind of resolution and they’ll tell you when you go to print at home. Shutterfly, Persnickety and Blurb though… they’ll give you great results. Screen Resolution at 72 pixels/inch is plenty.

We discussed Guides & Grids a few weeks ago, but a little refresher won’t hurt.
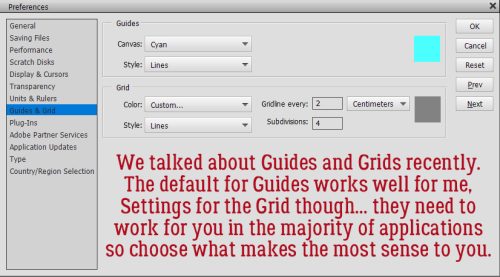
When you use a Guide, you might find the colour you’ve set isn’t really visible enough so don’t hesitate to change it. You’re the only one who will see it! I find cyan works well enough most of the time.

When visibility is the key, you’ll want to choose Lines – otherwise why bother?

For the longest time I had my Grid set to red but not any more. Again, if you find the colour you’ve chosen isn’t working, it’s easy enough to change on the fly. It’s not one of those settings you’ll have to hunt for.

<insert another image that speaks for itself>

See previous comments about units of measure.

In terms of where your Grid lines lie, the best choice is the one that makes sense for you. I like the notion of old-fashioned graph paper, with a heavy line every inch, divided by fourths. That lets me work without having to make any calculations. 😉

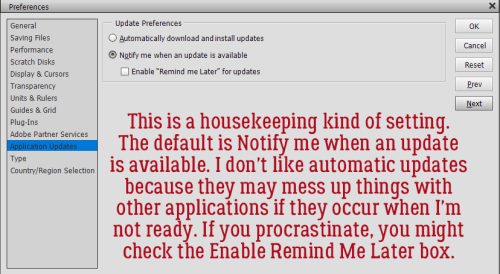
I skipped Adobe Partner Services, since the average Elements user who dabbles in photo editing and digital scrapbooking isn’t going to be bothered with those. But Application Updates needs attention. I HATE automatic updates. I want to consciously participate in updating my stuff. Too many times my laptop has restarted in the middle of the night and wiped out something I had open on my desktop. (Bad habit, I know.) I usually have Family Tree Maker open all the time and work on my branches when the notion strikes; it resents those improper shut-downs. Anyway, you do you here!
Omigosh! These might be the most important settings of all!! Type Options have a gigantic impact on the text parts of layouts. Smart Quotes drives me crazy, so it’s history. Asian Text Options lets you use the extra characters that come with some fancy fonts. And who doesn’t want a JUMBO Font Preview?
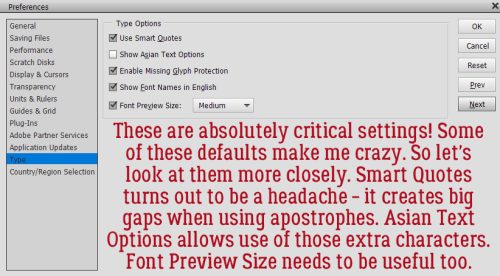
Enable Missing Glyph Protection came into play in more recent versions. If you see it, tick it! Who hasn’t been merrily journaling away with a cute font (like the free ones used for the Font Challenge) only to be punted into Myriad Pro when it’s time to add some punctuation? But if you have the option to Enable, you’ll get a gap where the punctuation would be and your font wouldn’t change. Then later you can choose a font WITH punctuation that coordinates with your original font so it looks intentional.

Lastly, Elements wants to know where you are so you can be directed to the correct Adobe website for things like help, updates and upgrades.

Now, since I reset everything so I could walk you through the Preferences menu, that means everything else was reset too. Where did my Layers Panel go?? There are at least 3 ways to access it. The easiest is to just click on the Layers button at the bottom right of the workspace. Another is Window>Layers and the third is a keyboard shortcut: F11.

I also like to have the Rulers there so I can align and resize things appropriately. That’s why the Rulers units matter… Click View>Rulers or CTRL/CMD>SHIFT>R to get them on the workspace.

View>Snap To can be useful, or a curse. For now I’ve got all the options set. Will it stay that way? Maybe.

The very last thing I recommend to beginners is to untick that Auto Select Layers box. Why? Because Elements is going to grab whichever layer your cursor is on, not necessarily the layer you’ve got active in the Layers Panel, and your next action might be something you really didn’t want to do. Or you can live dangerously.

Can you think of any settings you’ve customized that I haven’t touched on? Let me know!
![]()
Thanks for going through all this, Jan. I do have my favorite preferences & when I have upgraded or changed computers, I often forget to recheck my preferences — plus I sometimes forget what they are! LOL!! & I wonder why the newer version is doing what I am used to. I really should write my preferences down somewhere!!
I appreciate you sharing what your preferences are! 🙂
I can relate! I’ll be ticking along, thinking I’ve got everything set up the way I like it, and WHAM! Some random thing I missed punches me in the face. And it’s usually when I’m tired and trying to get something finished so I can go to bed.