Ink Smudge Technique for Photos
![]()
PDF Version : https://bit.ly/3SWPxqJ
Spoiler alert: This technique is an advanced one, but hopefully I’ve made the instructions clear enough that it’s achievable by everyone. Hence the huge collection of screenshots……
As I mentioned last week, Karen is trying to stay busy and has been looking online for new things to try for her digital scrapbooking repertoire. She came across a YouTube video showing a beautifully manipulated photo and wanted to try it for herself. But the video host’s accent was really heavy and he moved through the steps really quickly and soon she found herself lost. AND he was using Photoshop, not Elements – where terminology is different and some options and tools aren’t included. She uses Elements, so she asked me to look at it. I watched the video 3 times, watching what he was doing more than listening to what he was saying, before I ventured to try it. Then I did 3 dry runs, consulting the video as needed, before I started screenshotting my work. Ready for a workout?
Another caveat: There are steps in this technique that weren’t available in Elements until version 15, so if you’re working with an older version, I’m sorry, this one isn’t for you. As usual, I’m including commands for both Windows and Mac. I work in Windows, so that goes first. 😉
First thing is to choose a photo to manipulate. I looked at thousands at Pixabay and almost chose a photo of a cheetah, but then I found this one from Jerzy Gorecki that I really like. Portraits are most effective when the eyes are the focal point, and for me, that’s what I see here. Next, I hunted for some ink smudges or smears in my digistash. I found a bunch, all from the talented Connie Prince. I chose one from Hakuna Moscato and one from My Lucky Stars. And then… I discovered as I was doing my dry runs that PNG-format ink smudges don’t work for the technique. At all. They have to be JPGs. I converted them so I could keep going, but YOU could use brushes in black on a white background, then Save As a JPG and go with that.

It’s a good idea to get in the habit of doing techniques like this on a COPY and not the original, just in case something goes sideways. Right-click on the layer then choose Duplicate Layer.

You can change the name of the layer to keep them straight; you want the Copy layer to be with the original so nothing needs to happen with the Destination Document. Then click OK. If you’re into keyboard shortcuts, you can skip these two steps and just use CTRL/CMD>J.

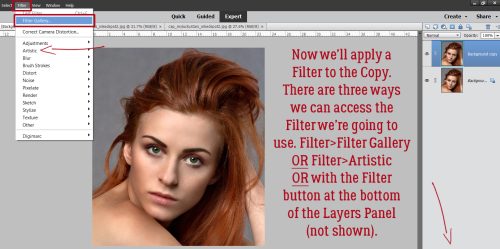
Filters are marvelous things. I highly recommend playing with them sometime so you can see what you can do with just a couple of keystrokes. But for right now, Filter>Filter Gallery>Artistic will do. Or Filter>Artistic – skip a step. OR… click on the Filters button at the bottom of the Layers Panel. They all end up in the same place.

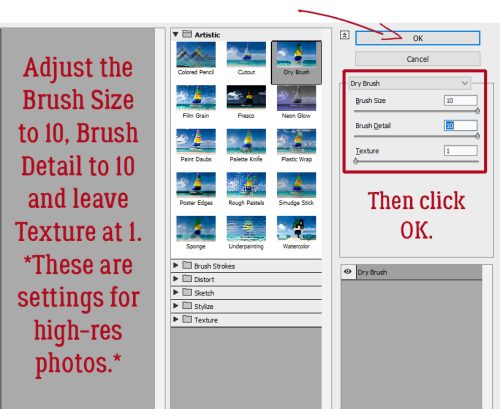
The Filter we’ll use is the Dry Brush.

Any adjustments to the Filter will depend on the resolution of the image you’re working with, as well as how much you want to alter the image’s appearance. This photo is pretty sharp, so I went BIG, with a Brush Size and Brush Detail of 10, but I left the Texture at the default 1.

The effect isn’t really obvious, but trust me, it’s there. Now let’s drop a New blank Layer on top of the photo layers.

Fill that new layer with white with the Paint Bucket.

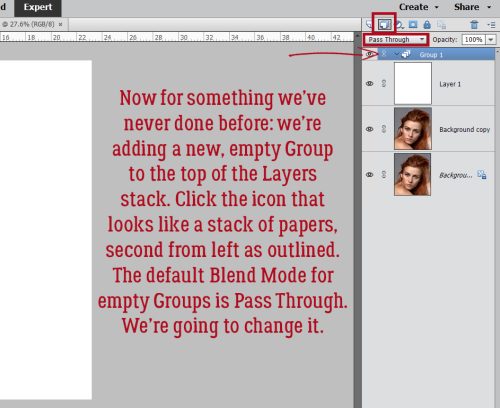
Ready for something we’ve NEVER done before in any of my tutorials? We’re going to add an empty Group to the Layers stack. This is what will let us get the special effect on the image in the end. Click on the icon that looks like several sheets of paper spread out on a table, second-from-left at the top of the Layers Panel. The default Blend Mode is Pass Through, and we’ll need to change that.

The Mode we want for the Group is Multiply.

We’re breaking a lot of new ground with this tut! Now we’re going to add a Layer Mask inside the Group. Click on the icon that looks like a blue square with a gray circle inside it, fourth from the left at the top of the Layers Panel. See how the new layer with the mask is indented? That’s how you’ll know you’ve put something into the Group.

Now go back to the Copy layer that we added the Dry Brush Filter to, down there second from the bottom. Click Select>All or CTRL/CMD>A. That will Select the photo and the Filter.

Next, click on Edit>Copy or CTRL/CMD>C. (See the marching ants around the outside of the photo?)

Move back up to the Layer Mask up there at the top of the stack. Hold down the ALT/OPT key and click on the Mask thumbnail. Then Edit>Paste or CTRL/CMD>V.

Now you know what that Mask will do… the photo turned to black and white. It needs a tiny tweak before we go on. The contrast needs some help. Enhance>Adjust Lighting>Levels or CTRL/CMD>L.

Go for drama with this step. Move the sliders on the histogram toward the middle. Watch as you adjust so you know when it’s right.

Now we’re going to turn the black and white image into a negative by first Deselecting the Mask (CTRL/CMD>D or ESC) then click CTRL/CMD>I.

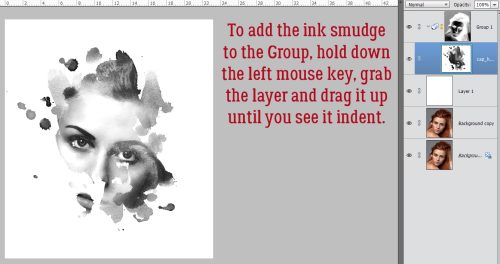
Drag and drop one of your ink smears onto the canvas on top of the white layer. See how it completely hides the Mask?

Not for long! You can use CTRL/CMD>] to move it up the Layers stack and into the Group, or you can drag it up there. That’s all it takes to have some of the photo show again!

Here’s where you get to play around with it! Resize the ink, Rotate it, Reposition it, move it about until you like what it’s showing.

But first things first. Let’s change the Blend Mode on the ink layer to Multiply too.

Now I’ve added my second ink smear onto the canvas and made sure it’s inside the Group. It’s obscuring the photo though. See the edge of the “paper” background?

Easy fix!

I think I like it. Most of her face is visible, her eyes are sharp, so let’s add some colour back!

We’ll need another Copy of the Dry Brush layer for this step.

The new colour layer needs to be on top of the whole stack. There are a few ways to do that. One is to click Layer>Arrange>Bring to Front. Another is to hold down the CTRL/CMD key and use the ] key to jump it up there. Or grab it in the Layers Panel and drag it!

Some steps just don’t screenshot. This is one of them. Yeah, I’ve added an Inverse Layer Mask to the colour photo layer I just dragged to the top of the heap. That’s how the colour is going to get into our image, so let me tell you how I did it. After the photo layer was positioned, I held down the ALT/OPT key and clicked on that same Layer Mask button – the one that looks like a blue square with a gray circle in the middle. That’s all!

Then I used the Brush Tool and some Ink Blot Brushes to bring the colour up. Don’t have any ink blot/splatter/smear Brushes? Check out Brusheezy.com!! They’ve got a ton of free Brushes and 98% of them are Elements-compatible. For this step be judicious. Drop the Opacity to 40-50%, no stronger. I think I used 3 different Brushes, sized fairly large, and just clicked them one time over a part of the image. Don’t forget that you can go into Brush Settings… and Rotate them, squish them and make them less Hard. Don’t be afraid to experiment!
When you’re satisfied with your efforts, you can Merge or Link the layers and Crop the image. It’ll have a solid background so it can’t be used like a PNG, but it CAN be Clipped to a Mask to eliminate a bunch of the white space and soften the edges. Anything you can do with any other photo can be done with this.

Next week we’ll be looking at Individual Style and a Challenge Spotlight. Where does the time go??
![]()