Greatest Hits: Work Smart, Not Hard!
![]()
Today’s Tutorial first appeared in April 2017 and was the thirtieth tutorial I’d written for GingerScraps. I’m a firm believer in working smart, not hard, so I put together a whole post filled with tricks and tips to make scrapping easier and more efficient. If I’ve missed anything that I’ve come up with since, I’ll add them in!
Here are all my Work Smart Not Hard tips and tricks in one place. We all have busy lives and could use a little help to streamline our workflow. So we can scrap more layouts, right? Can I get an AMEN??
- Use a template if you’re short on time. They take out the drudgery without eliminating creativity. If you’re like me and have a gazillion templates in your stash, it can be more time-consuming to find the one you want to use than it would be to wing it and build your layout from scratch. I’ve developed a way of expediting my search by relabeling the previews with some key words my File Explorer search menu can track down. It was a gargantuan job to go through all of the ones I already had but it was so worth it! What do I do, you ask? I had to decide what system I wanted to use first. To do that I had to think about how I select them in the first place. I usually choose photos first, so my labeling system needed to reflect that. And although I rarely make 2-page spreads, I thought it might be easier to find what I’m looking for by putting that in the label too. My main categories then are “single#” and “double#”. Then I thought about some other factors that relate to templates and started adding labels like “large” to templates with large photo spots, “circle” and “square” for those predominating shapes, “blend” for templates with blended photos, and “mask” for those with masks. Your labels should reflect how YOU work, so don’t feel like you need to duplicate what I do, just because it works well for me. Do what works for YOU. If you start with the new ones you download and do it as you’re unpacking your zip files, then gradually work your way through your existing collection, it’ll save you a lot of time in the long run.
This is what a search for a “single3” template in my GingerScraps stash looks like:
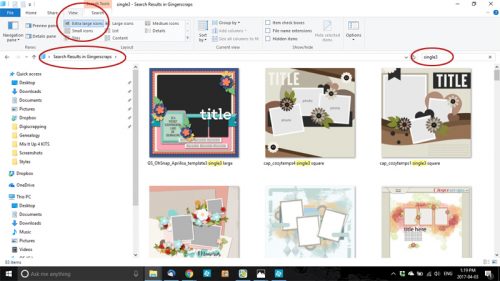
With the extra-large view, I can scroll through the whole list in a matter of a couple of minutes and choose the one that fits my desired photo(s) and kit(s) selections. Right-clicking on the preview image and selecting Open File Location takes me to the folder where the template lives. And away we go! (P.S… keyboard shortcuts to follow in a single list.)
- When working with templates, once you’ve added an item onto your canvas and moved it into position over/under the place-holder template symbol, look for all similar items. Duplicate the one you’ve just added and move it up or down the Layers panel until it’s just above or just below the symbol. Then nudge it into position on the layout over/under the place-holder symbol. **If you’re working with a pre-shadowed template, copy the symbol’s Layer Style and apply it to your element BEFORE duplicating, so you don’t have to do each layer individually.** Do this with each element of your template and all that will be left is to create a title and do your journaling. If you’re not using a pre-shadowed template, you can select all similar layers and shadow them with your Drop Shadow Styles (either default ones that came with your software, or those you’ve purchased) all at the same time. Trust me, this will save you a LOT of time! [Editor’s note: IF you’re doing your own thing – no template – and you’ve created a cluster or other assemblage of objects you’d like to Copy to position somewhere else on your layout, you can Select all of those objects by clicking on the first layer, holding down the Shift key and clicking on the last layer, then use the keyboard shortcut CTRL/CMD>J to Duplicate all of them in one set of moves!]
- Speaking of shadows… remember that whatever you’ve typed should never look like it’s floating. Journaling, sub-titles and date labels – anything you use a FONT for – should sit directly ON the paper below it. No shadows. NO shadows. The exception to this rule is if you’ve turned your font into a sticker; then you can apply a very slight shadow to it to show that it’s a sticker.
- And speaking of text… If you’re going to use more than one font, remember to Simplify your text layers as you go along to prevent the software from changing the font on ALL your text layers. This is more than annoying!
- I like to create my titles on a separate canvas. That lets me see what I’m doing without any distractions. I have a general idea how I want it to look in terms of shape and size, so I’ll select a canvas size big enough for me to move things around and see it all clearly. I like to use alphas with or without a font, and it’s nice to see what I’ve got going on without trying to take everything else into consideration. Once I think I have it right, I Merge the individual alphas for each word together then Link all the layers together so that when I move the title onto my layout, everything goes, but I still have some flexibility to adjust placement in order to fit it better into the layout.
- Don’t be afraid to turn off the Visibility of other layers if you’re trying to stitch a ribbon down, apply a staple or brad, or for any reason. Stitches and staples, just like text, should be on the layer immediately above whatever they’re securing. (If you want to turn on or off Visibility for a lot of layers, hold down the left-click mouse button as you move the cursor over those creepy little eyeballs.) Once you’re happy, you can turn all the other layers back on.
- Make good use of Layer Masks to add more realism to your layouts. The advantage of the Layer Mask is that it’s easy to correct over-zealous erasing by simple toggling the white foreground colour to the background, the black background colour to the foreground and painting back whatever you oopsed on. With this nifty trick you can dangle a charm from a string or a ribbon, make a paper clip look like it’s really holding two sheets of paper together, twine a ribbon or a vine around some flowers and twigs, tuck a flower into a pocket… really, anything your imagination can conjure.
- If your Panel Options aren’t set to give you a full-sized thumbnail in the Layers panel, you may want to rename your layers as you go along so you know what’s where. Don’t know how to change the layer name? Double-click on the label PSE has given the layer in the Layers panel and type in whatever you want. Want to change your thumbnail size? Click on the little icon that looks like a stack of papers at the upper right corner of the Layers panel right next to the trash can icon. Then select Panel Options>Thumbnail Size>Jumbo. Also make sure Thumbnail Contents>Layer Bounds is selected, otherwise what you’ll see in the Layers panel is a tiny little image in the area where it’s located on your layout inside the thumbnail box. I tried that and hated it!
- Learn some basic keyboard shortcuts. There are a lot of them, but you’ll probably only use about a dozen with any regularity. Once you’ve incorporated them into your workflow, you’ll wonder how you ever got anything done without them. I find that my fingers just do it automatically. Below is a list of the ones I use most often, roughly in order of use. Windows users will use the CTRL and ALT keys, Mac users CMD and OPT.
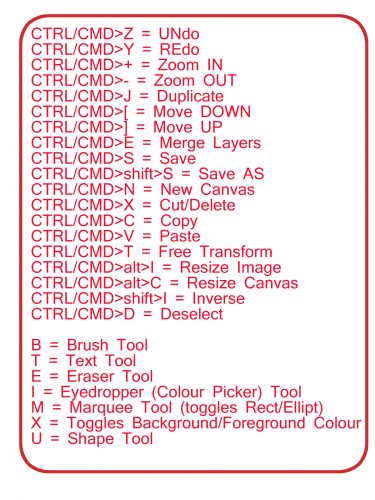
If you want to save this to your computer just right-click on the image and Save Image As… and then name it something you’ll be able to find later.
A few other keyboard shortcuts I’ve incorporated into my workflow are:
CTRL/CMD>G = Create Clipping Mask (attach paper or photo to shape, mask etc) for PSE 14 and earlier
CTRL/CMD>ALT/OPT>G = Create Clipping Mask (attach paper or photo to shape, mask etc) for PSE 15 and more recent
CTRL/CMD>SHIFT>N = New Layer
CTRL/CMD>V = Move
CTRL/CMD>K = Fill (Paint Bucket Tool)
CTRL/CMD>F = Last Filter Used
CTRL/CMD>R = Smudge Tool
CTRL/CMD>ALT/OPT>Z = Haze Remover Tool
CTRL/CMD>ALT/OPT>B = Convert to Black and White
CTRL/CMD>ALT/OPT>S = Select Subject
If you have any WSNH tips I’ve missed, or haven’t discovered yet, please share them in the Comments below!
![]()
Speak Your Mind