Templates with a Twist
![]()
I’ve been planning this tutorial for a while but the right moment hadn’t arrived yet. Then the June Daily Download broke and there it was! Tinci Designs and JB Studios (sadly Dani is retiring from designing) were together in the limelight with their Hey Man template bundle. It was the first time two template designers were in the Designer Spotlight together and it posed some interesting challenges to the store and to our devoted GingerScrappers. But it played right into my hand…
Did you know that you can combine two (or more) templates into a single layout? Are you shocked? Remember, templates are amazingly versatile tools. You don’t have to slavishly follow the design for them to help you create fabulous layouts. They’re intended as inspirational guides, with symbols as placeholders. With templates, your creativity is only limited by your imagination. I’m going to show you how to do a template mashup right here, right now. Let me begin by saying I probably wouldn’t have chosen this bundle for this technique, but the opportunity presented itself and I ran with it. To have the best results with your template mashup, you should choose two templates with clusters, photo spots, masks or combinations of those that you really like, with a good amount of white space, so you’ll have lots of options.
I decided to use the JB Studios template shown below as my base template. I like the row of circles with the small cluster, and I really like the little wordstrip cluster in the corner. I made a mental note of what the file was named so I could find it later…

Then I chose this Tinci Designs template for my second one. I had 2 photos I wanted to use. Now, I could have resized the centre cluster, which would have actually worked beautifully, but I wanted my photos to be really visible.

I had to make room for the section of Tinci’s template that I was going to move onto the JBS template so I selected all the layers but the background and the little wordstrip cluster then moved them up almost to the top of the canvas.

See how that gave me a lot of room?

The next step is to go to my second template and select all the layers I want to add to the first one. If you don’t have the Bounding Box turned on, you might want to do that. It will help you move only the layers you want by including the shapes you’ve selected inside it. You can see my Bounding Box in the screenshot below.

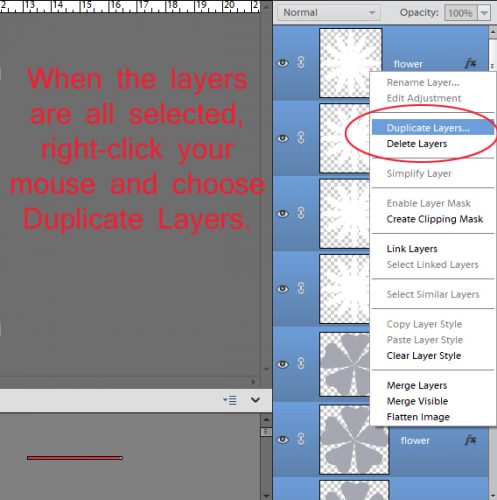
Once you’ve selected only the layers you want to copy onto your other template, right click on the Layers panel to open the Layers menu. Then click on Duplicate Layers…
A new menu opens with everything you have in your Photo Bin included. Look down the list until you find your first template. If you can’t remember the file name, look for the .psd suffix. When you’ve found it, click on it.
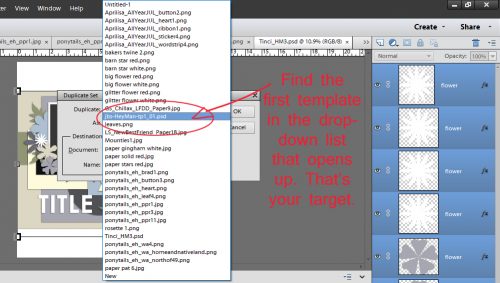
Your dialog box will look like this. You can rename the group of layers if you want, but you don’t have to. When you’ve got the correct file selected, click OK.

PSE automatically centres everything on the canvas, so this is what the new mashed-up template looked like right after I added the Tinci pieces to the JBS base template. Time to fine-tune!

I moved all the Tinci pieces down so the JBS pieces peeked out above them. Then I had to figure out what to do with that little wordstrip cluster that HAD to be in there.

Once I was happy with how it all looked, I could get my layout rolling. There were some layers from the original template that were completely concealed, so when I came to them in the Layers panel, I just deleted them. (I always work with copies of everything, never the original. That way I don’t have to worry about losing something I might want again later!)
If you decide to try this out, remember that you don’t HAVE to copy everything from one template onto the other. Choose the parts you LOVE. Forget about the rest. I could have copied just one of the photo clusters. I could have only copied the wordstrip cluster. It’s all about what you like most! Have fun!
![]()