A Little Bit Sketchy
![]()
Today I’m going to show you how to go from THIS…

to THIS!
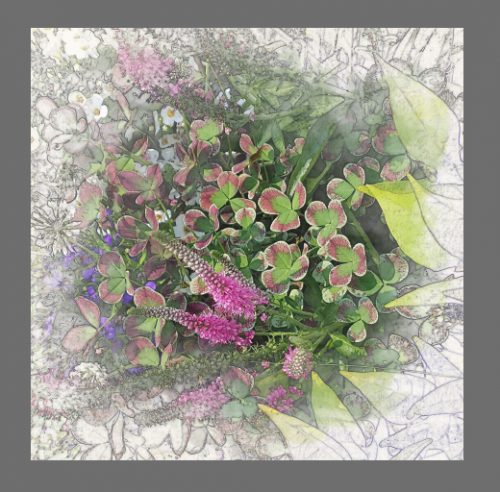
And it’s only going to take you about 10 minutes to create your own sketchy image. Really! (Glee, did you figure it out? Of COURSE I planned a tutorial when I created my Designer Spotlight challenge layout!)
First things first. Open up a new blank 12×12 canvas on your workspace. You can always resize it later, but having a big canvas to work on makes it a lot easier to get it right.

Drag and drop a soft white paper onto your canvas. You have lots of choices in your GingerScraps stash so pick one you like that will work with your photo.

Now drag and drop your photo onto the paper. Enlarge it to fill the workspace with the section you want to work on… or leave it… it doesn’t matter which you do. I wanted a square image when I was done, so I resized. Then Duplicate that photo layer. (WSNH: CTRL/CMD>J)

Then turn the TOP LAYER‘s visibility off.

We’re going to play with the Filters that come with the software. Remember to select the bottom photo layer to work on for this step, then Filter>Stylize>Find Edges.

Now you’ve got a neat pencil sketch right there. You could be happy with that, but with a couple of other tweaks you can have something much more unique.

To make the white areas disappear decrease the saturation of the layer down to -100. There are two ways to get there: Enhance>Adjust Color>Hue/Saturation is one and the WSNH way – CTRL/CMD>U is the other. The menu should look like this when you’re done.

Now we have to make the sketch vanish. Hold down the ALT key and click on the Layer Mask symbol at the top of the Layers panel. In case this is your first attempt at one of my tuts, it’s the one that looks like a piece of paper with a blue circle on it, the middle of five symbols grouped together.

Now for the magic! Go to your Brush tool (hit the B key) and find a nice watercolour brush. There are some in the default brush set Natural Brushes 2 that came with your software, or you can download some free ones via a quick Google search. I used some that I found at Brusheezy. Either way, you want to decrease the Opacity of the brush to give you more control over how your sketch comes together.

Make sure you’re working on the layer mask and NOT on your image. Start painting back your sketch with your watercolour brush, either by clicking on the mask with a full-sized brush several times or by clicking and dragging the mouse over the area you want to make visible. You want to keep the edges of your sketch soft and indistinct so it all seems to blend into the background.

You can change brushes and adjust the size and angle of the brush to vary their effects.

If you’ve never changed the angle of a brush, this will show you how. Click on the Brush Settings… bar and either move the tip of the arrow around or type a number into that box highlighted blue in the screenshot.

Keep moving your brush(es) around until your sketch looks well-defined in the area you want to highlight in your finished image and softer towards the edges.

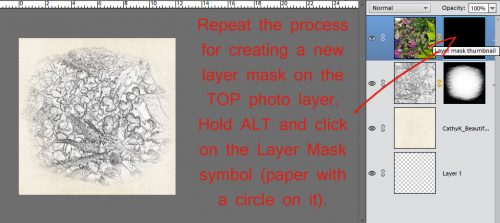
To bring some colour into your sketch, just follow the same process with your top-most photo layer. Turn the visibility back on so you can actually do stuff to the photo layer. Hold down the ALT key, click on the Layer Mask symbol and make your photo disappear.
Using the same watercolour brush or a different one, your choice, decrease the opacity a bit more and start painting the colour in.

Work carefully from your focal point out. You can have areas where the photo is 100% visible and other areas where the sketchy aspect is more visible. All up to you!

If you feel like you’ve made the photo TOO clear, you can change the foreground colour of your brush from white to black and soften it up again.

That could have been where I stopped. You could stop there and have a simply stunning photo effect that will make people so impressed with your skills. I wanted to see what I would have if I duplicated just the sketch layer. To do that, I used my WSNH keyboard shortcut (CTRL/CMD>J) then right-clicked on the new sketch layer to disable the layer mask. A second right-click let me delete the layer mask and left me with just the sketch. With it sandwiched in between the original sketch and the photo, it looked like the screenshot below. I played with the Opacity of that layer, which is what I used for my layout.

Rather than make you look for it, here it is.

I can’t wait to see what you do with this one!! This technique is perfect for those scenic shots we all have in our collection. Have fun!!
![]()