How Do You Know When to Upgrade?
![]()
Today’s tutorial is going to be a really wordy one. Lisa R made this comment on last week’s post: “That’s why I adore digital scrapbooking! I still have PSE 11 and since I use it mostly for photos (not scrapping), it would be interesting to hear the best things YOU like about it … I’ve been thinking of upgrading for quite some time but again, because I use it mostly for photos, I’m still on the fence.” I hope to make her decision easier by discussing some of the things that have evolved since V.11. I’ve never been one to upgrade just to stay at the front of the pack. There has to be something in the upgrade that I want… and I’m pondering whether it’s worth the money (about $120 Canadian for an upgrade, $140 for a new purchase) to jump to PSE 2019. But before I talk about that, let’s look at the changes from Lisa’s V.11 to my current V.15.
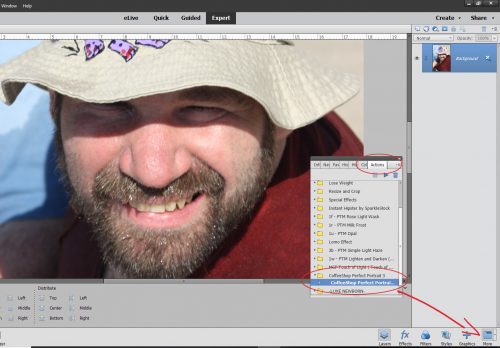
V.11 brought us some fabulous sketchy filters, and introduced automated actions to Elements – Photoshop CS/CC has had them for a long time. If you’re not familiar with actions, they’re little scripts that automatically perform a series of adjustments to your work. They’re especially useful for photo editing and professional photographers have their favourites, which then let them develop a personal style. Photographers whose specialty is newborns, for example, will use actions that tone down jaundiced skin, hide newborn “acne”, reduce mottling and so on. There are also actions that take the work out of getting the background right. There are lots of sources for free or low-cost actions online, with demonstrations of how they work. Here’s a demo of a free action from The Coffee Shop blog. It’s called Perfect Portrait 3. It’s pretty amazing!
In V.15 there are two ways you can access actions, both the very basic ones that came with the software and those you’ve installed. The first is to click Window>Actions and the second is to click that More button then choose the Actions tab. If you look closely at this photo of my son, his skin is pretty gnarly-looking so let’s see how Perfect Portrait 3 fixes it.
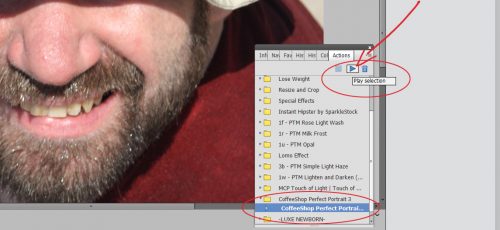
When you’ve chosen the action you want to run by clicking on the folder to the left of the title, you can either click on the dark blue triangle to the left of the folder’s contents, or the dark blue triangle circled below. That sets the action in motion.
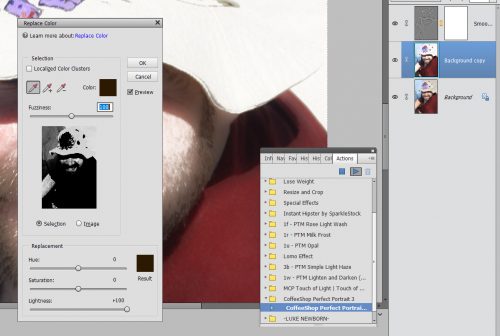
There may be some parts of the action that require your input, like this one. It’s actually the second spot where I told it what to do; the first was a Levels adjustment. In this screen I could change the source of the colour I want to replace.
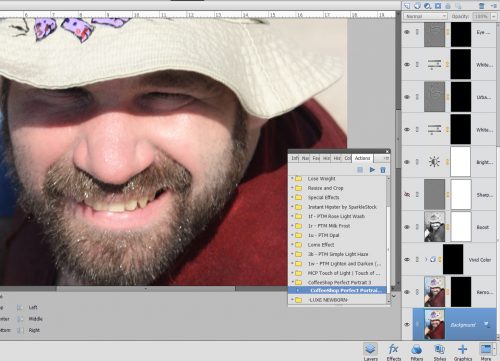
After I hit the OK button for Replacing Color, the action took off and in 30 seconds I had all these adjustment layers that I can now fine-tune. But even without any further input from me, those blemishes on Adam’s nose are gone, his skin tone is more even and his teeth are whiter. I think his crows’ feet aren’t as obvious too.
Another new feature that came with V.11 is in the Organizer. (I don’t use the Organizer because I didn’t like it with my first couple of versions, and created my own filing/organization system.) This version introduced user-determined tagging, allowing many more options for finding what you’re looking for by using your own tags. Options could be by name, by date, by location or by event, for example.
Last but not least, V.11 had the first Out-of-Bounds Guided Edit that allows cutting away the background from part of a photo but leaving things like heads, arms and legs in there. Think of those cool layouts where the photo looks 3D, like it’s bursting out of a frame.
V.12 brought a few more useful improvements. Content-Awareness allows for quicker, easier editing with the Spot Healing tool and with the Content-Aware Move tool. (I haven’t played with that tool yet, so I won’t try to explain how it works. We’ll save that for another day!) This version gave us a pet-eye correction in the Quick and Expert edit menus for the first time.
It also gave us the Zoom Burst Guided Edit that lets you add motion blur to an action photo that looks natural. That one looks like a lot of fun! Another new option in the Guided Edit menu in V.12 is Rotate and Straighten, making adjusting the horizon in photos super-simple. Here’s where the Puzzle edit and the Photomerge edit also came into play. One big drawback to V.12 was that everything was turned into a Smart Object, resizing things like buttons to the size of whatever the workspace it was moved onto was… 12×12 for example. It was a REAL pain in the butt having to then manually resize every. Single. Element. On my layouts.
V.13 got rid of that. It introduced the Refine Edge function to selections, which was a game-changer for lots of people. It allows for sharper extractions and cleaner edges. Some other benefits V.13 had include Auto-crop options – the software provides a preview of several ways to crop an image. [I turned that off eventually because I don’t want to be told what to do. ;)] They added Black and White (automatic and simple conversion to black and white), Black and White Color Pop (keeping a specific area of a photo in color while making the rest of it black and white) and Recompose (resizing your photos without losing important parts of them) to the Guided Edit menu.
And then there were these very useful additions! I haven’t actually played with these either, but I think I should!

V.14 is where there were huge changes made to Elements. Many of the techniques I’ve shared were made possible by these additions: Remove Camera Shake; Remove Haze (!); Batch Edit; one-click Whiten Teeth, frames, photo effects and textures; Photo Illustration; Paint-On Effects; select detailed edges (hair?); remixing 2 photos, improvements to the Recompose edit; RAW editing; new options in Photomerge and an opportunity to print at home came with V.14.
Compared to V.14, there weren’t a lot of changes in V.15, but improved function of some of the menus were a bonus. The Filter Gallery has been simplified and there were a few additions to the Guided Edit menu such as Photo Text (there was a tut on this one), Effects Collage (which lets you apply several effects to sections of a single photo), Painterly (there was a tut on this one too) and Speed Pan (giving a moving object a blurred background). There’s also a cool effect that lets you change a frown into a smile.
Changes to the appearance of the workspace, the location of toolboxes and buttons and other sort of housekeeping things have continued from version to version. There will always be a bit of a learning curve when you upgrade; the larger the gap between your old version and the new one, the steeper the curve.
So this is where my dilemma lies. Do I go from V.15 to Elements 2019? How hard will it be for me to learn the new stuff, and then translate it into easy-to-follow tutorials? Are there enough new things (there are 8 new Guided Edits) I can’t live without to make it worthwhile? 2019 has a powerful new function called Adobe Sensei AI, which does a lot of things automatically in both the Organizer and the Editor. It uses artificial intelligence to tag and organize your photos and videos based on image recognition, it allows for video editing, which V.15 does not, and it has several social media features. Oh and did I mention slideshows?? If you’ve ever had to create a slideshow, you’ll know how much work they are and how hard it is to get them just right. 2019 will automatically select the best photos from a selection and turn them into an animated slideshow guaranteed to impress. There’s also a more useful home screen. It looks like I have some thinking to do…
![]()