Deconstructing the Custom Shadow
![]()
I think we all agree that shadows are an essential and integral part of a great digital layout. There are lots of ways to add shadows in Photoshop Elements, and some of them are easier than others. But to create a true, realistic-looking shadow, there are a few things to keep in mind. Drop shadow styles are included with the software and can be useful; a number of digital designers have also created a set of drop shadow styles that make the task simple. However, to have the most realistic shadows, it’s not enough to “drop” them onto your layout. That’s because objects don’t have even lighting and they don’t have uniform and even shadows either. Objects CAST a shadow. So let’s deconstruct this concept a little.
Here are three identical flowers. I’m going to show you the default drop shadow style, a commercial drop shadow style and how I shadow a flower like this. See if you can pick out the differences.

First let’s look at the PSE default Drop Shadow set, found in the Styles menu. It’ll add a drop shadow to the object with one click. Because I’m shadowing a flower, I selected the Soft Edge version. Don’t know which is which? Hover your cursor over the thumbnail and it’ll tell you. These Styles are adjustable; by double-clicking on the fx icon on the layer’s thumbnail in the Layers panel you open up the adjustment menu. Move the sliders for Size (this determines how sharp the edges of your shadow will be – the bigger the size, the softer), Distance (this isn’t accurate, because it adjusts the size of the shadow) and Opacity (darkness) until you like the look.

There’s the default shadow on the far left, unadjusted. For the flower in the middle I’m going to use a commercial drop shadow styles set from Tracie Stroud. (Tracie has retired from designing, so her products are no longer available. Mommyish and Sahin Designs currently have drop shadow style sets in their stores.) This set is the 120° lighting angle set and I hovered until I found one called Flower. Click!

Hmm. Do you see much of a difference between the first one and the middle one? The one on the right side is the one I created a custom shadow for. This method seems to be really hard, with a lot of steps, but with practice it’s become almost automatic for me now and takes about the same amount of time as using a style does. I think you can see the difference here.

Here are the steps. The real thinking-about-it comes later with the adjustments. Start off by creating a NEW LAYER underneath your object. To do this hold down the SHIFT key and click on that little icon that looks like a piece of paper with the corner turned up at the left-top of the Layers panel.

This is what you’ll see in the Layers panel. If you forgot to hold down the SHIFT key, you can move the new layer down using the keyboard shortcut CTRL/CMD>[.

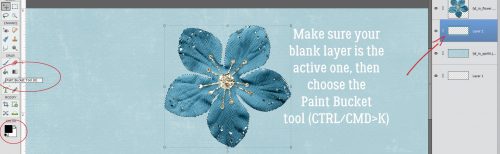
Next, click on the object’s thumbnail in the Layers panel. The thumbnail is the little picture.

Now the outside edges of the object have been Selected and have a line of marching ants around it.

Before you go on, make sure the BLANK LAYER is the active one. Otherwise you’ll be undoing. Then choose the Paint Bucket tool (K), set your foreground colour to whatever your desired shadow colour will be (I just used black, 000000 but some people like to use a slightly browner colour like 2C1902) then click on your workspace. Elements will fill the selection with the foreground colour.
And there it is!

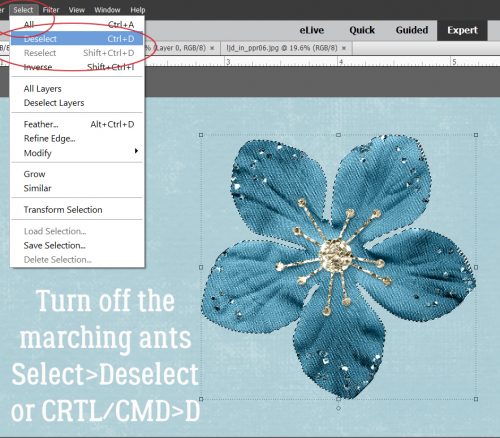
To Deselect the object’s outline you can go Select>Deselect, or just CTRL/CMD>D.
Next, decide where your light source is. Looking at the object can help with that, because there will be subtle highlights and shadows there already. For this flower, the light is clearly coming from the upper left. Now you need to activate the Move tool. I usually just go V. Then move the dark outline in a direction AWAY from your light source. Use the arrow keys to nudge it, if you like.

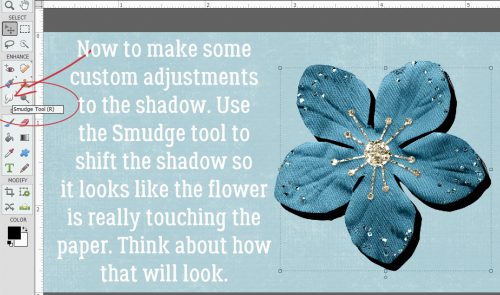
This is the interesting, fun part! Think about what parts of your object would actually touch whatever it’s resting on. The centre of this flower will be resting right on the paper, so the shadows around that part will be less noticeable – light can’t get underneath whatever is touching the surface, so no shadow can be cast. Use the Smudge tool (R) to push and pull the edges of the shadow into place.
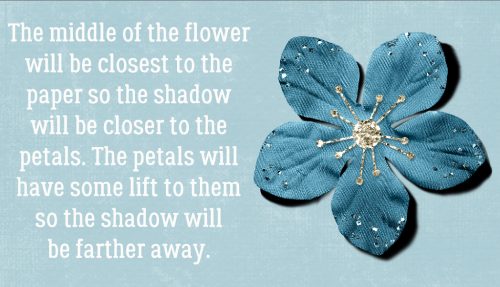
Can you see how I’ve adjusted this shadow? I pushed the shadow toward the centre between the petals. I pulled the shadow sideways and away from some of the petals and imagined the petal at the very bottom is twisted a bit so the left edge is touching the paper.
When you feel like you’ve got the shadow looking natural and real, it’s time to soften it up. Filter>Blur>Gaussian Blur is how that happens.

To see how much of an effect the Gaussian Blur has, click your cursor on a point somewhere over the edge of your shadow and your preview pane will shift to that spot. Move the slider until you’ve got a nice, soft edge. How soft will obviously depend on what it is you’re shadowing. A button would have a sharper edge, string a softer edge.

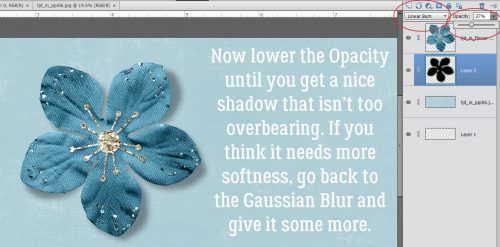
Almost done! Change the Blend Mode to Linear Burn for more of a shadowy look nearest to the object. It also allows the shadow to take on some of the colour of whatever is under it, in this case the blue of the paper.

Then lighten up up by decreasing the Opacity to somewhere around 40%, plus or minus. Keep an eye on what’s happening and you’ll see when it looks right. If you think the edges are still too sharp, use the Gaussian Blur again.
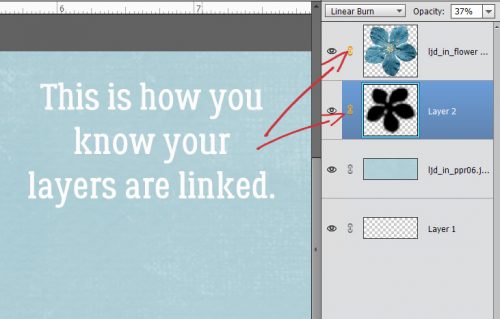
Last thing to do is to Link the shadow layer to the object layer. To do that, select the two layers then click on that little icon that looks like a couple of chain links. Alternatively, you can Merge the two layers by selecting them then right-click>Merge or CTRL/CMD>E. Why do this? Well, if you move the object and it’s not either linked or merged with the shadow, the shadow is going to be left behind and you’ll have a bunch of hassle positioning it right later.

When your layers are linked to each other, this is what you’ll see in the Layers panel.
This was a very basic custom shadow operation. Practice it a bit, then I’ll show you how to layer objects on top of other objects and get the shadows right in that situation. Even more fun!! Just let me know when you’re ready to take it up another notch.
![]()
Thanks for this easy explanation. I think using the Smudge tool will be the biggest challenge. How to manipulate it to get the look i want. I need to give this some practice time.
There is a bit of a learning curve with the Smudge tool. My best advice is to use a light touch until you get the feel of it. I found that actually came fairly quickly with just a bit of practice. I’ve found that if I want to shift a significant section of the shadow ( on a tag for example) I can use a pretty big brush and do it in one nudge. When I start talking about layering, I’ll get into some more depth about adjusting brush size to suit your purpose. But isn’t the best part of digital scrapbooking that you can play as much as you want without wasting anything but a little time?
I’ve heard of the smudge tool, but have not used it yet … I love this tutorial!! Thanks, Jan!! I would copy an element, drop shadow it & put the shadow far away from the element. Then simplify the layer & erase the element. Next I would move the shadow back under the original element layer & “skew” it. Sometimes this would work, but more often than not it wouldn’t do what I wanted. Your way looks so much easier & much more realistic. I can’t wait to play around with this!!! Thanks again!!!
Fantastic tutorial! Thank you. I do like the look of the custom shadowing better than the purchased sets I have. But those are much better than the ones that come with PSE11. Will be using this for sure. Of course, now I’ll want to redo the shadows on the pages already done for my 2019 MIR book.
Yes, this is a LOT quicker and easier. I was using Skew and Free Transform too but I found them unwieldy and time-consuming. And hard to emulate a realistic shadow too. This method has become such a part of my work flow that I literally don’t have to think about it.
Aw, thanks Jeannie! For a long time I was totally satisfied with the purchased styles and quite pleased with how my layouts looked. But then I started writing these tutorials and had to educate myself first. My WSNH (Work Smart Not Hard) philosophy is always my first thought. How can these be made easier and quicker? What have I tried that really worked? Can I explain how I did it to someone else? And will it be interesting enough for someone to read all the way through, never mind want to try themselves? I’m glad I’m hitting the mark, at least sometimes!
Hi Jan,
Sorry I wasn’t sure of another way for me to send you a question. This is about Tutorial Tuesday. Has the resource listing of all the posts for this column been updated recently? I had a saved link that I went to which has 1 tutorial listed beyond when i saved the list back in January, I think. Is there another location that is being updated as you publish a new tutorial? Thanks. This is such a great Resource!
No worries, Steph. You can always send me a private message if you want to ask questions or get more details… I’ve been very slack about updating the list the last while, having been really busy with other stuff. The good news is I should have time this week to get it caught up. I’ll shoot you a message when it’s done.
Thanks, Jan. i appreciate the update. Now I’m embarrassed to say that i don’t know how to send you a personal message. I don’t know your last name. I assume I go to the forum but I’m not sure. ???
In the Forum I’m JaninAlberta. When you open up the Forum the link to Private Messages is the second one from the left on the dark blue banner. Click on it and the Private Message menu opens. Click on Send New Message then in the Recipient Users box you only have to type in “Janin” and a direct link will pop up underneath that box, in yellow. Click on that and you’re ready to compose your message.