Perfectly Paired, with Diamond Dust Designs
![]()
After last week’s marathon tutorial I needed some downtime, so I took a look at the February Challenges. (I know, it sounds like the opposite of relaxing, right?) But to me, Challenges are a way of turning off and tuning out a bit. I mean, come on… they tell you what to do, all you have to do is do it! Lots of room for creativity, but less thought required. Ha!! Did you look at the Perfectly Paired Challenge?
“…you must use two different kits from two different GS Designers and select an equal number of papers and an equal number of elements from each kit that go well together. Then pick a favorite template from a GS Designer and create your LO, showing how you perfectly paired the two kits together. List both kits and their designer and the template designer in your credits.”
Sure, Ginger laid it all out about how to meet the requirements of the Challenge, but many of us are single-kit scrappers. So that got me thinking about a tutorial I wrote quite some time back about how to use multiple kits without losing our minds, and it seemed a good idea to replay it this week so more of you might be tempted to give it a try. The original tutorial is Windows-based, so if you’re using a different operating system there will be some adjustments to the search piece needed. Let’s have a look.
Caveat: This is my workflow and you might have a method that will work better for you.
I like to use templates, not gonna lie. They make scrapping so much easier. And I like to use folders. For me, they too make scrapping easier. For mixing kits, folders are a HUGE help. I have folders for each store I frequent, each of the kits I’ve added to my stash and I have folders for every layout I’ve created. It helps keep me organized. I’ve read posts from people who go through all of their kits and individually tag EVERYTHING. That’s a ton of work, and for the most part, it’s unnecessary. Designers usually label everything in a kit in some way, so why duplicate their efforts? Work Smart, Not Hard!
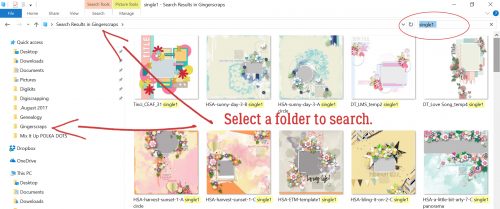
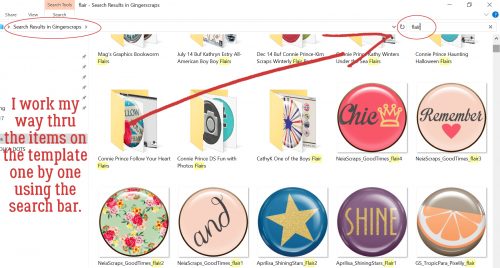
So let’s talk about folders. At the beginning of every month, I create a Challenges folder. And in this folder I add subfolders for all my favourite challenges. Into those folders, I copy my photo(s), template, papers and elements. After I’m happy with the layout, have ensured I have no bloopers and the layout is posted, I empty the folder of everything but the PSD of the layout and 2 JPEGs. That keeps the space taken up by the layout to a minimum but lets me find them later. The image below shows some of my folders in the list to the left. My first step is to select a template to use. In the tutorial on organizing your stash, I talked about labeling template previews in some fashion so it’s easier to find what you’re looking for later. My system, borrowed from someone else but modified to suit my workflow, is to label with whether the template is for a single or double spread, the number of photo spots and sometimes the shape/mask/blend the photo spots assume. The screenshot below shows a Windows File Explorer search for a single spread with 1 photo. (The icon for this utility is the file folder… super simple!) I had chosen a cute photo to build my layout around, so I opened my GingerScraps digikit folder then in the search box shown on the upper right, I typed in “single1“. After a few minutes, Windows had found all the template previews so labeled and showed them to me. (The actual search time will depend on the size of the folder you’re searching and the number of like objects to be found. It may only take seconds.) Now I could look at them and pick a template that would work for my layout.
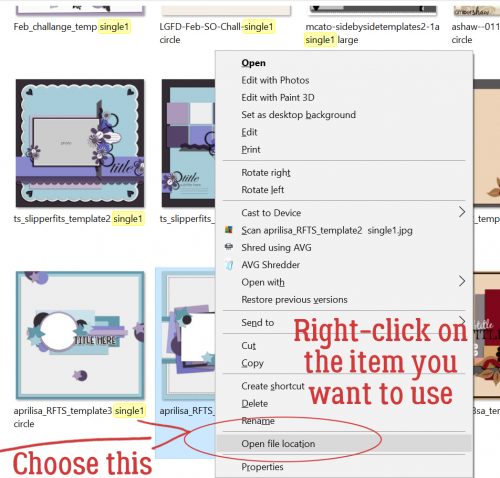
Now, how did I find the actual template, you ask, since all that’s displayed are the preview thumbnails? I right-clicked on the preview and selected Open file location from the menu window. That takes me right to the folder that holds the template. Then I copied the template file into my challenge folder. For other searches this step won’t be necessary, because you can just copy the objects right from the search pane.
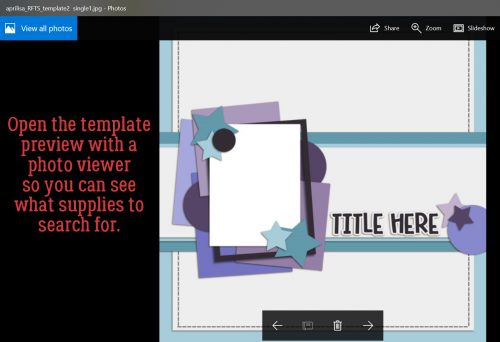
Next, I opened the template preview thumbnail in a photo viewer so I could see what supplies I needed to find next. I counted up the different papers the template employs and went on to my next search.
For this search, I put “paper blue” in the search box, as I’ve shown below. And Windows found all the papers labeled with those two words. Results will show both folders and individual images, which makes it easy to see just what you’re looking for.

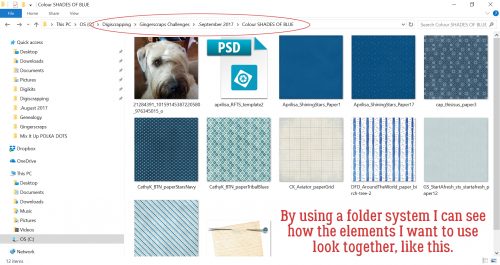
I copied each of the blue papers I might want to use into my GingerScraps Challenges> September 2017>Colour SHADES OF BLUE folder so I could see them all in one place. That helped me determine if they’d work together or not. They look pretty good!
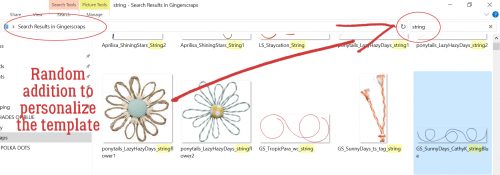
I worked my way through the different items used for the template one at a time to find things I wanted to include. There was a circular element I decided must be a flair, so I did a “flair” search.
Remembering that templates don’t necessarily have to be duplicated exactly, I chose to add some string to it. The search showed me a blue string right near the top that would work beautifully!
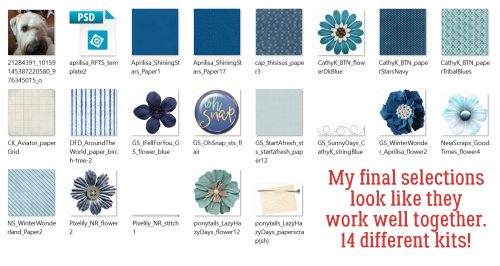
Once I had chosen all the things I thought I might use (substituting flowers for the stars) I could see everything in one place and knew they’d all work well together. I had pieces from FOURTEEN kits!
Once I was ready to build my layout, I opened Photoshop Elements and went to the Colour SHADES OF BLUE folder and opened all the items onto my workspace. From there it was zip, zip, zip!
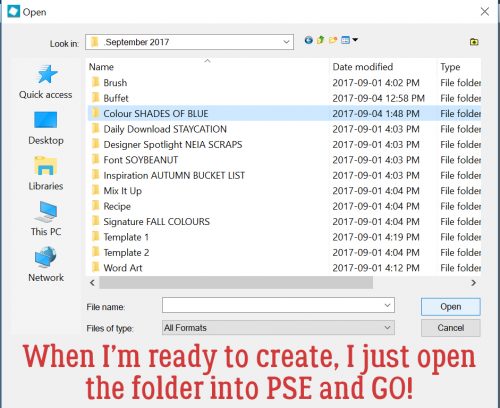
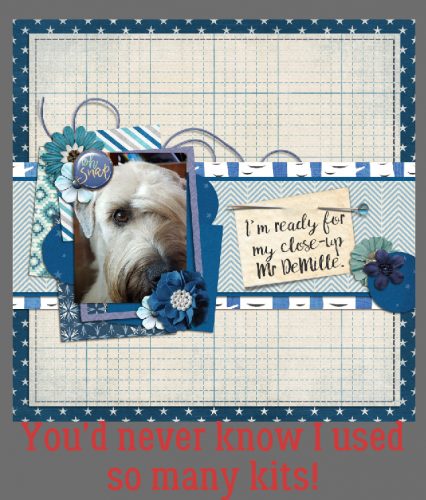
And this is where I ended up. (Once I post my challenge layout, I add a hyphen to the beginning of the folder name so I know it’s done.)
Another way this method is useful is for speed scraps. You can have Windows searching for things while you work on the previous steps. That’s sort of where I came up with my system. I used to partake of monthly speed scraps at another site that is no longer around and I wanted to be sure I was finished my layout with time to spare in order to win the prize.
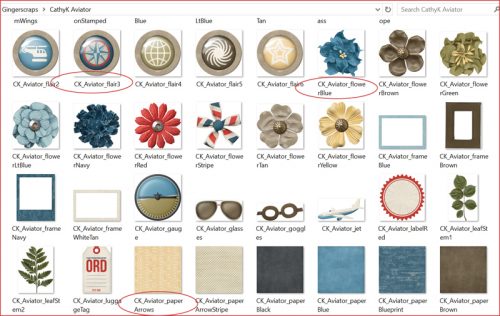
This screenshot shows how CathyK has labelled the items in her kit Aviator. This is for GingerScrapper Karen who had some questions about metadata.
Please feel free to adapt this however it will work for you! Now I’m going to collect my papers and elements to take on this Challenge. See you next wee, when we’ll be looking at Individual Style – Challenge Spotlight time! (It might even be this one…)
PDF Version : https://bit.ly/3t0uMfT
![]()
wow, that was a lot to follow–but I do basically the same. Maybe I learned from you in a previous tutorial? I also keep a thumbnail of the preview of the entire kit in my folder where I’ve completed a challenge and I also put that as a layer in my PSD so I remember exactly what kit(s) I used. Sometimes I add a layer with the names of the fonts I’ve used. These are under the background layer I do like the idea of using a hyphen in front of the challenge folder to readily see that it’s done! I’m stealing that one, thank you!
I love this tut Jan! Thanks for sharing your great insights with us! I originally started breaking up my kits by element types and soon realized this was WAY too much work. So I moved to keeping kits together.
Q1: If I understand your convention correctly, you further subdivide each kit into separate folders by element type (ConniePrince_Follow Your Heart_Flairs) or was this done already by the designer? I’m hoping this was a designer effort so less work for me.
Q2: To be clear, I thought you added to the original designer’s item name when necessary to accommodate your search strategy with “paper blue”. However, there were some papers later in your example that did not have “blue” in their name (aprillisa_ShiningStars_paper). So how did your search pick up this paper?
Q3: I need a bit more clarification on the example with the flairs. You say: “This screenshot shows how CathyK has labelled the items in her kit Aviator. This is for GingerScrapper Karen who had some questions about metadata.” Do you edit the flair element names to better search on these elements?
Any clarification on these questions is appreciated.
Steal away! Work Smart, Not Hard… my motto. I really should start including an invisible layer with the names of fonts I used so I can find them again if I need to.
Sorry for the long delayed reply, Lorri. I had to figure out what I did for the original version of that tutorial. It was back in 2017 and 2 laptops ago. 🙂
Q1: I don’t divide up my kits except for any alphas; they go in a separate subfolder. I open all the folders in a collection and transfer everything into the main folder then delete the previews and empty folders. I like to see everything at a glance. Now, as far as Connie’s flairs go, I’m pretty sure I got JUST the flairs from that kit, so for clarity I included the element type in the folder name. I often buy mix and match papers and elements while the Buffet is open; I might love one designer’s papers, but not their elements, for example.
Q2: I cannot explain how those Aprilisa papers were chosen. They don’t come up in the “paper blue” search, but would come up if my search term is simply “paper”.
Q3: I almost never change the file names inside a kit folder, unless it’s very nondescript. The designer has usually given the items some sort of name that will be searchable. This was Karen’s question: “When I checked the meta-data, there aren’t descriptors in most of the file names. So do I have to go back and add them?” I used Cathy’s kit as an example because I had it handy. I hope that helps…