April Showers have begun, and for the Gingerscraps family, it just means that the showers are full of amazing kits and templates!
Remember when you spend $10 in the store, you get a great new collab! Spring is here and it’s time to enjoy it!

https://store.gingerscraps.net/GingerBread-Ladies-Collab-In-The-Springtime.html

https://store.gingerscraps.net/CU-Messy-Threads.html

https://store.gingerscraps.net/Laurier-Scraps-And-Designs/

[kit] https://store.gingerscraps.net/Egg-stra-Special-Day-by-LDragDesigns.html
[The Collection] https://store.gingerscraps.net/Egg-stra-Special-Day-The-Collection-by-LDragDesigns.html
[Wordart] https://store.gingerscraps.net/Egg-stra-Special-Day-Wordart-by-LDragDesigns.html
[Borders] https://store.gingerscraps.net/Egg-stra-Special-Day-Borders-by-LDragDesigns.html
[journal cards] https://store.gingerscraps.net/Egg-stra-Special-Day-Journal-Cards-by-LDragDesigns.html

[kit] https://store.gingerscraps.net/Hippity-Hoppity-by-LDragDesigns.html
[The Collection] https://store.gingerscraps.net/Hippity-Hoppity-The-Collection-by-LDragDesigns.html
[templates vol. 1] https://store.gingerscraps.net/Hippity-Hoppity-Templates-Vol.-1-by-LDragDesigns.html
[templates vol. 2] https://store.gingerscraps.net/Hippity-Hoppity-Templates-Vol.-2-by-LDragDesigns.html
[journal cards] https://store.gingerscraps.net/Hippity-Hoppity-Journal-Cards-by-LDragDesigns.html
[worn out papers] https://store.gingerscraps.net/Hippity-Hoppity-Worn-Out-Papers-by-LDragDesigns.html
[glitters] https://store.gingerscraps.net/Hippity-Hoppity-Glitterstyles-by-LDragDesigns.html

42: https://store.gingerscraps.net/Page-Borders-42-by-Lindsay-Jane.html
Rec 42: https://store.gingerscraps.net/Page-Borders-Rec-42-by-Lindsay-Jane.html

41: https://store.gingerscraps.net/Page-Borders-41-by-Lindsay-Jane.html
Rec 41: https://store.gingerscraps.net/Page-Borders-Rec-41-by-Lindsay-Jane.html

Bundle: https://store.gingerscraps.net/Warrior-Princess-collection.html
Page kit: https://store.gingerscraps.net/Warrior-Princess.html
Journaling Cards: https://store.gingerscraps.net/Warrior-Princess-cards.html
Graffiti Pack: https://store.gingerscraps.net/Warrior-Princess-graffiti.html
Glitter Pack: https://store.gingerscraps.net/Warrior-Princess-glitter-pack.html
Bonus Papers: https://store.gingerscraps.net/Warrior-Princess-bonus-papers.html

Keep your memories Creative Box#1 – https://store.gingerscraps.net/Keep-your-memories-Creative-Box1.html
Wordart – https://store.gingerscraps.net/Keep-your-memories-Wordart-Vol1.html
Stamps – https://store.gingerscraps.net/Keep-your-memories-Stamps-Vol1.html
Stamps&Borders – https://store.gingerscraps.net/Keep-your-memories-Stamps-Borders-Vol1.html
Watercolor Borders – https://store.gingerscraps.net/Keep-your-memories-WaterBord-Vol1.html
Masks&Frames – https://store.gingerscraps.net/Keep-your-memories-Masks-and-Frames-Vol1.html

Full Bundle – https://store.gingerscraps.net/Spring-time-Bundle.html
Kit – https://store.gingerscraps.net/Spring-time-Kit.html
Embossed papers – https://store.gingerscraps.net/Spring-time-Embossed-papers.html
Clusters&Wordart – https://store.gingerscraps.net/Spring-time-Clusters-and-Wordart.html
Photomasks – https://store.gingerscraps.net/Spring-time-Photomasks.html
QPs Set – https://store.gingerscraps.net/Spring-time-QPs-Set.html

Bundle – https://store.gingerscraps.net/I-Am-Silly-Bundle-by-Scraps-N-Pieces.html
Alpha – https://store.gingerscraps.net/I-Am-Silly-Alpha-by-Scraps-N-Pieces.html
Elements – https://store.gingerscraps.net/I-Am-Silly-Embellishments-by-Scraps-N-Pieces.html
Papers – https://store.gingerscraps.net/I-Am-Silly-Papers-by-Scraps-N-Pieces.html
Cardstocks – https://store.gingerscraps.net/I-Am-Silly-Cardstocks-by-Scraps-N-Pieces.html

Page templates – https://store.gingerscraps.net/Template-Pack-49-by-Scraps-N-Piece.html
CU Giraffe Templates – https://store.gingerscraps.net/I-am-Silly-Giraffes-CU-Layered-Templates-Scraps-N-Pieces.html

Collection: https://store.gingerscraps.net/Spring-a-Ling-Collection-by-Snickerdoodle-Designs.html
Kit: https://store.gingerscraps.net/Spring-a-Ling-Kit-by-Snickerdoodle-Designs.html
Word Art: https://store.gingerscraps.net/Spring-a-Ling-Word-Art-by-Snickerdoodle-Designs.html
Accents: https://store.gingerscraps.net/Spring-a-Ling-Accents-by-Snickerdoodle-Designs.html
Alpha: https://store.gingerscraps.net/Spring-a-Ling-Alpha-by-Snickerdoodle-Designs.html
Bonus Papers: https://store.gingerscraps.net/Spring-a-Ling-Bonus-Papers-by-Snickerdoodle-Designs.html
Borders: https://store.gingerscraps.net/Spring-a-Ling-Borders-by-Snickerdoodle-Designs.html
Clusters: https://store.gingerscraps.net/Spring-a-Ling-Clusters-by-Snickerdoodle-Designs.html
Edgers: https://store.gingerscraps.net/Spring-a-Ling-Edgers-by-Snickerdoodle-Designs.html

https://store.gingerscraps.net/Magical-journey-5..html

https://store.gingerscraps.net/Smugglers-Notch-Trail-Bundle-by-ADB-Designs.html

Collection: https://store.gingerscraps.net/Cherish-Collection-by-Aimee-Harrison.html
Kit: https://store.gingerscraps.net/Cherish-Page-Kit-by-Aimee-Harrison.html
Alphas: https://store.gingerscraps.net/Cherish-Alpha-Sets-by-Aimee-Harrison.html
Titles: https://store.gingerscraps.net/Cherish-Titles-by-Aimee-Harrison.html
Frames: https://store.gingerscraps.net/Cherish-Frame-Clusters-by-Aimee-Harrison.html
Borders: https://store.gingerscraps.net/Cherish-Borders-by-Aimee-Harrison.html
Edges: https://store.gingerscraps.net/Cherish-Messy-Edges-by-Aimee-Harrison.html
Glitters: https://store.gingerscraps.net/Cherish-Glitters-by-Aimee-Harrison.html

Hello April Kit https://store.gingerscraps.net/Hello-April-Kit.html
Hello April Cards https://store.gingerscraps.net/Hello-April-Cards.html
Hello April Templates https://store.gingerscraps.net/Hello-April-Template-Pack.html
Hello April Bundle https://store.gingerscraps.net/Hello-April-Bundle.html

https://store.gingerscraps.net/Candied-Dreams-BGD.html

https://store.gingerscraps.net/Sweet-Talk-Mini-Kit-by-CathyK-Designs.html

Word Art and Flair Pack: https://store.gingerscraps.net/Travelogue-Indiana-Word-Art-and-Flair-Pack-by-Connie-Prince.html
Bundle: https://store.gingerscraps.net/Travelogue-Indiana-Bundle-Pack-by-Connie-Prince.html
Kit: https://store.gingerscraps.net/Travelogue-Indiana-Kit-by-Connie-Prince.html
Word Bits: https://store.gingerscraps.net/Travelogue-Indiana-Word-Bits-by-Connie-Prince.html
Templates: https://store.gingerscraps.net/Travelogue-Indiana-12×12-Temps-CU-Ok-by-Connie-Prince.html

Bundle: https://store.gingerscraps.net/Construction-Zone-Bundle-by-Connie-Prince.html
Kit: https://store.gingerscraps.net/Construction-Zone-Kit-by-Connie-Prince.html
Template: https://store.gingerscraps.net/Construction-Zone-12×12-Templates-CU-Ok-by-Connie-Prince.html
Messy Papers: https://store.gingerscraps.net/Construction-Zone-Messy-Papers-by-Connie-Prince.html
Alpha: https://store.gingerscraps.net/Construction-Zone-Alpha-Pack-AddOn-by-Connie-Prince.html
Word Art: https://store.gingerscraps.net/Construction-Zone-Word-Art-Pack-by-Connie-Prince.html
Extra Papers: https://store.gingerscraps.net/Construction-Zone-Extra-Papers-by-Connie-Prince.html
Border Clusters: https://store.gingerscraps.net/Construction-Zone-Border-Clusters-by-Connie-Prince.html
Flowers and Leaves: https://store.gingerscraps.net/Construction-Zone-Flowers-and-Leaves-by-Connie-Prince.html

https://store.gingerscraps.net/Big-Words-3.html

https://store.gingerscraps.net/Spring-Memories-Digital-Scrapbook-Kit-by-Dandelion-Dust-Designs.html

Sodalicious Collection: https://store.gingerscraps.net/Sodalicious-Collection.html
Sodalicious Kit: https://store.gingerscraps.net/Sodalicious-Kit.html
Sodalicious Finishing Touches: https://store.gingerscraps.net/Sodalicious-Finishing-Touches.html
Sodalicious Journal Cards: https://store.gingerscraps.net/Sodalicious-Journal-Cards.html

Right Here Right Now Collection: https://store.gingerscraps.net/Right-Here-Right-Now-Collection.html
Right Here Right Now Kit: https://store.gingerscraps.net/Right-Here-Right-Now-Kit.html
Right Here Right Now Finishing Touches: https://store.gingerscraps.net/Right-Here-Right-Now-Finishing-Touches.html
Right Here Right Now Journal Cards: https://store.gingerscraps.net/Right-Here-Right-Now-Journal-Cards.html

https://store.gingerscraps.net/Magical-Scraps-Galore/

https://store.gingerscraps.net/Down-This-Road/

https://store.gingerscraps.net/PrelestnayaP-Design/

https://store.gingerscraps.net/Studio-Jx2
Remember, if you complete 10 challenges, just ten, you get a free kit as well!!

They say it’s nearly spring! Maybe this kit will inspire Mother Nature to agree!
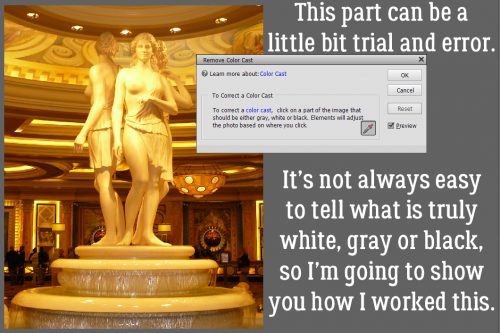
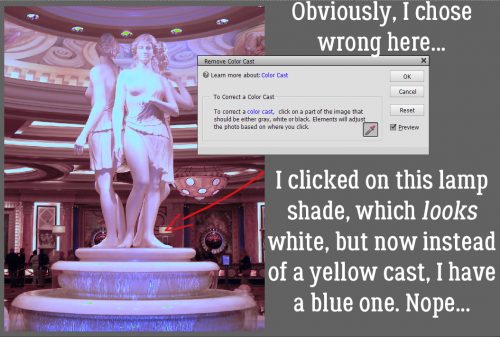
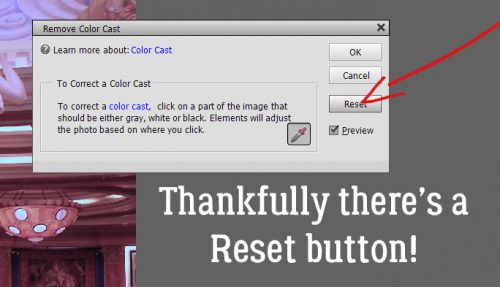
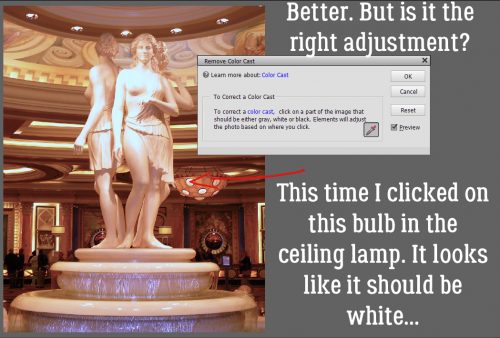
![]()