Tutorial Tuesday (Individual Style)
Challenge Spotlight: Recipe

It’s time again to shine the spotlight on all of YOU! But first… did y’all get your Prime Day shopping done? 😀 I paid my credit card off yesterday so I’d have a wide-open window. 😉

Let’s get down to business. This month the Challenge in the Spotlight is the Recipe Challenge, which is hosted by Sweet Pea Designs. It’s a good Challenge for a Blog post, since all the participants are working from the same set of required elements. So I’ll be taking a close look at each of the layouts to find each of the things on Penny‘s list. The layouts will appear in the order they were uploaded to the Challenge Gallery, and as usual, they’ll be linked to the Gallery so you can get a closer look. Just click on the Scrapper‘s name and you’ll be zoomed right to their layout. (Anything I underline will be a hot link!)
First up is this pretty layout from alexandergirl68. She’s definitely got 5 papers there, a tiny string heart, a ribbon bow and there are flairs on her title. banner Single photo, frame, 2 clusters and border, check. I had to zoom in to see that the heart on the frame is made of beads, check! And the theme is perfectly represented.

Let’s look at this one from snickels next. She’s used 2 photos, one with a thin white frame and one masked. Check! One of her 5 papers has been clipped to her border. Clever! Beads are all over the place, I’m guessing the string is holding up her birthday banner and she found a birthday flair to coordinate. Bow, yep; 2 clusters, yep; looks like all the boxes are ticked!

GrannyNKy‘s layout is so feminine! Like snickels, she has clipped one of her papers to an overlay. I like how she’s interpreted the “photo with frame” by putting the frame behind her photo. 10 points! I see 2 clusters, 2 bows – one of string, several flairs, a lovely banner, some paper borders and a celebratory theme. The beads are there, scattered under the larger cluster. Zoom in if you don’t see them. Full marks.

Katherine Woodin‘s clebration isn’t obvious, but it’s everywhere in her journaling. I had to look really hard to see all 5 papers, which is a sign of a crafty Scrapper. The rest of the required elements are much more easily spotted. That happy face emoji flair cracks me up.

I didn’t have to look too closely to see the theme for dj_w‘s layout. Every one of the listed ingredients is easily identified. Good job!

Macsandy had me squinting… she used a string of beads and I overlooked them 3 times! I love the stamped-heart border she chose and her clusters are perfection. This might be my favourite of the six layouts I found for this Challenge.

One thing I noticed about these layouts is that four of them have a similar colour palette, which has to be a coincidence.

I hope everyone is safe from all the weather-related events we’re seeing. Last night’s derecho was pretty frightening. We’re seeing quite a bit of smoke today, as we head into week 3 of 90+°F temps. I’ll be driving up to have what might be my last visit with my dad later this week… he’s tired of feeling unwell and is talking about being “ready to go”.  So if I miss a post, that might be the reason. Stay cool and stay safe, my friends.

Tutorial Tuesday (Photoshop Elements)

Creating and Shadowing Transparent Elements

PDF Version : https://bit.ly/4cJAs3t

Let me tell you a secret. I really don’t like hexagons. Like REALLY. Possibly because of my husband’s obsession with board wargames, which are played on a hex-grid map, are horrendously expensive, eat up huge chunks of storage space in our house and enormous chunks of his time and attention. Maybe. But all that being said, I decided I would take a run at this month’s Surprise Challenge, hosted by Magical Scraps Galore, which requires the use of hexagons. They had to be there, but they didn’t have to be the focal point, right? So I decided I’d use a glass honeycomb created from a paper mat I found in the GingerBread Ladies‘ collab Everyday Happiness.  [Yes, I got the kit’s name wrong on the screenshot. Oy!]

Zoomed in, it’s easy to see it’s actually paper.

These next few steps turned out to be unnecessary. Feel free to jump 3 steps ahead! There is a purpose for applying Styles in this way, as in when you want to add a Glass, Acrylic or Epoxy Style but preserve the colour or other detail of your original layer. Anyhoo… this is the process I used for this technique, so it stays in. I made a Copy Layer: right-click>Duplicate Layer… OR CTRL/CMD>J.

If you opted for the right-click route, this Option Box pops up. Just click Ok.

Then I turned off the Visibility for the original layer.

How many of you out there aren’t aware of how to add and find commercial Styles (and Brushes) to your electronic devices? Do we need a tut on it?

To access the Styles you have installed on your device, click on the Styles button at the bottom of the Layers Panel. It opens the Styles menu. Scroll through until you find the Style set you want to use. I’m using Glass Styles from Karen Schulz. Click HERE to see them in the store.

I wish I could still show you the labels that show when you hover the cursor over these. I chose the “glass-11” version, one that has a fairly shallow Bevel and no shadow. This is an important factor. An integrated Drop Shadow will cause the transparent parts to turn gray everywhere – see the thumbnails in the Styles menu in the screenshot – and I don’t want that!

There! The honeycomb is transparent and has a slight weight to it. Against the transparent background, it’s hard to see, but not for long.

Even transparent objects will cast a shadow, so I’m going to add one to my glass mat using my usual custom shadow technique. Some of you will already have tried it and know how it works, so I won’t be offended if you scroll on by. I start by adding a new blank layer UNDERNEATH the Glass Layer.

The blank layer is highlighted as being the active layer. That’s what you want. Now, CTRL/CMD>click on the Glass mat’s Layer Thumbnail. That will Select the edges of the mat, but won’t change the active layer. You can see the marching ants in the screenshot, which helps make the glass visible too.

With your Foreground Color set to black (hex code 000000) use the Paint Bucket (keyboard shortcut CTRL/CMD>K) to Fill the Selection. It’s ugly but not permanently so.

To get rid of the marching ants, you can click Select>Deselect or use the keyboard shortcut CTRL/CMD>D.

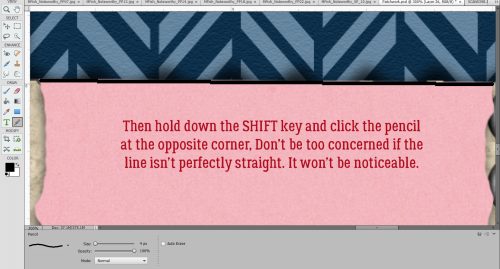
Now I’ve decided that my light source is in the upper left of the image, so I’ve used the arrow keys to Nudge the Shadow Layer down and to the right a bit. Keep in mind how much your object is raised off the page when determining how much to move your Shadow Layer.

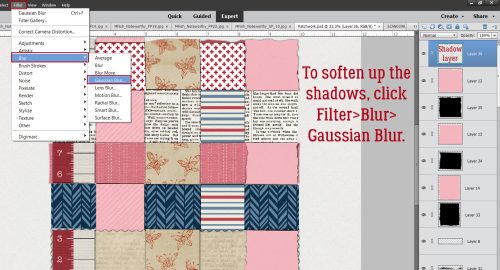
Next, to soften up the edges of the Shadow. Click Filter>Blur>Gaussian Blur…

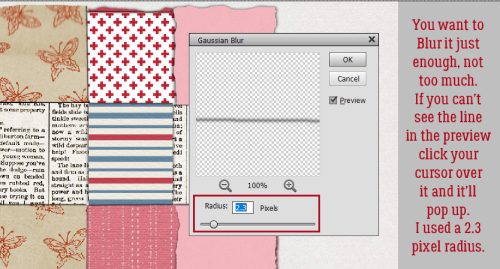
In this screenshot, you can see the glass much more easily. I moved the slider to the right until I liked the effect – it shows up on the canvas in real time. The Radius is 5.6 Pixels. Of course, it’s much too dark, but the finished product won’t be.

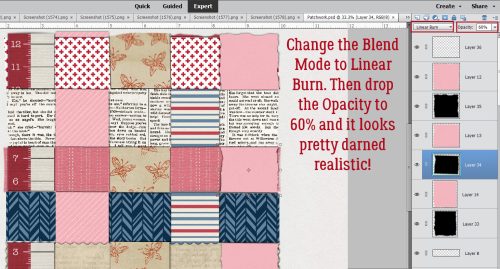
I next changed the Blend Mode to Linear Burn. This is to allow the colour of whatever goes underneath this mat to show through. If I left it set to Normal, it’ would show as black/gray against the paper.

Then I dropped the Opacity to 40%. Make sure to keep these steps in order: change Blend mode first, then the Opacity, otherwise it’ll mess up your hot keys. I think it looks about right. Sort of. If this was a solid object, it would be done.

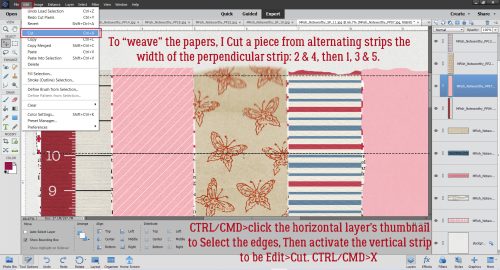
But it’s GLASS. So I reSelected the edges of the Glass Layer (ignore the active layer in the screenshot because it’s going to change). CTRL/CMD>click on the Glass Layer thumbnail.

With the SHADOW Layer active, click Edit>Cut OR CTRL/CMD>X. That will remove the Shadow lying underneath the Glass.

There! You can see the Shadow, the Glass is easily seen and it looks realistic. This Shadow technique will work nicely for acrylic, epoxy and vellum too.

And with paper behind it, it looks spectacular!


Tutorial Tuesday (Photoshop Elements)

Taking Distress to the Next Level

PDF Version : https://bit.ly/4d1IYdD

Happy July! Happy Canada Day! Happy Independence Day! Happy Muharram! Happy Bastille Day! On to the second half of the year……….

Last week’s Quick Trick elicited this response from Steph: “I gave this tut a try and like the effect I got. While I was reading the text, i was thinking that we would be “roughing up” the edges of the text or shape. What i ended up with was a distressed look on my whole word. Is it possible to do a roughed up edge just on the outside edge? This might be tough on a font, but would a simple shape be more possible? Thanks!” Well, yeah. It’s possible! Some parts of this technique are similar to an old, old tutorial on inked edges, but I’ve added some twists.

What better object to create a beat-up look on than a piece of ephemera? I chose this price label from the GingerBread Ladies‘ collab Like Them Apples. If you look closely along the right side of the label, it shows some foxing – that rusty, splotchy, discolouration seen on old photos and documents. We’re going to add some foxing to the lower right corner of the label.

Because we’re working with the Brush Tool, repeat after me: “Brushes go on their own layer!” Before we go any further, pop a new blank layer on top of the Label Layer by clicking on the sheet of paper icon to the top left of the Layers Panel. My foreground colour was picked using the Eye Dropper Tool, from a darker are of the foxing already on the label. Now to choose a Brush. In the Natural Brushes set there are a bunch of Stipple Brushes. (One of the most recent updates to my firmware removed my ability to show you a lot of things, like the Brush Options Panel in screenshots. Grr.) I chose the 21 pixel size, then Resized it to 30 pixels. (To quickly Resize Brushes on the fly, use the [ – bigger and ] – smaller keys.) Then I clicked the Brush – Opacity at 100% –  randomly along the edge of the label, overlapping the edge in several spots. That’s not a problem, it’ll be fixed in a minute. But don’t DRAG the Brush, that just makes a mess.

When I’ve got enough colour there, next step is to Select the outside edge of the label. With the Brush Layer active, CTRL/CMD>click on the Label Layer Thumbnail. The marching ants will appear around the edge.

If we went ahead and Cut away the Stippling right now, it would disappear from INSIDE the edge, so the Selection has to be Inverted. You can click Select>Inverse or use the keyboard shortcut CTRL/CMD/SHIFT>I.

If it seems like I’m belabouring the point about being positive what Layer is active, it’s because I am. Edit>Cut or CTRL/CMD>X the stippling that falls outside the label’s edges to clean it up.

The only issue I have with how it looks is that it’s a bit too dark and looks artificial. Easy fix!

I’ve circled a foxed spot that was part of the label before I started messing it up. I used it to guide me as I dropped the Opacity of the Brush Layer to 45%. Now it looks natural!

To simply rough up the edge, rather than Brushing ON, Erase away! Choose the Eraser Tool, pick one of the Dense Stipple Brushes, make it fairly big and rather than spreading the clicks out, group them closer together. (I’ve put a white background layer behind my sample so you can see the rough edge better.) If you want to give the effect of white-core cardstock, “fox” this new edge using white. So many ways to make this work!!

Now let’s distress this baggage label from Cindy Ritter‘s One in a Melon. The label has been crumpled, but if it had ever been on a bag, it would look more beat up than this.

This kind of label is ink-printed on heavy paper, so distressing it should show the base paper through the ink. To that end I picked my colour from the lightest cream area of the paper. I’ll use a Dry Media Brush, Pastel on Charcoal Paper to add some “wisdom” to the label.

On your shiny new layer that you’ve popped on top of the label, start clicking the Brush over areas that logically would be rubbed against the wall or other baggage. The tops of those creases need to be rubbed a bit too. You can adjust the size, roundness and angle of your Brush by clicking on Brush Settings… and making your changes.

Now, if you’re really Type A and want to replicate what your luggage tag looked like after your last airline experience, you could add some dirt….

Once you’ve got your label roughed up enough, Select the edge of the label as we’ve done before, but with the Brush Layer active.

Invert your Selection.

And clean up your background.

Yep, it’s scuffed alright!

Side-by-side comparison…

Does that give you some ideas, Steph?


Tutorial Tuesday (Photoshop Elements)

Quick Trick: Distressing Elements

PDF Version : https://bit.ly/3zNdf1K

I’m still processing last night’s Game 7 Stanley Cup final. What a game!! I’m sad that the Oilers didn’t win, but I know they’ll be back in the fall, this time stronger and more determined. Congratulations Panthers on a great series.

This Quick Trick might be of particular interest to the former paper scrappers in our midst. Remember using an emery board to rough up the edges of your cardstock or to “age” a tag, label, frame or other element? I’m going to show a digital technique that has the same effect. I’m demo-ing it on some text, but you can apply the technique to almost anything. And it only takes a couple of easy steps. I’ve used Amastery Script and the paper behind it is from Aprilisa‘s Evolving.

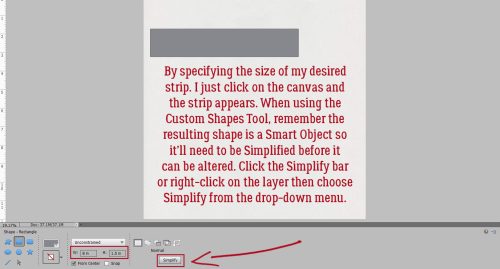
If you’re trying this Trick on text, make sure you’ve Simplified it so it can be manipulated.

Click on the sheet-of-paper icon at the top of the Layers Panel to open up a new blank layer on top of your text layer.

Now go to the Brush Tool and look for the Faux Finish Brushes set. It’s one of the standard brush sets that comes with the Elements software. You’re looking for the Rolled Rag – Terry Brush; it’s about halfway down the palette. If you hover the cursor over the thumbnails, their names will appear on the screen. (I can’t catch them with a screenshot or I’d show you!) No need to adjust any of the settings, other than the size.

Next, with the blank layer active, CTRL/CMD>click on the text layer’s thumbnail to Select the edges of the text. This will ensure that the Brush is only applied to the text, not the whole thing. More about this in a minute.*

Now, look at which layer is active before proceeding. It must be the blank layer! Adjust the size of the Brush (you can use the slider or the [ and ] keys) so it covers roughly half the height of the text. You’ll see the image of the Brush on your canvas so you can judge your adjustment. Don’t fuss about the colour you’ve got selected in the foreground. I’ve used white, but it’s going to be removed so it’s not a factor. Then randomly click the Brush over your text. I went a little overboard, just so you could have a good look at what it does. Whatever you do, don’t DRAG the Brush – it’ll be ugly and you’ll be CTRL/CMD>Z-ing it away.

Next, Select the edges of the blotches you’ve created with the Brush by CTRL/CMD>clicking on the Brush Layer’s thumbnail. You can kinda see that I’ve outlined the marching ants with red in my screenshot.

To remove the Brush‘s blotchies, click CTRL/CMD>X and they’re gone. All that’s left is to Merge the layers. Activate the Text and Brush Layers then CTRL/CMD>E and it’s done!

* So, the tutorial I based this one on said to Lock the Pixels on the Text Layer and then use the Brush. Well, I tried that – the Brush wouldn’t work. So I created a workaround.

Next week, we’ll be into the second half of the year. I know! Gah!!

Tutorial Tuesday (Individual Style)

Challenge Spotlight: Template

The third Tuesday is the day of each month when I take a moment to shine the spotlight on YOU, the GingerScrappers, and your individual styles. I spent some time browsing the Gallery and chose Scrapbookcrazy Creations by Robyn‘s Template Challenge for today’s Spotlight. Template challenges are perfect vehicles for this kind of spotlight because every participant starts with the exact same blueprint and can interpret it in their own way. And templates are great kickstarters for GScrappers whose mojo is nojo. As of this morning there were 29 layouts posted to the Challenge Gallery! No, I’m not going to make you scroll through 29 separate entries; I instead will show you every second layout, in the order they were posted. If you’ve participated and your layout isn’t here, it’s not because it isn’t worthy, it’s because it ended up being an even numbered entry, that’s all. I’ll offer some gentle analysis of each layout and link it to the Gallery so you can get a closer look, and maybe leave your own comment – just click on the GScrapper‘s user name and you’ll be whisked right to it.

But first, let’s look at the template Robyn has provided to each of us, at zero cost. It’s relatively simple, but with a great deal of potential.

You’ll notice that most of the layouts to follow are oriented exactly as the original template is – there’s nothing wrong with that – but look very different! In fact, there are only 3 layouts in the Gallery ATM that have switched up the orientation. Let’s go…

This layout by alexandergirl68 stays very faithful to the original template. Her colour palette is drawn from her photos, with the houndstooth paper mimicking the brick in the larger photo.

For her layout, domino44 chose to make her floral clusters larger and to keep the layout monochromatic. (Remember colour theory? 😵)

I like that dj_w has used a slightly larger, distressed paper behind her wildlife photos. She too used a colour palette inspired by her photos; keeping her clusters smallish and subdued allowed her photos to be the stars of her layout. That tree is a great addition!

Windswept has created a beautiful monochromatic composition that is perfectly colour-matched to the blues in her photos. The addition of a third cluster and the much larger title add a personal touch.

Alasandra’s layout is the first real departure from the basics. The mat behind her main image is more prominent compared to the template, and she’s created a floral border rather than a paper one around her smaller image – the one I didn’t even see until just now! The two watercolours seem to blend into each other. Lovely!

For her layout, larkd chose to rotate the template 90° to the left. She enlarged and shifted one of her clusters so it’s a bit more central and added some extra flowers. Her pastel palette puts the focus on her photos.

Did you all know Michi likes to travel? 😉 She kept the template in its original orientation, but that’s really it; she’s added some arrows to draw the eye to the map, expanded the lower cluster down into the corner with travel-related elements and added a subtitle.

O.M.G!! I love this layout by greenfiend27. It has so much depth and texture with those frames. Clusters are perfection! She simply rotated the template 90° left and ran with it.

Here, jenniferl75 has kept things simple, letting her photos tell their story – the first things I see are those smiles. The nautical colour scheme supports the subject matter.

Here’s a departure from the basic! I like that fontaine has added two more photos that echo the template’s photo blanks, and that she scaled down the clusters to keep the layout from being too busy. The paint behind the photos and the wordstrip set her layout apart.

Pixel Palette has moved a few things around – the title and subtitle are replacing the clusters, which have moved underneath the photos.

I’m so drawn to that large photo! Using coral as a foil for the desert colours in the plaid paper ties the layout together for trinanne. The addition of the dolies to the clusters gives them an elegance.

Perfect picks on the patterned papers, Got2Scrap! They both mimic the dimples on the dome in the large photo. I also like how she’s chosen elements in the same colours as Stitch – the two blues, the soft purple and the pink really work.

Who doesn’t love photos with cute kids getting Grandpa to make funny faces? RobynC has kept the masculine aspect of her layout with her choice of elements.

And last, we have this soft and lovely layout by andastra. Her upper cluster forms a perfect photo corner, and rather than creating a cluster in the lower left area of the layout, she’s shifted it to the centre. The little happy face flair is so sweet!

Great work, ladies! See you next week when I’ll have a Quick Trick for you.


Tutorial Tuesday (Photoshop Elements)

One-Step Photo Editing with Blend Modes

PDF Version : https://bit.ly/3zjWdYy

I stumbled over this brilliant concept and just had to play with it. Because of course I did. 😉 Photos make our memories tangible and are a significant contributor to preserving those memories. But let’s face it… the photos that tend to mean the most are the candid ones, the ones that happened on the fly, and that sometimes means they’re not as true to the snapshots we carry in our hearts as we’d like. Sometimes there really is a quick fix though!

This is a photo I found on Pixabay. It’s tack sharp but has an obvious colour cast and looks underexposed to me. I like the photo, but think it could be better. I could run a whole bunch of edits on it and spend a lot of time trying to make it fit the way I envision it. But… first I’ll run some Blend Modes on it, just to see. [Editor’s note: Blend Modes are the same in Photoshop, but have extra tweakability.]

Before we start experimenting, make a Copy of your photo layer. Why? So the original isn’t altered. Also, because of how Blend Modes work. More about that in a minute. Right-click on your photo layer and choose Duplicate Layer… from the options.

Then click OK. If you prefer to use keyboard shortcuts, CTRL/CMD>J will do both steps in one move.

We’ve talked about Blend Modes a LOT in previous tutorials. But we haven’t really talked about how they work. You may have noticed that they’re grouped in the drop-down menu found in that button bar at the top left of the Layers Panel. The first grouping is the NORMAL Modes. That means the layers don’t interact with each other when at full Opacity. Next is the Darken Modes; these DO allow the layers to interact with those underneath them, and produce different effects as you’ll see. The third grouping is the Lighten Modes. Self-explanatory, sort of. Following that is the Contrast Grouping, which is also essentially self-explanatory.  If you’re interested in learning more about the science of Blend Modes, check out this video from PiXimperfect. It’s about 42 minutes and is based on Photoshop so there are some differences, but it’s fascinating! Now, let’s play!


Click on the Blend Mode button bar and open up the dropdown menu. We’ll skip the Normal Modes and start right with Darken.

Just so we can remember what the original looks like before I change it… each Mode is named under the image.

Darken: It hides every pixel that is darker than the base brightness. The only change here is that the snow looks more gray to me.

Multiply: Only the purest black is unchanged.

Color Burn: Will change pure black and pure white,  darkens and adds colour. This effect is more evident if a solid Fill Layer is applied to above the photo. But this photo is just the photo. It’s a hot mess.

Linear Burn: Basically the same as Color Burn, but it does NOT keep pure white pure white.

Darker Color: You’ll probably never use this one – it’s not really any different than the Darker Mode. The others are more interesting.

Let’s get the original back up so you don’t have to scroll so much to see the changes.

Lighten: The polar opposite of Darken; the snow is a bit whiter, her skin tones are a bit more visible and there’s a hint of purple in her jacket.

Screen: Huge difference! It’s the opposite of Multiply, so it lightens the whole image. This is the easiest fix for underexposed but otherwise perfect photos there is. If it’s too bright, tone down the Opacity until you’re happy.

Color Dodge: Everything is brightened and a lot of the highlights are blown. But it’s an intriguing look.

Linear Dodge: More highlights are blown, the overall image is a bit brighter. More colour variation is noted.

Lighter Color: Again, you’ll probably never use this one because there’s not any obvious difference.

Back to the original before we move on to the Contrast Group, which will lighten lights and darken darks.

Overlay: Yep. Sure did increase the contrast.

Soft Light: This is similar to Overlay, but more gentle.

Hard Light: It sounds contradictory, but this one adds a faded contrast rather than harsh.

Vivid Light: The image looks sharper, with a harsher contrast again. It keeps the white white and the black black.

Linear Light: Lots of contrast but not a ton of detail…

Pin Light: This one is a combo of Lighten and Darken. They seem to cancel each other out.

Hard Mix: Hard is right! The contrast is almost eye-boggling!!

Individually, these Blend Modes are useful and interesting. But the real magic happens when they’re stacked. Check out this image:

I made 4 Copies, so 5 layers in all. The top layer is Screen at 100%. Second layer is Color Burn at 35%, Third layer is Linear Light at 70%. Fourth layer is Hard Mix at 10% and the bottom layer is the original.

Same four layers. But I changed the Linear Light to Linear Dodge at 50% and increased the Hard Mix to 20%. I could play with this photo for days!!


Tutorial Tuesday (Fonts)

Celebrating Grads and Dads Again

PDF Version : https://bit.ly/3yYDDVH

Are y’all getting tired of font-based posts? Lately I’ve been looking at fonts from a bit of a different perspective, searching for those that would be suitable for cutting with my Cricut for cards. When I was making my Father’s Day cards this year, I ended up using an old standby, Lumberjack Regular – the very font I use to create the text on my tutorial screenshots. I think it worked fairly well, considering the text I cut was only about 1/2 an inch tall…

While I was browsing at dafont.com, I noticed a few [100% free, no-pennies!!] fonts that I could easily use to create titles for graduation and Father’s Day layouts too. I’m going to share some of them with you today. As with past font posts, each is linked directly to the download to make it easier for me to enable your font hoarding. Just click on the font name, in red.

I think this grungy font Nexa Rust Slab would work for both grads and dads. It might look fabulous with one of the gradient techniques we’ve played with recently.

College Boy has a varsity vibe and could be used for both titling and text.

Reach has several variations included in the download.

Stitch’n School has a letterman’s jacket look to it. I wish I could have put my letter on my varsity curling sweater.

Athletica already has a gradient applied!! I would probably find a way to make it metallic using Styles.

Now for the dads… Hot Winner Team might actually be suitable for both. I like the condensed form and the funky angle on the horizontal aspects of the letters.

.

This one, Hand Shop Typography A20 is sort of similar, but still different enough. Be advised, the only numerals in the download are the 2 and the 0.

I like the vintage look to Rumble Brave. It’s a bit of a fairytale-hero font, don’t you think?

I love the texture I see with Inlander. It could be zhuzhed up with some Styles for a unique title. Chipboard or felt would be perfect.

Kingston Roman makes me think of gladiators. Who doesn’t love a good toga? 😉

Speaking of superheroes… Smallville actually included the curved title! You can find it by using the tilde [ ~ ] key.

Catastrophic Consequences is perfect for journaling. Clean, upright, legible – exactly what good journaling needs.

Here’s one for the gamer dads. Darks Skyrim has so much potential. I could see it with a shiny shades-of-blue gradient. Yeah!!

And one more journaling font, Philosopher. It’s a little fancier but still clean and clear.

I’ll confess, I’m really struggling with scrapping inspiration and even more with tutorial topics. After almost 350 tuts, it’s really hard to come up with fresh stuff. I may have to make some changes. Stay tuned.


Tutorial Tuesday (Photoshop Elements)

Quick Trick: Gradient Titles

PDF Version : https://bit.ly/45ljkOv

Are you up for another way to use Gradients in your scrapbooking? Let’s apply one to some text to create a title. (I’m showing it on a photo, but it’ll be great as a layout title too. You could even create your own Gradient papers and alphas with this Trick!!) It’s a really quick way to elevate our layouts. Let’s use this photo.

Did you recognize the Joshua tree? Trajan Pro 3 is an Adobe font; I used it for its clean lines. It may be a system font on your computer. But any font you like will be perfect.

I don’t think I’ve ever mentioned what happens when you Simplify a text layer. It basically converts the font to pixels, which then allows us to modify it however we want to – but it’s no longer editable. Here’s a tip: If you think there’s any risk of needing to edit that text, make a Copy of it and make it invisible, like I’ve done here.

This next step is absolutely essential. Click on the Lock Transparent Pixels button, show in the box, so that the Gradient is applied ONLY to the text.

I want to use colours from my photo for the Gradient, so using the Color Picker (Eyedropper), I first selected a spot in the sky for a bright blue. Then I held down the ALT/OPT key and clicked the Eyedropper on the darker shadow area of the photo just above the “U”. That way, I didn’t have to switch the target swatches, Elements did it for me.

This technique’s path is much shorter than the one in our last Gradient tutorial. Click on the Gradient Tool (looks like a… dark-to-light gradient across a sheet of paper) in the Control Panel. To keep this really basic, we’ll use the default settings for the Tool. But there’s a LOT that can be done down there in the Tool Options panel to create a truly unique effect.

To duplicate the photo’s palette, with blue above and tan below, I clicked my cursor above the text and dragged a straight, vertical line to below the text. The Gradient will go in the direction you drag your cursor; I tried upper-left-to-lower-right too, just to see what it looked like. You do you! 😉

To bring the text up out of the sand, I added a slight Drop Shadow and a bit of a Bevel. That’s all there is to it!

For this sample, I went to the invisible, unSimplified text layer and put it all one a single line. Then I followed the preceding steps again to get this effect.

With the identical Shadow and Bevel, this look is much more subtle. Hmm. Which way do I like it better?

Here’s one last look at options. This time I pulled the Gradient up from below, creating a mirror version. I can’t decide!!!!

See you all in June!


Tutorial Tuesday (Individual Style)

Challenge Spotlight: iNSD Mini Kit Challenge

Yep, I know. May is 2/3 over already. It seems Spring is a little behind for us this year; it’s quite cool and damp – I can’t complain about rain though, given the extreme drought we’re stuck in here. But I digress. This month I’m taking us on a bit of a different path for the Challenge Spotlight. Rather than going with one of the usual monthly Challenges, I chose the iNSD Mini Kit Challenge, hosted by CarolW. This was part of the week-long (inter)National Scrapbook Day celebration and it was VERY well-received. The kit Carol provided for the Challenge is beautiful! [editor’s note: There’s an entire BUNDLE that matches the mini in Carol‘s store…] The mini was so well-received, in fact, that I had to stop snagging images from the Gallery when I hit 20. Can’t lose the audience, you know! The layouts appear in the order they were posted to the Challenge thread.

As always, I’ll be linking each of the layouts to the Gallery so you can get a closer look at them and leave some comments, should you wish. Just click on the Scrapper’s user name and you’ll be zoomed right to her layout. Now let’s look at how each Scrapper has used the exactly same mini kit to create a very individual layout…

First up is this clean-and-simple layout from deej. She’s kept her focus on the photo with her minimalist use of papers and embellishments.

Katherine Woodin‘s a scrappin’ machine. She participates in EVERYTHING while also documenting all the moments of her life. She’s augmented the mini with bits and pieces from the full kit to create her layout. By blending her desaturated photos into the background paper, she was able to use photos that might not coordinate colour-wise with the kit while reflecting the theme. I like the precision of her perfectly-spaced button border.

LovelyMissKait makes her first Challenge Spotlight appearance with this beaut! [Welcome!!] The design of her cluster is perfection. The shadows on those papers… the paper looks like it’s lifting a bit in spots. Very effective.

For her layout, greenfiend27 blended some of the papers, threw some paint splashes on, then clustered the elements to draw the eye to her images. That star bokeh adds an almost mystical look. The quote is the perfect addition.

The yellow patterned paper is surely a hit! Here, aquaris has used the wire heart as a frame, anchored by her floral cluster. [Should I tell her I see hummingbirds out my living room window all the time?]

Ah! The grungy, gesso-smeared paper takes its first starring role! The photo of the crocus was a brilliant choice, andastra; it coordinates with the kit’s colour palette beautifully.

There it is again! But this layout looks very different – individual style, amirite? That tumble of paper rounds created by pagefrocks provides movement anc keeps the eye traveling across the page.

And we’re back to the yellow patterned paper again. But that’s the only similarity to the other yellow layouts. KarenDiamond has chosen a photo that coordinates perfectly, then blended it over a paper frame. Her use of brushes and word art to draw the eye while remaining true to the theme is quite skillful.

I see mum23ms has used elements from the full kit for her white space layout. Can you pick them out?

What an artsy look dhariana has given her layout. That grungy paper is the perfect background for this style. She’s made expert use of white space and created a strong horizontal aspect with the arrangement of her elements.

This just screams JOY at me! LidiaG has designed a gorgeous cluster to anchor her photo, and is the first to use the most neutral of the papers for her background. On (much) closer inspection I see she’s also used a mask to blend in the striped paper with a very subtle touch. Love it!

It’s so interesting that two Scrappers can use identical backgrounds and yet have such unique looks. I can see where trinanne got her inspiration – the carriage flair! So far she’s the only one whose extracted the hummingbird from the ephemera.

Cool!! Look at how the way jenasz used the star bokeh sparks her photo! It adds such a magical touch – almost like fireflies. The other unique touch is how she’s twined the vine all the way around the photo, like a frame.

Ooh, where do I start with this? The splotchy ink is gorgeous, the masked photo is perfect and to be honest, it’s really hard to tell where the photo ends and the elements pick up. This is a masterpiece, biche77!

I adore how bagheertje has blended her papers for the background. It looks easy, but getting it right isn’t! She too has extracted the hummingbird and used the loop of twine as a frame, but brings her own style to that beautiful central cluster.

There’s the star overlay again, but with a completely different look. Pippin‘s spray of flowers draws the eye to her photo beautifully blended into the ink splotch. See how the hummie ephemera almost seems like an extension of the ink?

I think this is the first layout to make prominent use of the raffia twine loops. I very much like the font demma_b13 chose for her title – it has an old-world feel, evoking thoughts of European colonization in the late 15th century. The yellow flowers bring a sunny warmth.

How clever is wvufan04? Using the ink splash as the background for some word art in a font very similar to the one on her male subject’s t-shirt… so smart! I like the tiny pops of pink too.

I like how jirsev has amped the ink splashes against that grungy paper. Her layout pops right off my screen.

Our last peep is muted and filled with luscious white space. AJsRandom opted to emphasize the yellow end of the colour palette for her layout and kept her cluster very simple. Lovely!

If you participated in this Challenge and your layout isn’t shown above, I apologize for the omission. It doesn’t mean your layout isn’t stunning and deserving, it means I ran outta gas! I’m functioning on very little sleep ATM and just couldn’t go beyond 20 today. I feel like my brain is melting… But I’ll pull it together and come up with a Quick Trick for next Tuesday!

Tutorial Tuesday (Photoshop Elements)

Recolouring Word Art with Gradient Maps

PDF Version : https://bit.ly/3wGloE0

We’ve talked about recolouring embellishments, word art and brushes before and I’ve shown you a variety of ways to accomplish that goal. One that we haven’t ever looked at is using Gradient Maps. Today we’re only going to talk about recolouring word art, but they’re pretty powerful tools for photo effects too.

But first… what the heck is a Gradient Map? Here’s a direct quote from Essential Photoshop (it also applies to Elements): “Gradient Map is a tool in Adobe Photoshop that allows you to apply a gradient effect over an image. It works by mapping different shades of gray tones in your image to colors defined by a gradient bar. This creates an effect where the highlights and shadows are transformed into specific colors without affecting other details in the image.” Let’s see how it worksI’m going to use this title word art from Word Art World. I’ve made several copies of the word art and isolated the big words, afternoon and park, onto their own layers by Erasing everything else on that layer. I have one untouched original layer just in case I mess it up; it’s not visible. This will let me selectively recolour the words.

This is only a sample so my colour choices are arbitrary; if I was going to use this word art title on a layout, I could choose colours from my photos or from the kit I’d be using to create a cohesive look. When I think about “park”, I see grass, trees, water and light in my mind’s eye. So I think I should colour the word park green. As you can see, I’ve used the Paint Bucket Color Picker to set the foreground colour to a spring green.

Next, I toggled the Color Picker (click the X key to toggle between foreground and background) and chose a more yellow-y green. These two colours will form my Gradient.

Next I clicked on the icon that looks like a circle half blue and half gray, at the top of the Layers Panel, which is the Add Fill/Adjustment Layer button. From the drop down menu I chose Gradient Map…

See the new addition to the work space? That’s the Gradient Map adjustment panel. The colour bar shows the two shades of green I chose, gradually shifting from one value to the other. At this point the Gradient Map layer is affecting all the layers, but that’s easily fixed, so we can ignore it for now.

One easy way to adjust the Gradient Map is to simply Reverse it. Now the colour bar has the light and darker colours swapped. It’s easy to see the difference between the two screenshots. Remember that Elements has created a grayscale copy of the word and has applied the colour based on a mathematical algorithm. If you don’t love it Reversed, untick the box.

Another option is to change the Blend Mode. This will take a little experimentation to find the look I want, so I ran the list. I like the grungy look I get with Vivid Light, so that’s where I stopped.

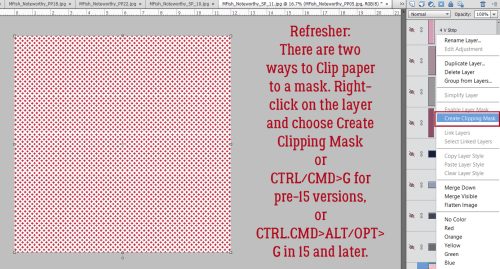
I also tested adjusting the Opacity and decided I liked 100% best. Now I can Clip my Gradient Map to the PARK layer. Right-click on the Gradient layer then choose Create Clipping Mask. Or use the keyboard shortcut CTRL/CMD>G for PSE14 and earlier versions, CTRL/CMD>ALT/OPT>G for PSE15 and more  recent.

Now I’ll do the AFTERNOON layer. Notice that the Adjustment panel is empty. It’ll populate again once I click on the Add Adjustment Layer button.

This tool is so much fun to play with! What do you think the Gradient Map will look like for this colour combo?

Well, it’s pretty orange. Clicking on the colour bar itself opens up this adjustment panel. The sliders start out at the ends of the adjustment bar, and as you move them, you can watch the effect they have on the image. I’ve got the Reverse box ticked, but I’d still like a bit more magenta to show.

It’s very hard to see the bits of magenta that show in this screenshot, but if you’re viewing in PDF, you can Zoom in and check it out.

Now I’ve got all the layers recoloured and the Gradient Maps are all Clipped to the appropriate layers. All that’s left is to Merge the layers and add the title to a layout!

As I mentioned above, this tool is FABULOUS for adding colour to Brushes. I have some grungy alpha brushes that I played with first and other than having to put each letter on a separate layer, I loved the effect. I can’t wait to try it with alphas and other embellishments. What do you think? Would you like to see how Gradient Maps work with photos, or is that not something you’d ever do?