![]()
Happy Wednesday. Are you ready for some sneak peeks? Let’s see what the designers have coming out this week.


I love the colors of these. I can’t wait to go shopping.
![]()
![]()
Happy Wednesday. Are you ready for some sneak peeks? Let’s see what the designers have coming out this week.
I love the colors of these. I can’t wait to go shopping.
![]()
Sizzling Signatures!
![]()
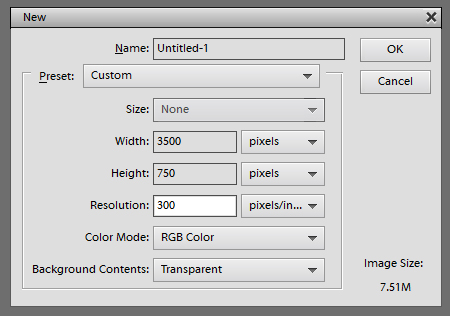
It’s a brand new month, a brand new year and it’s time for a brand new siggie. Signatures… we all have one. Our online presence is greatly enhanced by having a pretty one, or an intriguing one, or a sizzling one. The January 2017 Signature Challenge hosted by CathyK Designs asks us to use glitter in our signature and there’s so many ways we can do that. (psst…. any text that is bold and green is linked to the very spot in the forum, store or gallery I’m talking about… you can just click on it and you’re there!) I know there are some of you who find creating signatures to be a daunting thought – largely due to the very teenytiny size required – so I’m going to give you some tips on making yours fabulous. The guidelines given for these files is that they can’t be bigger than 750 x 150 pixels. But who can create in a space that small? I sure can’t. So I start out with a file size FIVE TIMES the guideline size so I can see what the heck I’m doing.
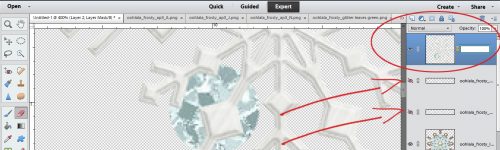
As I’ve mentioned before, this is my own workflow and it works for me, so don’t feel like you have to follow these instructions to the letter – they aren’t INSTRUCTIONS, they’re SUGGESTIONS. Anyway, I like to make a folder for each of my challenge layouts where I collect all the items I want to use in one place. I copy the elements and alphas from their original folders into the new dedicated folder, as I’ve shown below. Then it’s a simple matter of highlighting all the items in the folder and opening them all at once, as a batch.

As you can see, I’m using a kit from Ooh La La Scraps called In the Frosty Air. I chose this one because it has glittery paper in it and because Katie almost always has an alphabet or six and a collection of styles that coordinate with her collections. My name is short, so I like to use an alpha or font with some presence. This one worked for me. If your name has quite a few letters, you can use a skinnier alpha and still make a statement about who you are. Spacing is up to you, whatever is pleasing to your eye. See that I have all three letter layers selected. This is because I want to centre the letters on my palette; I can move them all together without messing up my spacing.
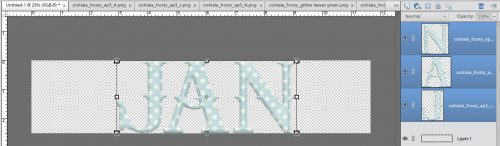
The easiest way to centre a group of items like this is to pull a guideline out to the centre of the workspace. It’s a bit hard to see it in the image below so I used a honking huge arrow. If you’ve never used a guideline before here’s how: Put your cursor right on the edge of your workspace – either the very top, where I have a ruler visible, or on the left side, where I also have a ruler that isn’t shown below – then click and drag until you’ve got it where you want it. You can also see that I’ve merged my letter layers into a single layer.
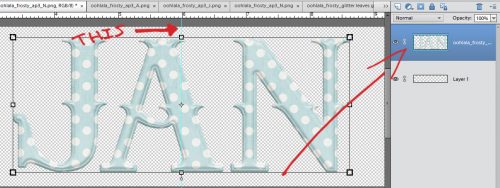
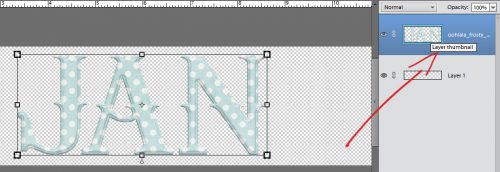
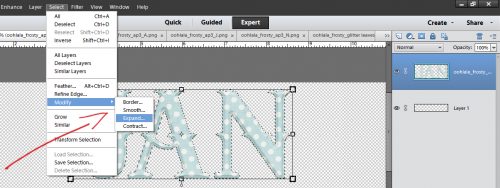
I want to put a glitter paper border around my alpha to jazz it up and to meet the challenge criteria. I messed up my screenshots, so let’s pretend I’ve already dragged my glittery paper onto the workspace. Now I’m going to create an outline of my alpha by selecting the edges – clicking on the Layer Thumbnail. That puts some marching ants around the edges.
Then I clicked on Select>Modify>Expand to create a nice border around my alpha.
The pop-up menu looks like this. I chose 20 pixels, after some trial and error. Just enter a number in the box then see what it looks like. You can always CTRL/CMD+Z out of anything you’re not happy with.
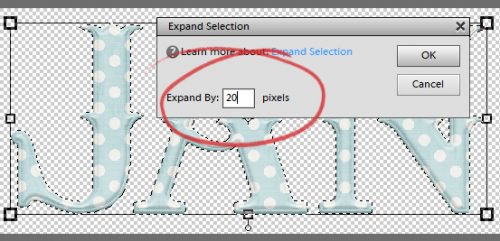
See where the marching ants are now? 20 pixels gives me a nice border, visible but not overpowering.

While I still had the alpha layer highlighted, I inverted the selection, since I want to “cut” the excess paper away from my outline. Clicking on Select>Inverse in the Tabs is the same as CTRL/CMD+Shift+I.
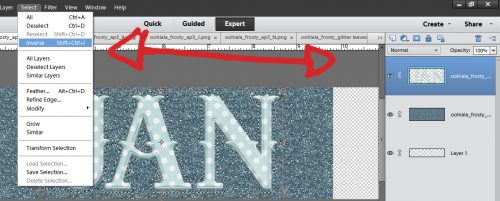
Don’t forget to change the selected layer to the glittery paper. If you forget, when you Edit>Cut (CTRL/CMD+X) you’ll just delete your alpha from its layer. Not what you’re going for.
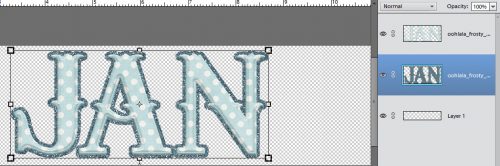
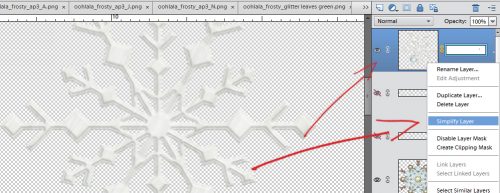
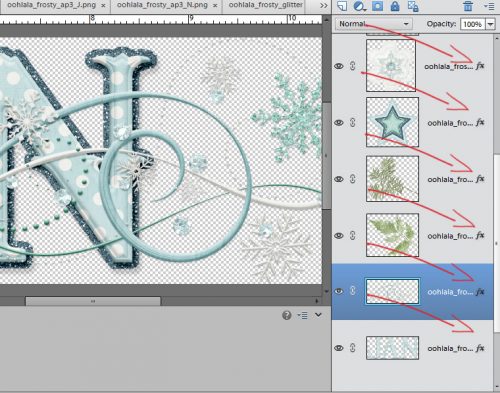
So now I have a glittery border around my name. I went ahead and added the various elements I chose for my siggie and was pretty happy with it. BUT… I decided I wanted to glitter up one of the snowflakes in the scatter I used. So I duplicated (CTRL/CMD+J) the layer. Using the Elliptical Marquee tool I selected one of the large snowflakes from the duplicated layer then Cut it (CTRL/CMD+X) and Pasted (CTRL/CMD+V) it onto its own layer. I turned the visibility of the two scatter layers off so I could see what I had. Oh, there’s a sequin there. Don’t want to glitter that up, it’s already glittery! So I created a Layer Mask by clicking on the blue rectangle at the top of the Layers panel. The mask is that white strip to the right of the Layer Thumbnail. You’re probably asking why I didn’t just use the Eraser tool to erase the sequin. I could do that, but if I accidentally had a dog land on my laptop as I was erasing and I erased most of the snowflake too, I’d have to go back to the beginning of the process. This way, if I erase too much, I can paint whatever I didn’t want gone back in. Remember, white conceals and black reveals.
With the Eraser tool and a white foreground colour, I carefully erased the sequin. If I’d slipped and took off one of the points on my snowflake, changing the foreground colour to black (the X key does that for me without having to click on the little bidirectional arrow) and un-erasing over that spot will bring it back. Once I had the sequin erased and the snowflake all perfect, the layer had to be Simplified. Right-click somewhere in the blue area on the selected layer then choose Simplify Layer.
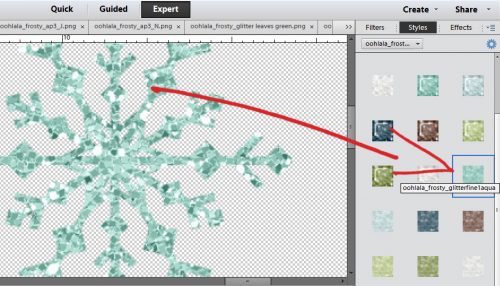
Next I opened up my Effects Panel and chose the Glitter Style from Ooh La La Scraps’ In the Frosty Air styles menu. I decided I wanted the aqua fine glitter style and double-clicked on it to apply it to my snowflake. Woohoo!
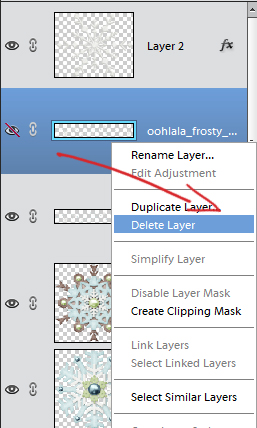
Then I went ahead and deleted the duplicated layer of the snowflake scatter… the one that I had cut the snowflake from. The original snowflake scatter layer is visible again too.
Then I shadowed all my layers so they’d have some nice oomph. Don’t forget this step! You still want your siggie to look three dimensional and pretty.
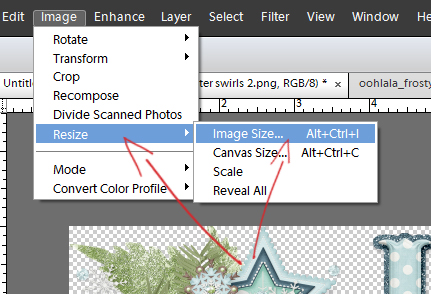
When you love how your name looks with all its finery around it, it’s time to shrink it to fit the guidelines. You can follow the steps shown below, or go the quick way with a keyboard shortcut (CTRL/CMD+ALT+I).
These are the settings I recommend. Make sure you’ve checked those boxes at the bottom. When you do it this way, you can change the pixel counts and all the other settings automatically change too. This is helpful for posting to the gallery, because you can just resize your image to 600×600 this way.
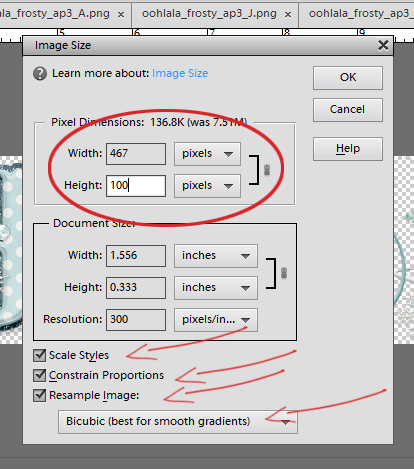
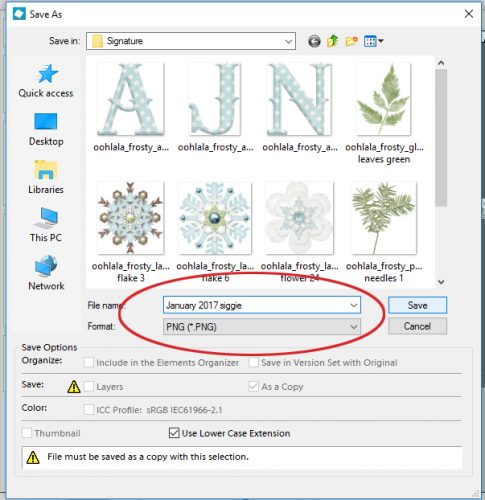
See how teensy the image is now? But I promise, the details have been totally preserved. I like my siggie to have a transparent background. If you save it as a JPEG, it will have a white background. So what I do is select Save As… (CTRL/CMD+Shift+S).
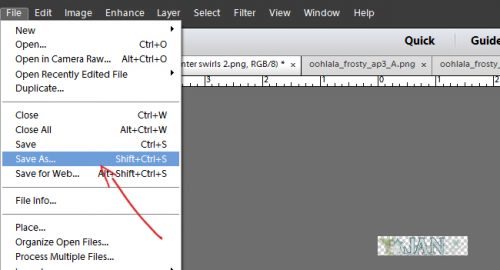
In the Save As menu, I choose PNG and give it a name that I’ll be able to recognize later. And I save it into the same folder I had all my elements in already. Gotta keep it all together in one place…
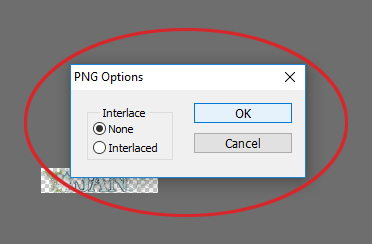
The PNG menu looks like this. Just save it as I’ve shown.
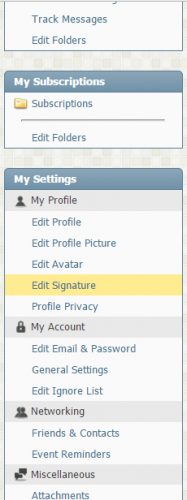
Now you can add your signature to your GingerScraps Forum profile! First, post your siggie to your gallery. Open up GingerScraps in a new tab to save yourself some work. On that second tab, go to the Forum and select Settings from the upper right hand side of the screen just below the banner. Then select Edit Signature.
I already had a siggie that I’m now going to replace. So I clicked on the old siggie, turning it blue, then hit the Delete key.
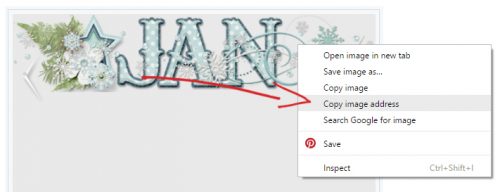
Then go back to the first tab, where you have your siggie selected in your gallery. Right-click on the image and select Copy image address.
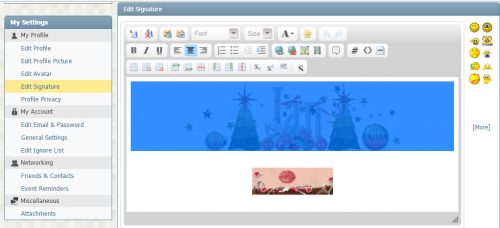
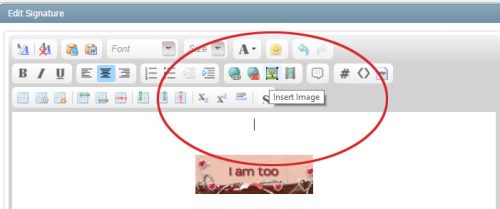
Flip back to the tab where you’ve got your settings open and click on the Image icon. If you want your siggie to be centred under your forum posts, make sure you have that control selected.
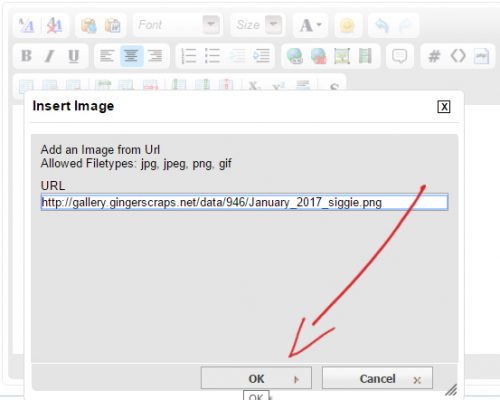
Then paste the image address in the URL box as shown, then click OK.
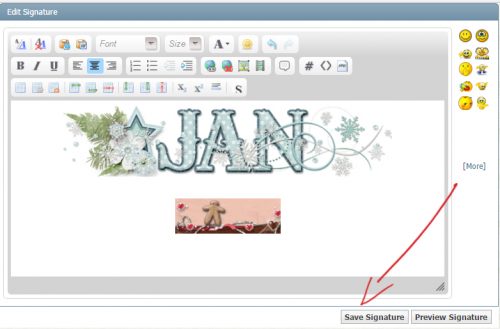
That’s all! When you see the image of your siggie appear, you just have to click on Save Signature and you’re all done!!
Some tips for eye-catching signature files:
Last thoughts: Last week I mentioned an unofficial Tutorial Tuesday Challenge. There is now a Challenge Gallery on our GS Facebook Fan Page for those who have FB accounts. For those who don’t, a link to your layout in the GingerScraps Gallery in the comments here on the Blog will get you an entry too. At the beginning of each month I’ll check both places for participants and Mr Random will select the winner. So start thinking about what we can learn together.
![]()
![]()
Did you know that GingerScraps had a book club? Well, we do. Head over the forum and check out the Hey Good Bookin’ area of the forum. For January, specifically check out the Book of the Month. This month JoyLynn (our own Blue Heart Scraps) has chosen “The Shack by William P. Young“.

Want to read along with us? Pick up a copy of the book from Amazon or Barnes and Noble or your local library.
Watch in the middle of the month for a Scrap Your Read Challenge. One participating layout will receive a $5 giftcard to Amazon or Barnes and Noble, and have their layout featured in next month’s blog post.
Want to help pick out February’s book? JoyLynn has added a poll to the forum. Click on over and add your vote. Don’t put it off. JoyLynn will close the poll on January 10 so that there is plenty of time for everyone to pick up the book voted on.
Happy reading!!
![]()
Should auld acquaintance be forgot,
And never brought to mind?
We seem to start every New Year’s newsletter that way. It’s a great tradition. This year, changes might happen, but some things will stay the same. We’ll add new designers, but we won’t lose that “it’s like family” feeling you’ll always find in the forums and gallery. Thank you, all of you, for a wonderful year at Gingerscraps, and here’s to a new one filled with so much more!

It is the First of the month, and that means the revel of our new Buffet!!
*NEW Buffet Bundles* Take a look at our all new Buffet Bundles! Each buffet for 2016 will have a sub category for our Buffet Bundles. One easy click to add bunches of Buffet goodies to your cart, and an amazing value too!

The designers all had their own take on what the colors and theme said to them! I love the variety!
The designers definitely each made the palette their own and came up with some gorgeous designs, each unique but working so well with the other designers’ creations
The CT did such a great job showing how well all of the kits blend. They all did wonderful work!
This is just a few of the layouts. Keep an eye out in future newsletters to see more. Maybe even one of yours, if you make sure you put it into the Buffet section of the gallery!
This month, we have several new designers joining the team, and our December Guest is staying through January!

https://store.gingerscraps.net/Eyeinspire
Thank you for sticking around, Rhonda!

Please welcome Jennifer, of Word Art World!!
We asked Jennifer to give us a quick note about herself, and this is what she had to share:
Hello! My name is Jen Arbon and I design under the name Word Art World. I began creating word art designs over six years ago and fell in love with designing digital scrapbooking products and printable wall art. I am married to a wonderful, supportive husband and together we have three beautiful children. Currently, I am studying Web Design and want to teach Web Design at our local high school, against my two teenagers’ wishes. Years ago, I set a goal to "create" something new every day, and that is why I love designing because it gives me the opportunity to do just that.
Here are just a few things she has in her store:

https://store.gingerscraps.net/Word-Art-World

https://store.gingerscraps.net/Word-Art-World

https://store.gingerscraps.net/Word-Art-World

Please welcome Kristina, of Kristmess Designs!
We asked Kristina to give us a quick note about herself, and this is what she had to share:
Hmm a bio? What can I tell you about myself? My name is Kristina Messier, I design under the name of Kristmess Designs, I have been selling at Gotta Pixel since the store opened a million years ago – okay so more like 10!! I am a very shy and quiet person, I was born and raised in England, travelled the world working on Cruiseships for 4 years where I met my husband, a French Canadian, and I now live in Montreal QC Canada, with him and our 3 sons. As you know I’ve been working as a designer for the past 10 years or so before that I worked at Sears PhotoStudio taking photos of the little kiddies! I have a degree in Photography but don’t really use it now since I found my passion is with Photoshop!!
Here are just a few things she has in her store:

https://store.gingerscraps.net/Kristmess

https://store.gingerscraps.net/Kristmess
And she has a great sale going on, as well.

Remember when you spend $10 in the store, you get a great new collab!

https://store.gingerscraps.net/GingerBread-Ladies-Collab-Puttin-On-The-Glitz.html
This month’s Monthly Mix is called “Good Vibes Only”! It is a gorgeous kit created by Connie Prince, Amy Stoffel, Pretty In Green, and Trixie Scraps Designs. Don’t be afraid to be you!

https://store.gingerscraps.net/Monthly-Mix-Good-Vibes-Only.html
A new year means a new Daily Download!
Before I show you this month’s, here was last month’s (last years’?)

https://store.gingerscraps.net/Family-Is-Forever-Kit-by-Keley-Designs.html
A perfect kit for the holidays! Even more perfect for the start of a new year!
And here is this month’s:

https://gingerscraps.net/gsblog/2017/01/dd-jan-01-4/
Remember, the download is kept up for 5 days, and then it is taken down. If you miss pieces, the kit will be available for purchase on the first day of the following month.
Remember, if you complete 10 challenges, just ten, you get a free kit as well!!

I know I’m going to make sure I do my 10 challenges for THIS, that’s for sure

A new year means a new Daily Download!
Before I show you this month’s, here was last month’s (last years’?)
https://store.gingerscraps.net/Family-Is-Forever-Kit-by-Keley-Designs.html
A perfect kit for the holidays! Even more perfect for the start of a new year!
And here is this month’s:
https://bit.ly/2idJmO5
Remember, the download is kept up for 5 days, and then it is taken down. If you miss pieces, the kit will be available for purchase on the first day of the following month.
