Carol: Objects Inside Other Objects and Going Incognito
![]()
At the end of last week’s tutorial I announced that Carol (gnana96) had been selected to challenge my PSE skills. When I contacted her she told me she had two tricks she’d like to learn and couldn’t decided between them. They were both relatively simple so I decided to show her how to accomplish both. Ready, Carol?
In her message to me, she said she was building a recipe book and wanted to use cooking-related elements but was having trouble making them look right. She wanted to know how to put something (ground meat) into something else (a frying pan) so that it looked good. I don’t have those sorts of elements in my stash, so I’m going to use toys instead, but the principle is the same.
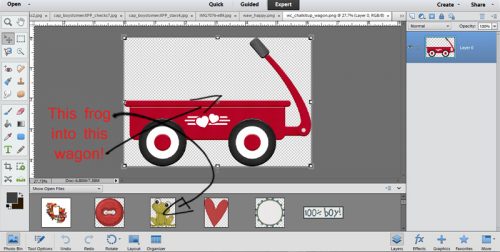
I pulled a wagon from a Wimpychompers kit called Chalk It Up (acquired via The Daily Digi). Then I grabbed a puppy and a frog from Boomers Girl Designs‘s Boys Will Be Boys. I proceeded to put the puppy and the frog into the wagon, so to ensure I had enough room to manoeuvre, I changed the Canvas Size. The long way is Image>Resize>Canvas Size [WorkSmartNotHard: CTRL/CMD>Alt>C]. Then I moved the wagon down to the bottom of the canvas.

To see where things needed to sit for the best effect, I put the puppy element and the frog element on layers on top of the wagon, resizing as necessary, and adjusted them so they didn’t extend below the bottom of the wagon. Then to make sure they were properly aligned I used the Align tool. To do that, select as many layers as you want to line up then go to the Tools work space. Determine which edge you want to line up, then click on the appropriate icon – NOT the descriptor, because that does nothing!

Then, with both puppy and frog layers still selected, I moved them under the wagon on the Layers panel. Now it looked like they were inside the wagon, and that might have been enough (ground meat in a pan) but these little things have articulating limbs, so I could take them another step toward really looking like they were inside the wagon.

I wanted to have one of the frog’s legs and one of the puppy’s legs hanging down over the side of the wagon, so I created a Layer Mask. (Lots of previous tutorials have used Layer Masks, so if you’ve read those ones, feel free to skip ahead.) The reason for using a Layer Mask is to give more control over what happens to an image. Layer>Layer Mask>Reveal All [WSNH: Click on the blue-square-gray-circle icon at the top of the Layers panel]

Now I was ready to erase the wagon where it overlaid the frog’s leg. Make sure you’re on the Layer Mask, not the actual element. I selected the Eraser tool with white as my foreground colour. (Black Conceals, White Reveals) You can toggle between white and black using the X key.
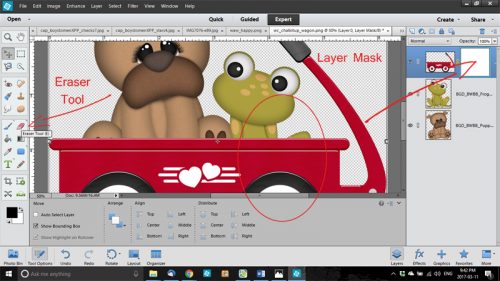
Don’t worry if you erase more of the object than necessary, because you can switch from erasing to painting back by toggling foreground colours. I did the same process to reveal one of the puppy’s legs too.

I zoomed in really close for the painting-back step so I could see exactly where the limb’s edges were. Looking good!

Once I was satisfied the image looked perfect, I right-clicked on the layer in the Layers panel and selected Simplify. That incorporated the masked areas into the layer and eliminated the risk of messing it up. But…

The detailed images of the frog and the puppy had shadows where they overlaid the critters’ bodies. Shouldn’t there also be shadows on the side of the wagon? Simply using a drop shadow Layer Style isn’t going to help (even though I DID use one at this step so that the frog threw a shadow on the puppy where they overlapped) because the layer’s shadow will be behind the wagon. What to do?
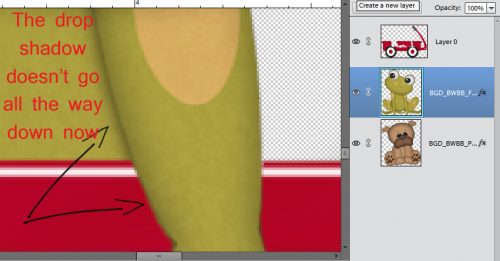
Drop Shadow brushes to the rescue!! These brushes come preloaded with your PSE software, so just look in your Brushes menu for them. Remember, for ease of adjustments later, put your brushes on their OWN LAYER. For this step, don’t worry about the Opacity of the brush, just pay attention to the colour you’ve chosen and the size of the shadow you’re extending. It’ll take some trial and error to get it right so be patient! Following the direction of the light source the designer used, I painted in my shadows.

When I was done, I wanted to soften the edges of the shadows. Filter>Blur>Gaussian Blur will do that nicely.
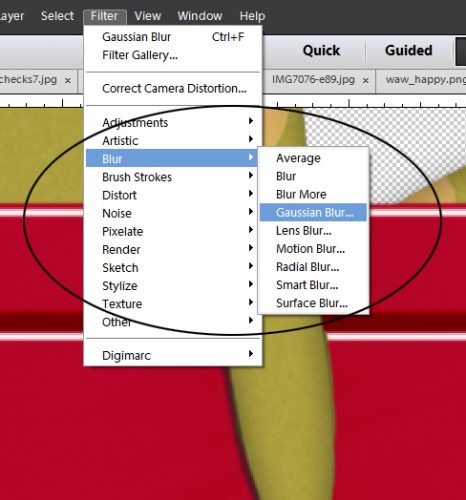
I pulled the slider to the right to increase the radius of the blurring, and watched the actual image as I went along. When the shadows I’d painted blended into the shadows on my little frog, I selected OK. Then I decreased the Opacity of this shadow layer to seamlessly blend the edges in. You can adjust Opacity first and then Blur if you like. It might give you more control, so try it both ways to see what works best. CTRL/CMD>Z (Undo) is your best friend!

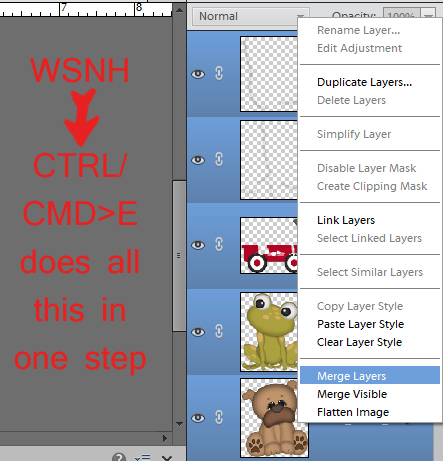
I repeated the process for the puppy. When I was finished, I knew I wanted to Merge the layers together to move them to my layout as one object.

After selecting all the layers, I merged them as shown. (You’re saying, “Yeah, sure… you used the keyboard shortcut.” And you’re correct!) Then I carried on with building my March 2017 Inspiration Challenge layout.
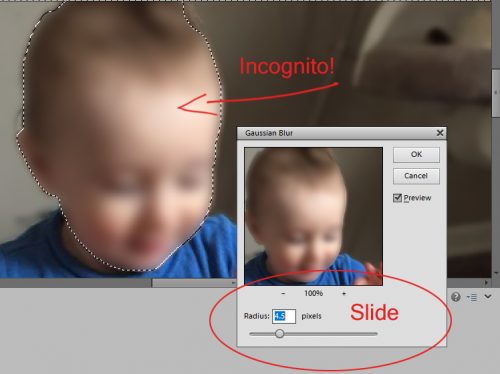
When choosing something that makes me happy – the theme of the Inspiration Challenge – the first thoughts that come to mind are thoughts of my grandchildren. The second of Carol’s requests was about concealing the identities of her older grands, who value their privacy. So this was a natural! Little A isn’t concealed at all below, is he? I clicked on the Quick Selection Tool, which many people just call the Magic Wand. Using it, I outlined his little face, which put a line of marching ants around it. That’s my “selection”.

Then I went to Filter>Blur>Gaussian Blur just as I did for my limb shadows above.

A little tug to the right and his features are blurred, but his expression is still discernable. It’s really that easy! To conceal parts of her journaling, Carol could select the words in question on her text layer (simplified, of course!) using the Rectangular Marquee tool then blurring the very same way. Now Carol (and all the rest of you grandmothers out there) can scrap photos of her older grands as often as she wants.
Remember, if you’ve used a technique from these tutorials, post your finished layout in the GingerScraps Facebook Tutorial Tuesday Challenge Gallery for an opportunity to have YOUR chance to challenge me. If you’re not a Facebooker, you can post a link to the layout you’ve created with the tutorial you used in the comments section here on the Blog. I’ll get a notification and will then enter you into the draw. The first week of each month I’ll have a random draw of all entries and the winner will be announced at the end of the first tutorial of that month.
See you all next week!
![]()