Down on the Border (not the Little River Band version)
![]()
A while back some of my fellow Sugar Cookies (praise team members) and I were kicking around ideas for tutorial topics. I usually have some ideas about what I can show you, but coming up with new, fresh lessons every week isn’t as easy as it sounds. So my Cookie gals gave me a couple of ideas that I could use for quick tuts, and this was one of them. Well, not precisely what was suggested, but I think it’s even better! I’m going to show you how to build a border, using repeating shapes. I could have taken the easy route and showed you how to make a simple scalloped border that some template designers use routinely, but I thought, no… let’s do something with a little more vision. And here we are…
I didn’t do the Signature Challenge in February (it’s a difficult month for me and I can’t get excited about it) so it was time for a new siggie. March doesn’t mean spring in this part of the world – we still have snow well into April most years – but March has other wonderful implications. Both my daughters were born in March, and St Paddy’s Day is right in the middle. Since I’m mostly Irish by ancestry, my March siggie will always include some reminders of those good things. And that led me to create a border of shamrocks, using the Custom Shape tool.
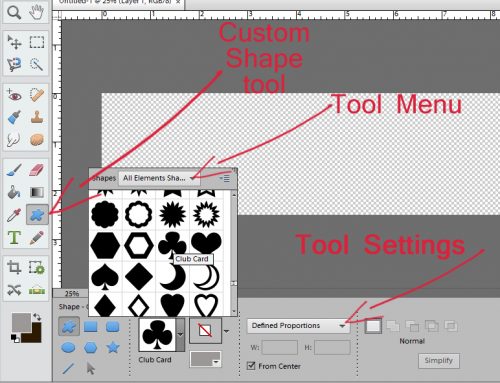
The first task before you can get going is to open a new file work space in PSE. If you want your border to extend from edge to edge on your layout, choose that measure for one of the dimensions, and go with 1 or 2 inches for the other. Because I was doing a siggie, I selected the same dimensions I described in the tutorial on signatures. I also added a grid so my shape could be easily sized. But you can do that even more simply by setting Defined Proportions. When you use this setting your Custom Shape tool will automatically give you a shape in exactly those dimensions.
I usually select All Elements Shapes from the pop-up menu when I open up the Custom Shape tool so I have a wide variety of choices. I know there are all four playing card suits represented as standard shapes, so I went right there and chose the CLUBS shape – which is a shamrock! (Real shamrocks have three leaves, not four.)
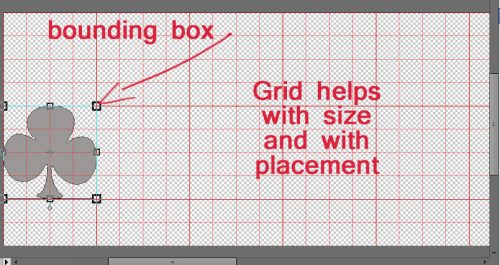
Once I had all that figured out, I went ahead and made a shamrock shape on my canvas. You can use the grid, or not. I’ve played around with using the grid and and without – either method will work just fine.
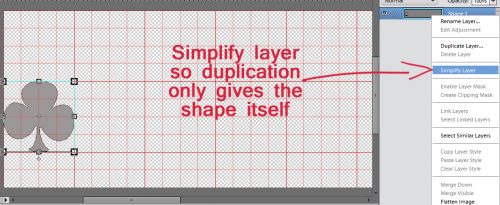
I knew I wanted the shamrock border to extend from one side of my canvas to the other, so I Simplified my shape to get rid of the extraneous stuff the software puts on a shape layer.
Then I made a stack of copies, all identical to my first shape. [Work Smart Not Hard tip: CTRL/CMD>J duplicates your layer.]
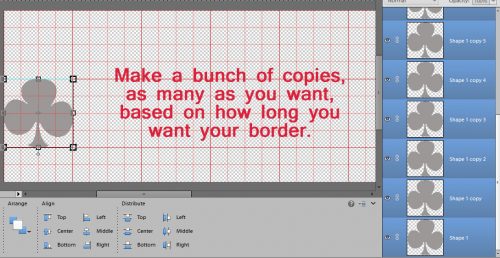
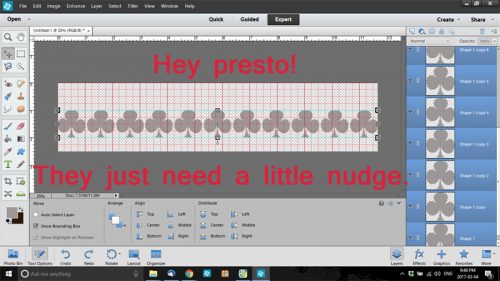
The software stacks them one on top of the other, so when I had as many copies as I thought I’d need, I selected only the top-most shape and moved it all the way to the other side of my canvas. Once I had shapes at each side, I selected ALL the shape layers. Then I went down to the Tool Options menu and clicked on Distribute>Middle.

Whoa! All my shapes lined themselves up in a nice, tidy, evenly-spaced line! (This is a fabulous tip to use when you’re putting buttons in a row, or lines of stitches, or almost any objects you can come up with.)
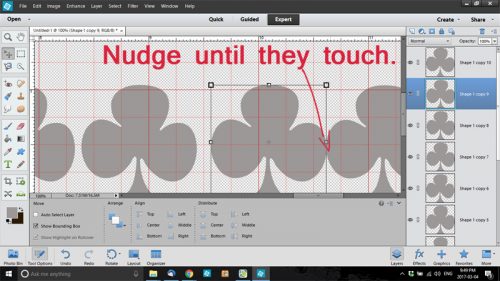
There was some space in between my shapes, which won’t work well for a continuous border, so I nudged them until they were all very slightly overlapping. Then I resized the whole group of them to regain my edge-to-edge border.
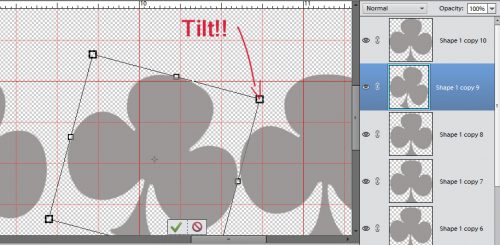
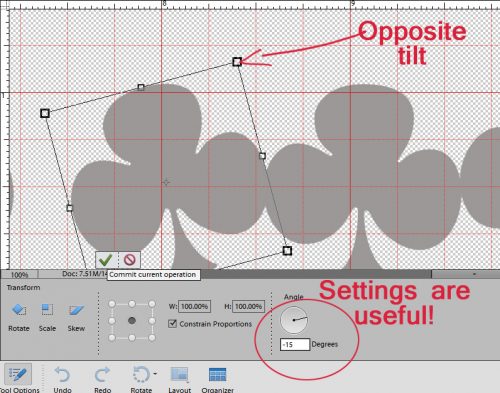
Then I decided to get fancy. So I tilted some of them to the right, and others to the left. If you’re a little OCD (like I am) you can use the tool settings to make the tilts uniform, simply by keying in the angle you want. Tilting to the right uses a positive number, to the left a negative.
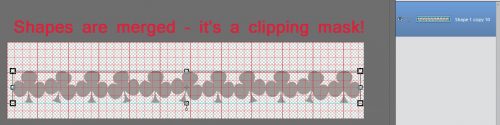
Once I was happy with the way it all looked, I merged the layers. [WSNH tip: Select all the layers you want to merge, then CTRL/CMD>E] And now I had a clipping mask!
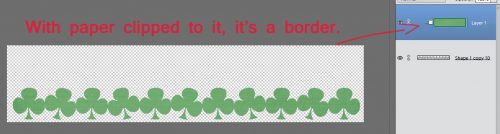
Once I clipped a paper to it, my border was done! (Almost…) [WSNH tip: CTRL/CMD>G to clip the current layer to the layer below it.]
I looked at my border for a couple of minutes and decided it needed some inked edges. Keep your brush size a little bigger than you think you want, because otherwise it won’t fade away into the paper in that nice way you want it to.
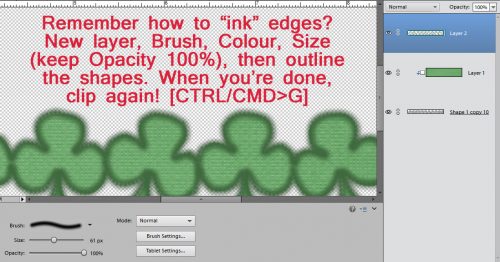
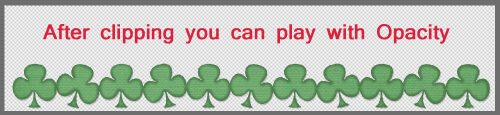
When your edges are all inked, create another clipping mask [CTRL/CMD>G] and cut away the brush edges that extend past your border. Then you can adjust the Opacity of your brush until you like the way it looks. Finish up by merging [CTRL/CMD>E] the ink mask with the border. And you’re done!
Remember, if you’ve used a technique from these tutorials, post your finished layout in the GingerScraps Facebook Tutorial Tuesday Challenge Gallery for an opportunity to have YOUR chance to challenge me. If you’re not a Facebooker, you can post a link to the layout you’ve created with the tutorial you used in the comments section here on the Blog. I’ll get a notification and will then enter you into the draw. The first week of each month I’ll have a random draw of all entries and the winner will be announced at the end of the first tutorial of that month.
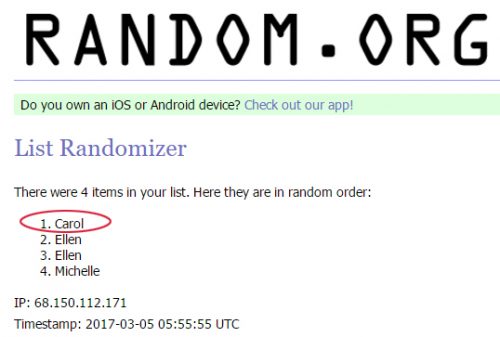
At the end of February there were 4 names on the list of people who had either posted a layout to the Tutorial Tuesday Challenge Gallery on Facebook or posted a link to a layout in the Blog comments section. Mr Random chose Carol’s name (gnana96) … Carol!! Think about what you’d like me to show you and your peers for next week, send me a PM and I’ll get right on it!
![]()
What a fun tutorial! It’s great to learn something new. Thanks!
Thank you Liz!
I have seen this tutorial before but never as well written as this. Thanks!!
Thank you, Heidi! It’s good to know my tuts are helpful.
Jan, I am IN LOVE with your tutorials! Seriously, you do SUCH a fantastic job. Thank you. I’m working on a page right now using a border with two buttons, and it works so nicely distributing them alternately across the page. I can’t get it to work with 3 buttons, though. It puts all of one color at one side (side-by-side), then alternates the other two the rest of the way. I know there must be a trick, but I can’t figure it out. Any ideas?
I’m not sure about why that happens. Let me play with it and see if I can come up with a solution.