Pick Your Pivot Point
![]()
Today’s tutorial is a quickie – short, sweet and very much to the point. The PIVOT POINT that is! I’d seen a tutorial at another site that was compiled by the talented Yobeth Puckett, and I filed it away to examine more closely another time. Yesterday, I dragged it out and tried to make sense of it. Unsuccessfully. At first. Because I was overthinking it. But believe you me, this is going to be a boon to all of us because it’s going to speed up our scrapping and reduce frustration by a lot. I know I’m going to incorporate it into my workflow, starting today.

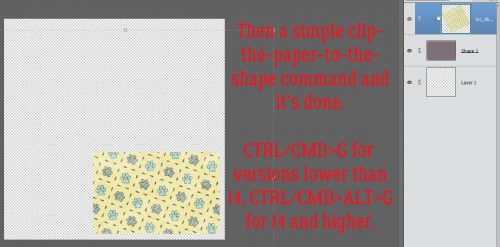
So you know how sometimes you’re using a template and you decide you really want the stripes on your paper to run diagonally instead of horizontally. So you drag and drop your paper onto your template, then you rotate it to the desired angle. But it looks like my screenshot – the paper isn’t covering the whole paper shape mask you’re planning to clip it to. Then you nudge the paper until it covers the shape. Many steps. But…

Have you paid any attention to the controls the Move tool provides? I know I didn’t. But I’m never going to ignore them again. See that little box made up of dots? It’s a POWERFUL thing. Notice that the central dot is selected.

That gray dot signifies the Pivot Point around which the object rotates. So if I left the centre dot selected, the paper would spin on centre. But if I MOVE the selection to another one of those dots, it changes the Pivot Point!

See? By moving the Pivot Point to the middle of the right side, then rotating my paper on THAT point, the shape is completely covered! To quickly get the exact angle I want on the pattern, I typed in a numeric in the Angle box rather than try to hit a moving target.

Then all I had to do was clip the paper to the shape. As you already know, I use keyboard shortcuts rather than click on a tab, drag the cursor down an options list then click on the one I want. Quick clipping is achieved by CTRL/CMD>G for versions prior to 14 and CTRL/CMD>ALT>G for versions 14 and up.
Sweet! Now I know a shortcut for rotating a paper. But what about something that isn’t symmetrical, like this piece of ribbon. I want the knot to sit on top of the bow’s knot, but I want the ribbon to be at about a 30° angle to the bow. How can it be rotated around a different Pivot Point? Is it even a thing??
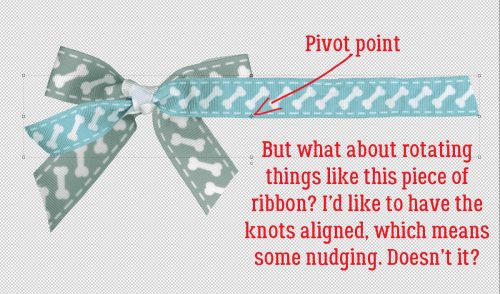
Here’s what usually happens. I rotate the ribbon. Then I have to nudge it until the two knots line up. Not the end of the world, but boy, it would be nice to be able to do it even more quickly and easily. Work Smart Not Hard is my mantra after all!
The actual Pivot Point is at the centre of the bounding box around the ribbon, but I want it on the knot. I tried using the tool’s command box but it was a colossal fail. None of the options was right.

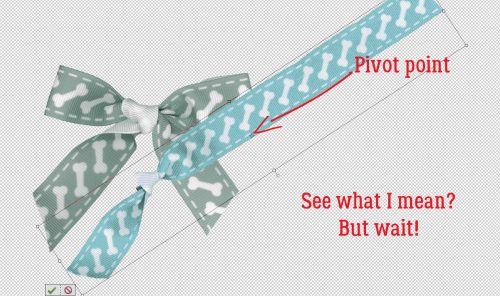
This is what happened when I selected the upper left corner of the box. Better, but not what I want.

This is the part where I struggled with Yobeth’s tutorial. I was really overthinking it, trying to drag the Pivot Point to where I wanted it while holding down the ALT key. But all I had to do was hold the ALT key down and CLICK on the spot where I wanted the Pivot Point to go.
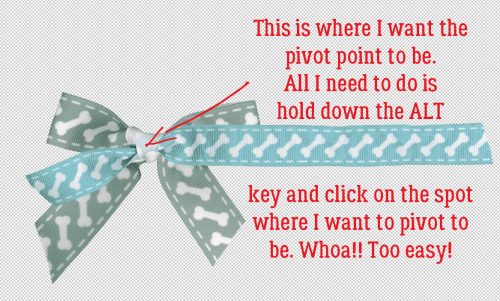
It really IS that simple!!!!

I can think of so many ways to use this trick. One that immediately jumped to mind is for rotating photos to match the angle of photo spots on templates. It’ll save so much nudging, I’m not even kidding!
Now I’m ready to create my layout for the Storytelling Challenge. My examples here were set up using some of the items I’m going to use from LouCee Creations‘ Shampoodle and Setter kit. It should be finished and in the Gallery by the time this tut goes live. See you all next week!
![]()