The Key to Painless Extractions!
![]()
Greetings GingerScrappers! It’s Tuesday again… the weeks are just flying by for me. Hubby and I have started working on the “non-essential” area of the house, what I’m calling #jansworld… the huge room in our downstairs that will be my hobby space. The movers dismantled all of our storage shelves and two of my desks. They also just loaded the room with every box that had “office”, “Jan” or “craft room” on them, piling them up 5 or 6 high with no rhyme or reason. So it’s a monumental job to get that space sorted out. We’ve made a good start but when I told him today I had a tutorial to write and we weren’t going to spend any time in there… he went ahead and did some things without me and then had to interrupt me twice to ask for guidance. Grrrrrrrrrrrr. So I know I’m going to miss my usual post time. Sorry… Thankfully my boss (the amazingly generous Ginger!) isn’t too much of a stickler.
On to the tutorial. I’m feeling like I should be able to get some scrapping done this month so I looked at the July Challenges and decided which ones I might be interested in taking up. The Inspiration Challenge Lina of LDragDesigns has tossed out is to use an extraction on a layout. I like extractions but find them very time consuming. What to do, what to do… How about checking to see if Elements+ has a quick mode?! Why yes, yes it does!
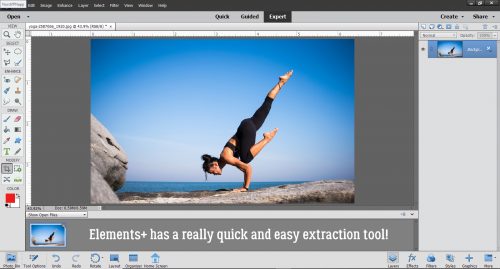
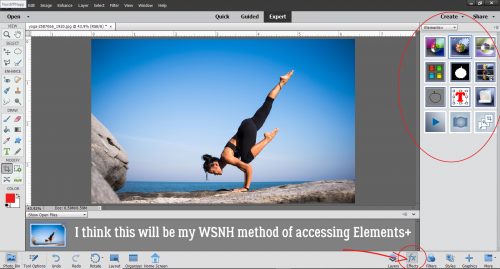
I’m intrinsically lazy, so if I’m going to do something as fiddly as an extraction, you know I’m going to choose carefully. I’m going for a clean cut and as little work as I can get away with. This photo from Pixabay ticks all my boxes. The Elements+ feature I’m going to show you is in the Selections menu, which makes perfect sense because that’s what an extraction is. I think for the sake of Working Smart, Not Hard, I’ll be using the Effects button at the bottom of the Layers panel and choosing Elements+ from the drop-down.
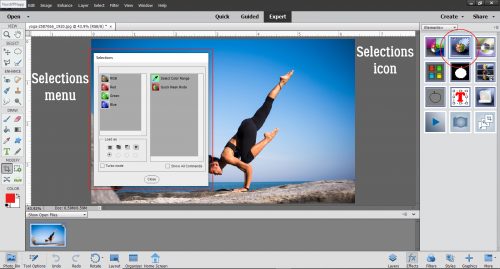
You can see what each of those Elements+ icons is for by holding your cursor over them and letting the name pop up. The Selections icon is at the centre of the top row. The Selections menu appears on the left of the workspace as shown.
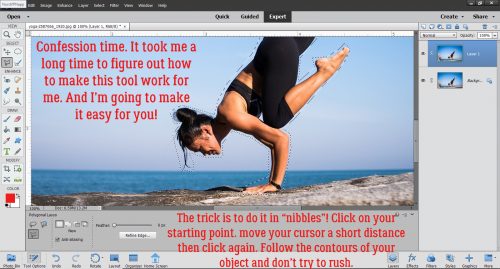
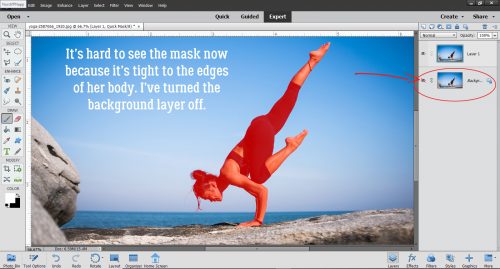
But first, before we go down the rabbit hole, I made a Duplicate photo layer… just in case I do something I can’t undo. I’m going to start off with the Polygonal Lasso Tool. It’s the one that looks like a Greek symbol with a tail. I also turned off visibility for the background layer.

You’re not going to believe how long it took me to figure out how to use the Polygonal Lasso tool. Let’s just say it took a LONG time – I hated it because it didn’t do what I wanted it to do – and leave it at that. But now that I know how to use it, I quite like it! The trick with it is to make small nibbles, and to get as close to your subject as you can. It might sound like a slow process but it isn’t. As my mother used to say, less haste and more speed! Click on a spot where it makes sense to start out. Then move your cursor to a natural spot to change course. I started at the left of her hands, just below them. I went over to the area just below where the heel of her hand starts to lift off the rock and clicked there as my next reference point. Then I went to the bottom of her bracelet, clicked and moved to just past the bead on her bracelet. By taking a little bit of extra time with this step, it sped up the subsequent steps. I kept making small (and a few not so small) runs, clicking at the end of each, all the way around her. When I got back to my original starting point I double-clicked and I had a nice, free-form selection!
In this screenshot you can almost see the outline of my Lasso’d area. Now I went back to the Selections menu and clicked on Quick Mask Mode. Red is the default colour, but if I was trying to extract something from a red background, I could easily change the mask colour to blue, green or a chosen colour.

And that was all I had to do to create a mask on my image! Now I can fine-tune the edges.

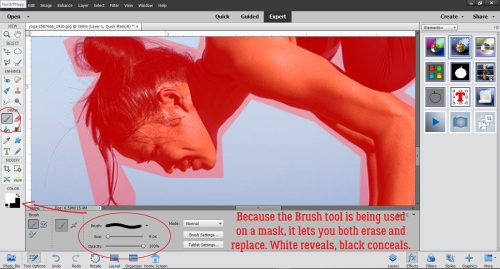
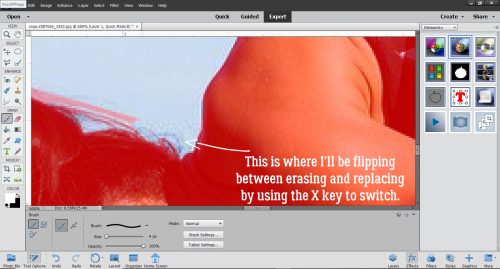
Next I went to the Brush tool to clean up my extraction. Because I’ve put a layer mask on the active layer, the Brush tool automatically sets up for concealing and revealing – the colours in the picker are black (which CONCEALS) and white (which REVEALS). I flip back and forth between erasing and replacing by clicking on the “X” key. (JUST the X key… I don’t want to go to another keyboard shortcut accidentally!) I was able to get pretty close to the outline of her body with my Lasso so I can go with a fairly small brush size – 9 pixels – and I can adjust the size up or down by using my square brackets keys. The Left bracket makes it smaller, the Right makes it larger in the same way using them with the CTRL/CMD key zooms in and out.
I just started brushing away the mask with the foreground colour set to white. I zoomed in quite a lot to see clearly where my edges are.

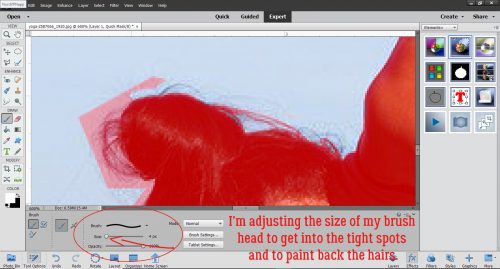
There is a bit of very minute detail in her hair that I’ll have to brush back in, so I can switch the foreground colour to black, make my brush smaller and paint it back. Before I forget… If I didn’t manage to include an important area of my image, I can add it in during this step really easily. Brush it in with black!
My brush size ranges from 1 pixel for the really tight spots, to 12 pixels for the straightaways.
Now that I’ve finished with the clean-up, I went back to the Layers panel. This step tells Elements+ that I’m moving on to a new operation.
To get Elements+ to finish the job, I clicked again on the Selections icon then told it to Exit Quick Mask Mode.
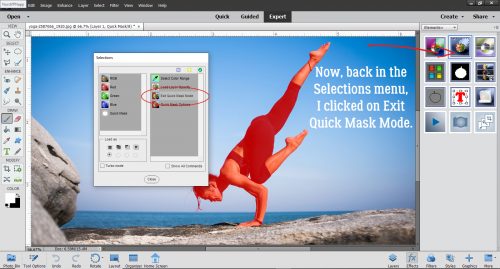
The red mask is gone, and now I have marching ants instead. I just need to…
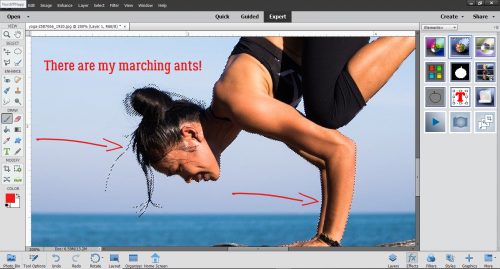
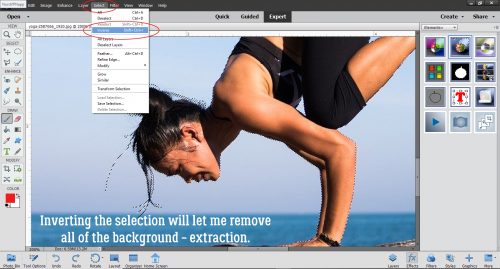
Invert the Selection (Select>Inverse or CTRL/CMD/Shift>I) and then I can eliminate the sky, the water and the rocks.
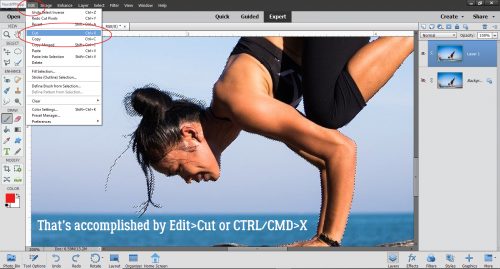
Two ways as usual, Edit>Cut or CTRL/CMD>X.
Boom! It looks pretty sharp to me.

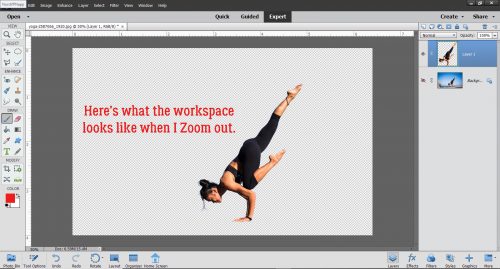
Here’s what the whole workspace looks like when I Zoom back out.
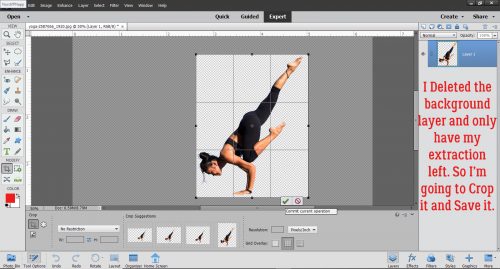
So before I Save it, I’m going to Crop it down to a more useable size.
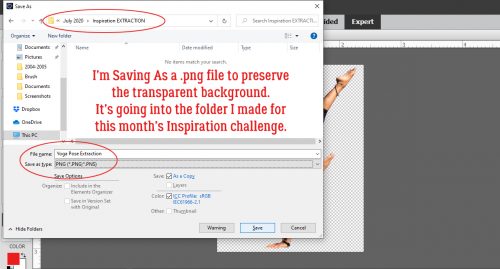
I want to keep the background transparent so I’m going to Save As a .png. The keyboard shortcut for Save As is CTRL/CMD>Shift>S.
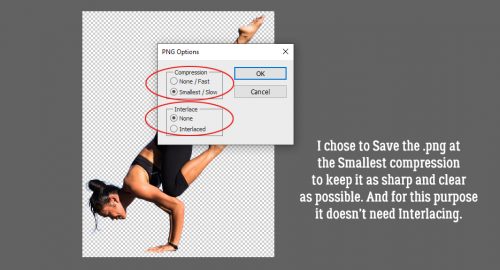
To keep as much sharpness as possible I’ll save it at the Smallest compression but it doesn’t need to be interlaced.
Now I can put this yoga queen on just about anything! I’ll have to figure that part out later.
![]()
WoW !!! You made that look so easy. I am seeing this at just before midnite so I will give it a go hopefully tomorrow. What version of elements are you using ?? Does it matter ?? Awesome tutorial …thank you.
I have a totally off-topic question for you: I know that you work in elements a lot and my current laptop is having fan issues and I need a new one. Any suggestions about what to look for ?? I find the number of choices almost overwhelming. Any help you have would be appreciated 🙂
It totally IS as easy as I made it look!! I had my doubts until I got going and then it was so quick! This Quick Mask Mode is included in every version from 6 up, so I think you’ve probably got it in your version.
Looking for a new laptop is such a challenge, isn’t it? The one time I let my hubby choose the one I went with turned out to be a bad idea! For me personally, I’ve had a laptop from each of the major brands and that isn’t really a consideration when I’m choosing – except when we talk about Macs. I’ve had so much trouble with Apple products that I’m never going to use a Mac. I look for a good processor first. This HP one I’m on right now has an Intel Core-i7 processor. Hubby is a retired IT guy and won’t let me buy anything that doesn’t use Intel. Then I think about how much memory it has. I use several power-hungry programs and the bigger the memory the faster I can work. 8 GB might be enough for you, I have 16. Then I think about my workflow. If you’re comfortable using an external hard drive for storage, you can choose a laptop with a smaller hard drive. Mine is 2 TB because I like to have everything in one place. One thing I insist on is that the keyboard has separate numeric keys. (That’s a Jan thing though!) And as I’ve gotten older, my screen has gotten bigger. I started with a 15 inch and now prefer a 17. This laptop isn’t quite as heavy as the two before this one, which is always nice. If you’re going to use it to stream video and audio, you’ll want a good graphics card, a high-resolution screen and good speakers. My best advice is to think about how you’re going to use it, and decide what features are most important to you, then look for all of that in a machine that will fit into your budget. Words to the wise: Make sure you copy all the important files from your current machine now before the fan dies altogether and you lose them. That will take a lot longer than you think, and starting now would be a good idea. Second, remember that your Elements+ patch is only going to work on one computer. So you’ll have to buy another copy for the new laptop. Good luck with your search!
Great extraction tutorial!! I’m going to have to try this when I get some time. I had to giggle when you wrote that your IT hubby won’t let you buy anything that doesn’t use Intel. Same here with mine!
My hubby is the same about the Intel processor. One Christmas the kids gave us a laptop with the other processor & it’s so sluggish … I let me hubby use that one! LOL!
I love extractions! That was awesome, Jan. Can this be done in regular Elements? or only with Elements+?? I never thought of using that Lasso Tool … I’ve always used the Quick Selection tool; which can be hit or miss — then I have to add & subtract when using the mask. It looks like using the polygonal lasso tool, I would only need to subtract when adding the mask…
Great tutorial, Jan … thanks!! … & show us some pics when you have your craft room all set up! 🙂
Thank you so much, Jan !!! I have thought about a couple of those things but you have completed my list. A few of the items are probably out of my budget but it least I have a solid place to start now. I don’t have a lot of storage on my current laptop 232 GB to be exact so there is not a lot of files to tsf. I already have a 5 TB EHD that I use so it will all fit on that. I am in the process of documenting the programs that I will have to reinstall or tsf. Hopefully, I can find a laptop close to what I want. COVID has really played havoc on the computer selection that we have available plus I live in a small town so that makes it even harder. I have been looking online to get a feel for what is available and there are a lot of “out of stock notations”. Thanks again and I will be looking into the Elements+ add on that you are using. It looks pretty interesting. Thanks for the link 🙂
I’m sure it IS possible to use the extraction technique in regular Elements. But you’d have to take a few more steps, like adding a layer mask manually. Take a look at the screenshots with the layers panel open and see how the script has added more layers. If you want, I can email you a larger, higher-res image of the screenshots. Just let me know!