Uploading Your Layouts to the Gallery – Step-by-Step
![]()
Sometimes we forget that we’re being joined by new GingerScrappers all the time. And we forget that not everybody has expert computer/web skills. Suzanne Powell has the added challenge of health-related obstacles and she asked if she could have some very straight-forward instructions on uploading her layouts to the Gallery. Well, of course she can!! Let’s get her up and running…
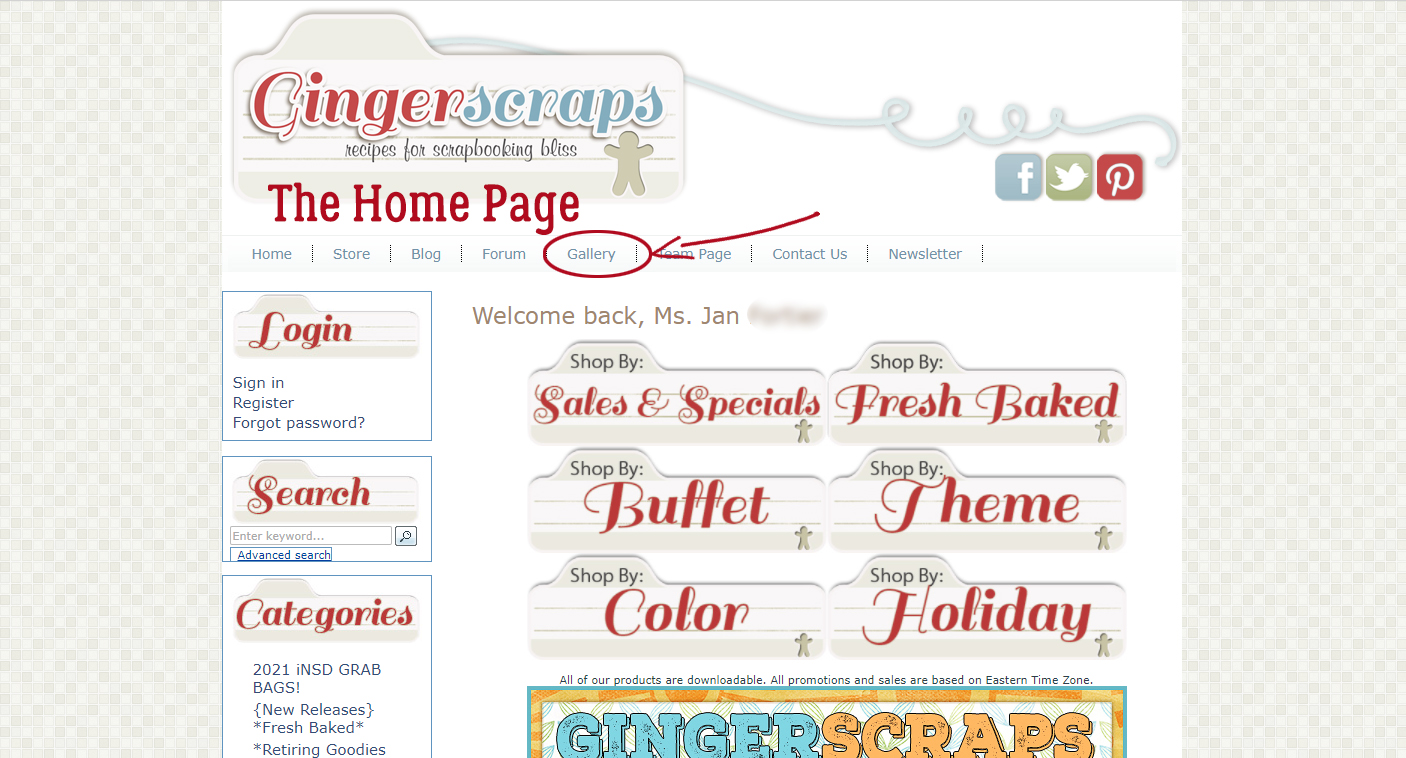
We’ll start right at the beginning, with the Home Page. Across the top, just under the site banner, is a navigation bar with buttons for each of the high-traffic areas on the site. Right in the middle is the Gallery button.
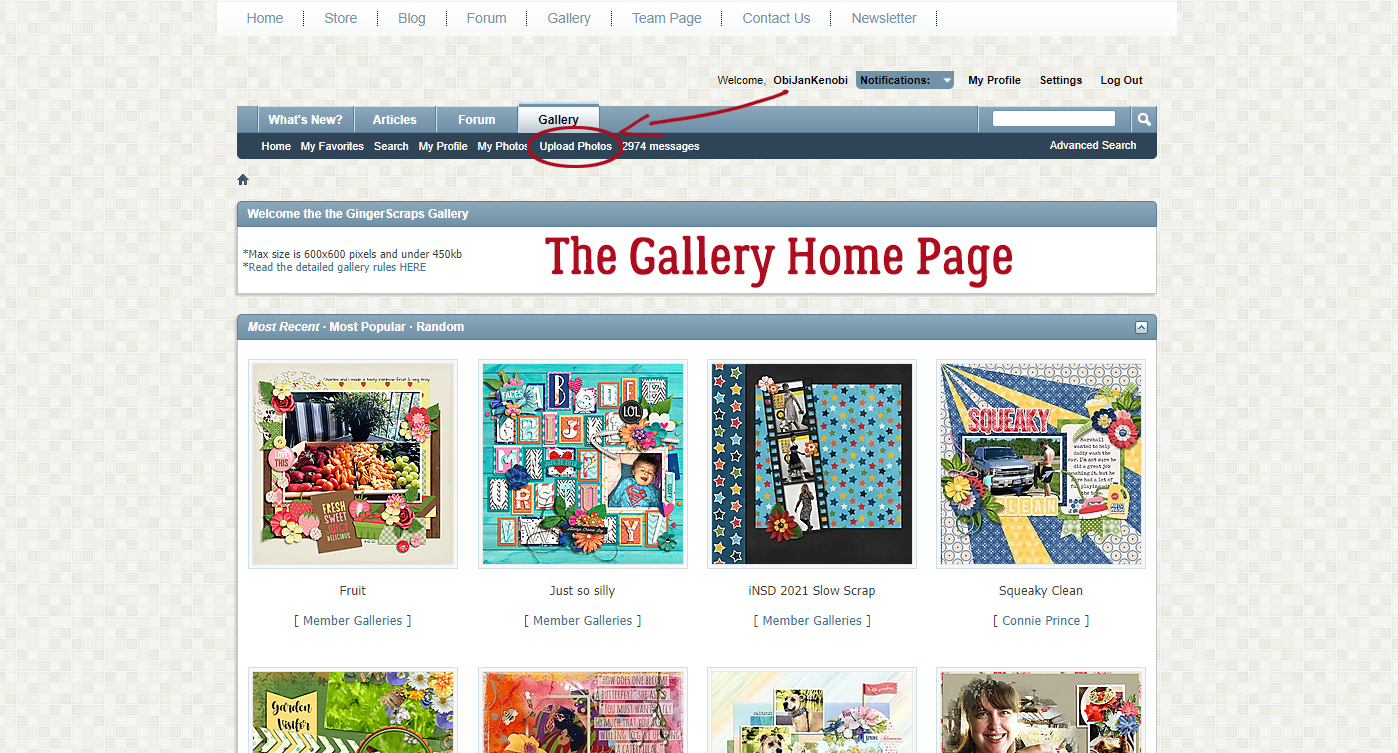
Clicking on that takes us to… the Gallery Home Page. There’s a link to the rules for the Gallery, which explain maximum image and file sizes, very important information that I’ll expand on at the end. The dark blue navigation bar has all the required Gallery functions and a counter that keeps track of all the comments left for your layouts. Just to the left of the counter is the Upload Photos button.
The Gallery command centre looks like this. At the top are some reminders about Gallery limits. It also shows how many images you’ve begun to upload process for but haven’t yet completed. (YES! It’s possible to batch-upload, but that’s a topic for another time.) In the middle of the page is where all the choices are made. I usually start by deciding which Gallery (aka album) my layout belongs in.
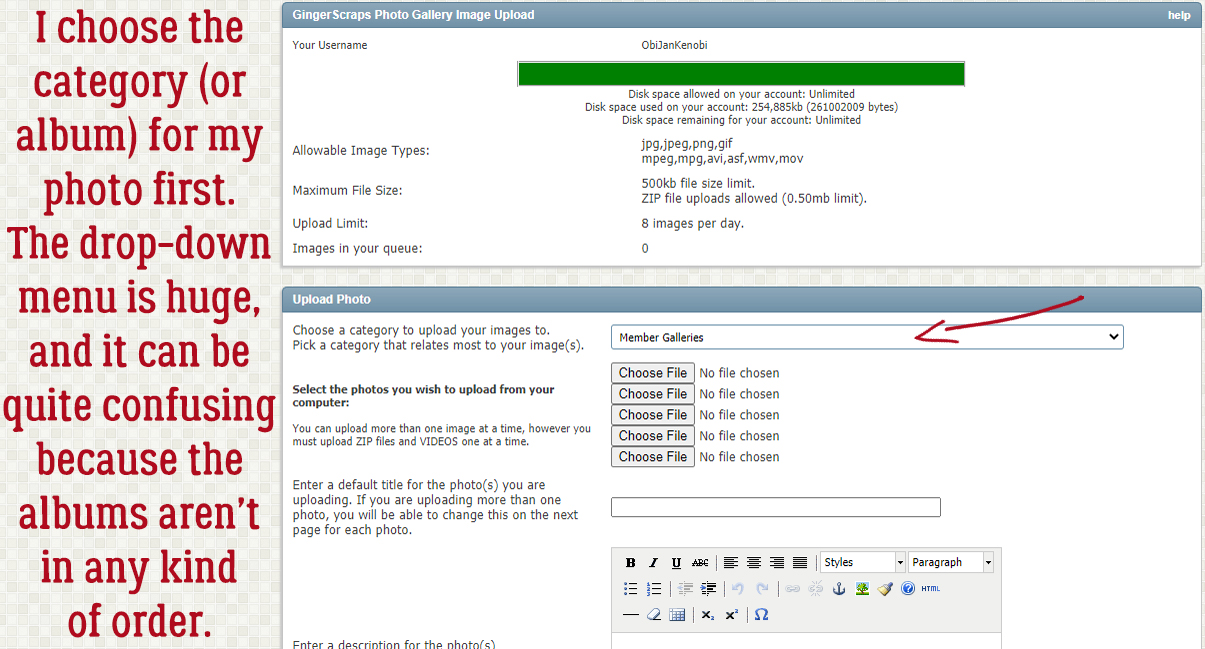
Right at the very top of the drop-down that opens when the little arrow is clicked is the Member Galleries area. Each person who has a Gallery at GingerScraps has her own Gallery. Every layout a member uploads is automatically sent to the Member Gallery. Each of the GingerBread Ladies has a Gallery, and each of the Challenges has a Gallery. More about that in a second. Unfortunately, it’s not possible to Members to create their own online albums in the Gallery, but it is possible to add specific layouts to one’s own personal My Favorites album.
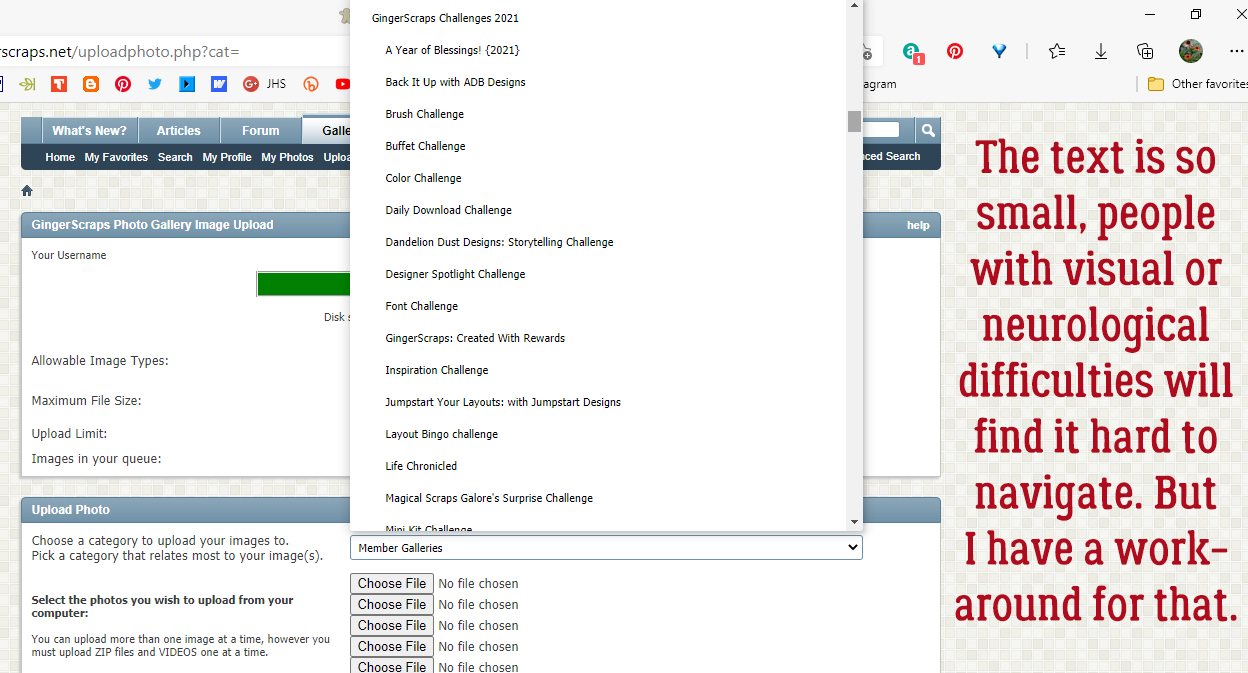
The typeface for these Galleries is very small, and Suzanne is having particular trouble with that. Did you know you can Zoom in on your screen the same way you can Zoom in on your layouts? Holding down the CTRL/CMD key and clicking the + sign Zooms in to 110%. The sharpness of the display is affected a little but not enough to be an issue. A second click on the + sign brings the size to 125% and a third click to 150%. Reversing it is easy, CTRL/CMD and the – key does the job.
Before we move on, be aware that navigating the Gallery list isn’t as simple as it sounds. You may have to scroll (slowly) down the list to find the one you’re looking for, particularly if you’re uploading Challenge layouts. You want to be positive you’re putting it into the correct YEAR‘s Gallery. When missdamsel goes looking for your layouts to verify your monthly Cookie Jar count, she won’t include it if she can’t find it! The problem with the Challenges yearly galleries is that they’re not in chronological order, so take the extra minute or so to make sure you’re in the right place!
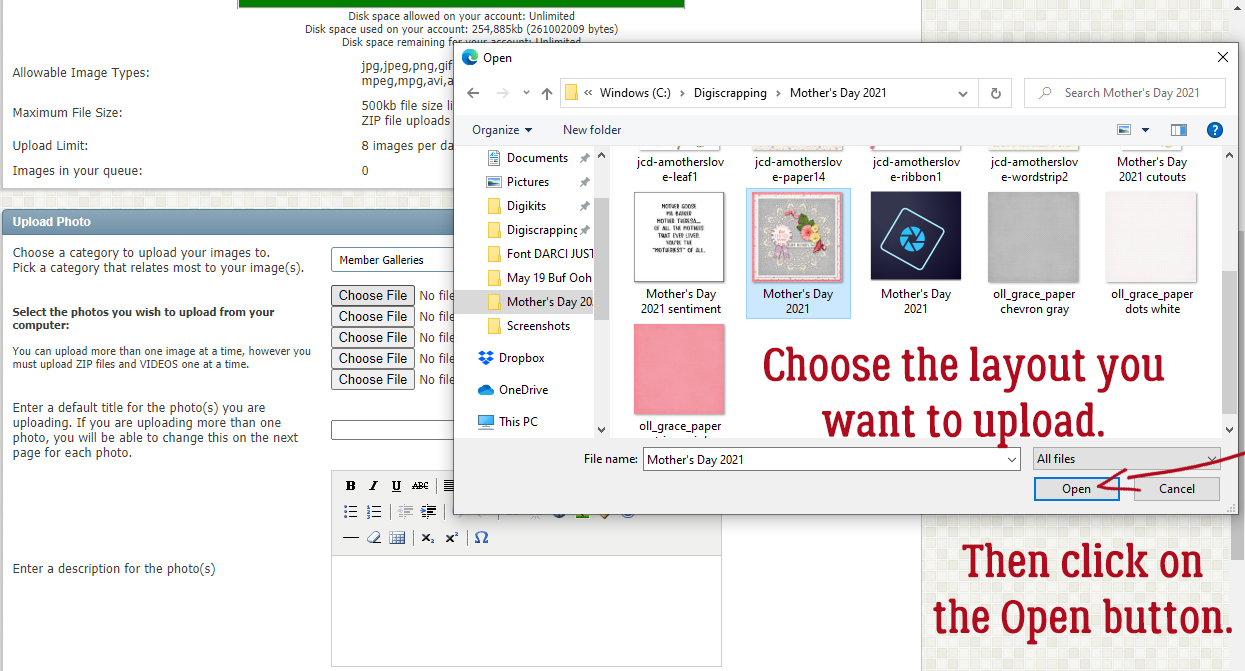
Once you’ve chosen the Gallery you’re uploading to, it’s time to upload that layout! Click the Choose File button and then find your layout. As you can see, I use a folder system to keep everything easily located. It looks cumbersome but I find it really streamlines certain parts of the process. Click on your image, then click the Open button.
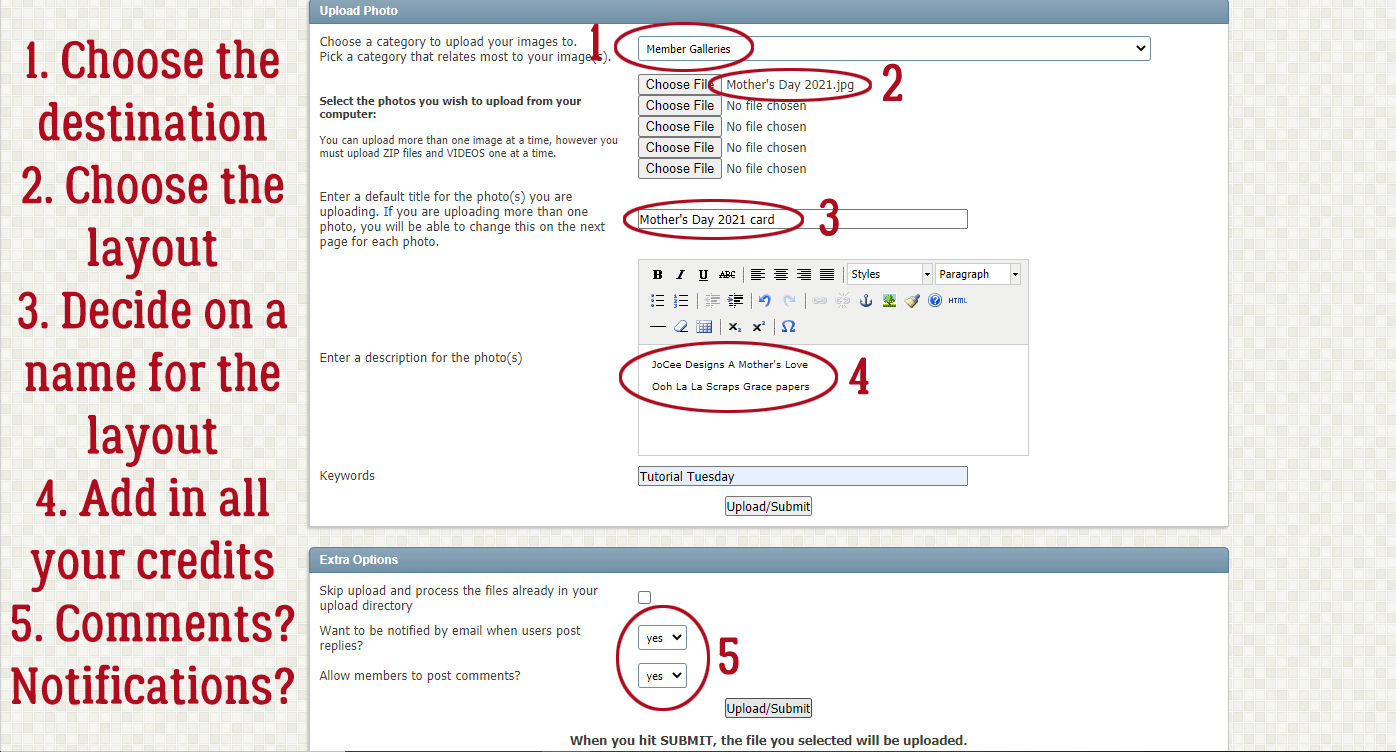
Once you’ve selected the image for upload, this menu opens up. This is a busy image, so I’ve numbered each of the things that need some expansion.
- Make sure you’ve got the correct Gallery! you can change it if you need to.
- Make sure you’ve got the correct image!
- Give your layout a name.
- In the Description box, break down your layout and provide credits to the Designer(s) whose product you’ve used. You can also include your journaling here if it’s hard to read on the (itsy-bitsy) image, and any other detail you think is important.
- Decide whether you want other Members to be able to make comments on your layouts, and whether you want to be notified when someone gives you some love. (Who doesn’t??)
When you’re satisfied you’ve got everything the way you want it, click Upload/Submit.
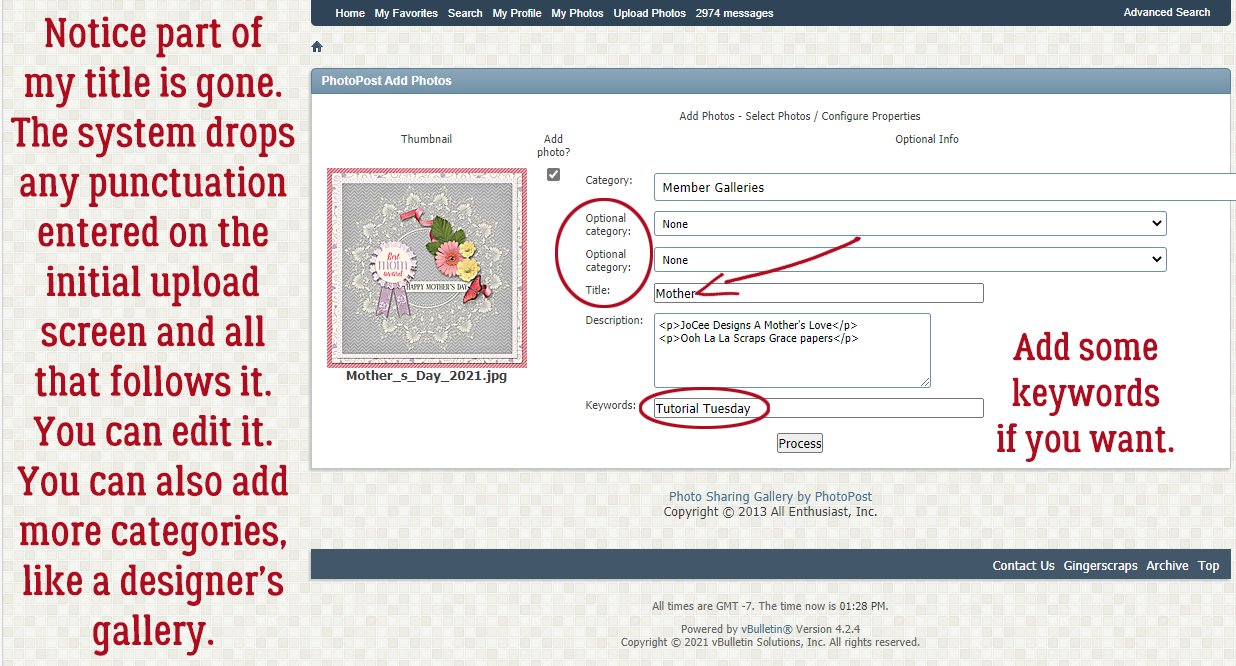
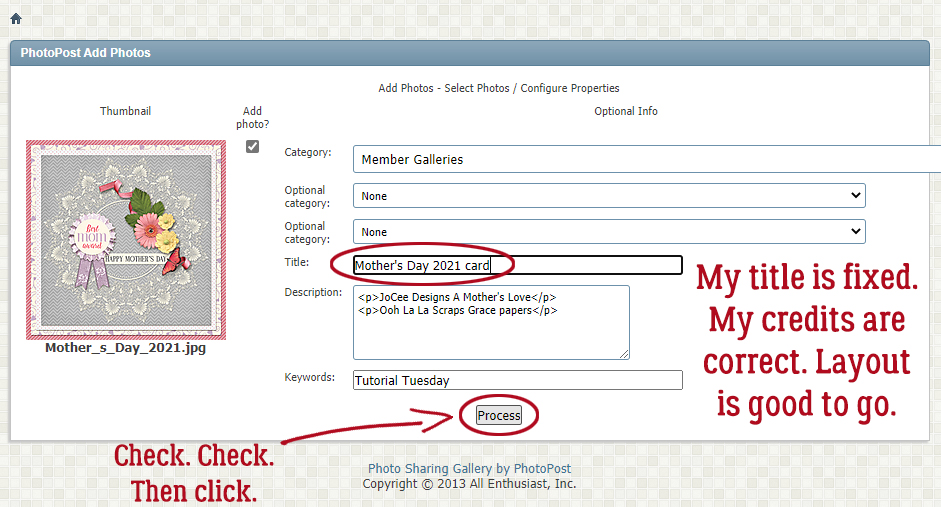
Almost there! This seems like a redundancy, but it’s a vital step. If your image is too big, this is where the system will tell you so. The maximum size is 600 x 600 pixels for the image and 500 kB for the file size. Check to see that your layout thumbnail is there. Sometimes the Gallery Gremlins toss out your credits, or they don’t like your title, especially if you’ve used punctuation or a special character. As you can see, part of my title is gone, because I had an apostrophe in it. Everything from the apostrophe on – poof. BUT!! I can add all of it back in here and it’ll be fine. My credits are right there. Perfect. And here’s where you can decide if you want to put your layout into more than one Gallery. The caveat to that is this: each of the Galleries you choose here will count as an individual layout for your daily upload limit, which is 8 images. If you’ve got several layouts you’re uploading at one time, you’ll get a message telling you you’re over your limit when you’re really not. Never fear… ObiJanKenobi has a work-around! Just select a single Gallery in this step. Then, when you’ve completed the process, you can go back and Edit Photo, adding in all the Galleries you want. Easy-peasy! This is also where you can add in some keywords describing your layout, such as the Challenge name, or some other descriptor that will be searchable later.
When you’ve filled in all the blanks and have all the information you need in there, you can click Process.
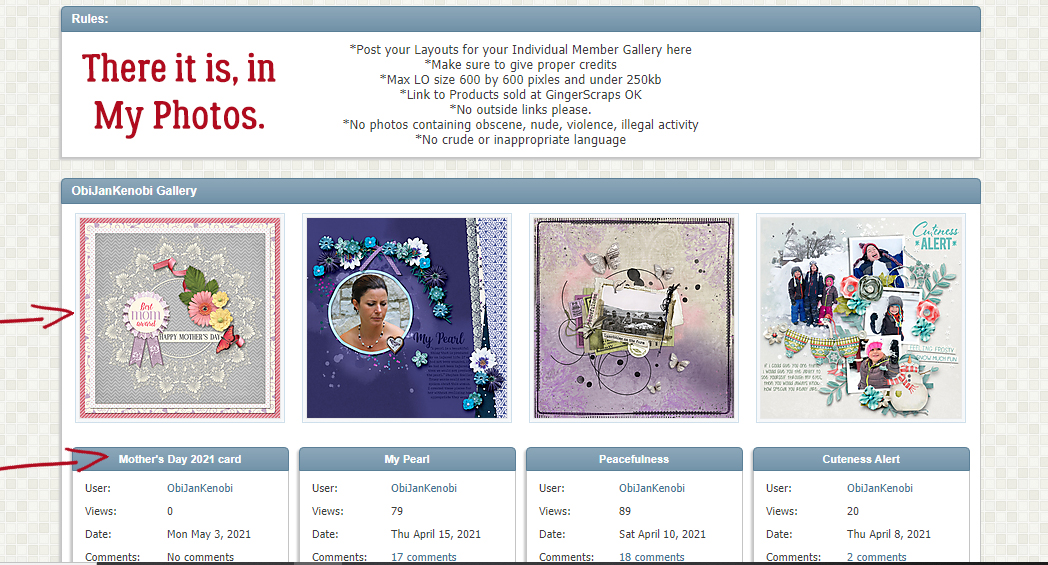
And there it is! The most recent layout added to my personal Gallery is first on the list. The title is correct, the image is correct and it’s all good!
Would you like a tutorial on batch uploading? Or do you think you can figure it out on your own? Lemme know!
Before I go, I want to give a shout-out to the one and only GINGER who gets these tutorials into PDF form so you can save them to your own computers. I think it’s been a game-changer!
{This is Ginger jumping in to add the PDF … Awe thanks for the shout-out Jan, you’re the best!}
Here is the PDF version of this tutorial: https://bit.ly/3vCfa1u
![]()