Let’s Talk Some More About Siggies
![]()
It sounds like there were a lot of people who learned something new from last week’s tutorial about using the GingerScraps Gallery. Music to my ears!! And, as sometimes happens, that tutorial led to a request for some help with another feature at GingerScraps. Corinne said, “Since Jan did a really nice job of explaining how to upload photos to the gallery, I am wondering if she could tackle the unknown world of signatures? How does one go about designing and uploading? Thank you! Corinne” Ginger and I discussed it and we decided it would be a good idea to do some review. I first discussed signatures in the Sizzling Signatures! post. Then last December we talked about adding links to your signatures in THIS tutorial. So some of today’s tutorial will be review, and who knows, I may have something in here that you didn’t know!
What’s a signature? What’s all the fuss about? Signatures are those beautiful little images seen at the end of posts in the GingerScraps Forum. They’re a big deal! They have their own monthly Challenge, after all. Each month the GingerBread Lady facilitating the challenge will provide a theme or some other required element for the month that form the basis to all the new siggies for that month. For May, ChristieDawn wanted to see flowers. Signatures can be as detailed or as simple as the user likes. You’ve probably seen some really fancy ones, and some really unfussy ones. They’re pretty good at showing the user’s personality and scrapping style. Some users make theirs with alphas from their stashes, like I usually do, while others make theirs with fonts. It’s completely up to the user! Now let’s get into the tutorial…
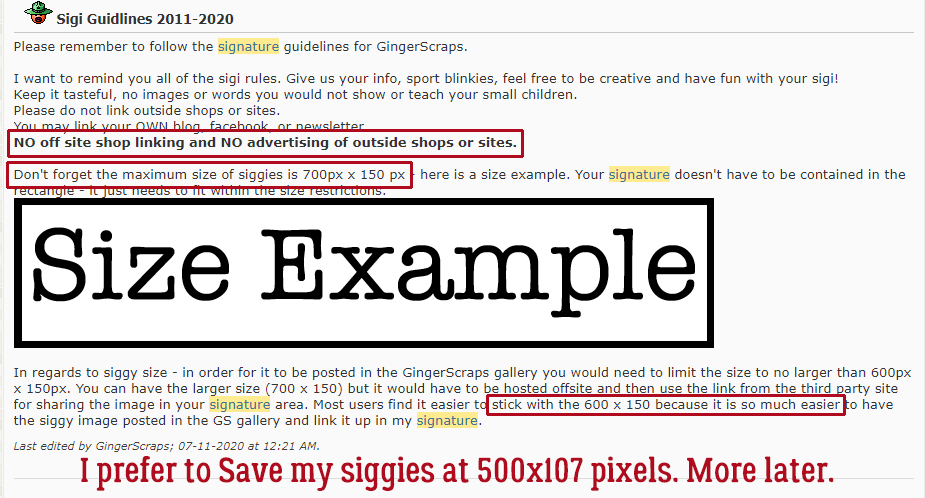
Let’s talk about the rules for using signatures at GingerScraps first though. Perhaps the most important rule is that your signature cannot link to or advertise any other shop/site. It’s fine if you want to link to your personal blog, newsletter, Facebook or the like. Also make sure your signature is suitable for all ages and audiences. If it would offend your grandmother, don’t do it. Let’s stay classy, y’all! The other important rule is the maximum size for your siggie. The guidelines say 700×150 pixels, but the Gallery has a maximum 600 pixel limit, so it’s easier and a lot less work if you just keep your signature at or under 600 pixels wide. I like to make my siggie a little smaller than the max, coming in at around 500×107. That makes it a little less in-your-face. More about that down the post. As to the shape of your signature, it doesn’t have to be a rectangle. I like to use Custom Shapes as the basis for mine. As long as the shape you choose fits into the max dimensions, you’re golden.
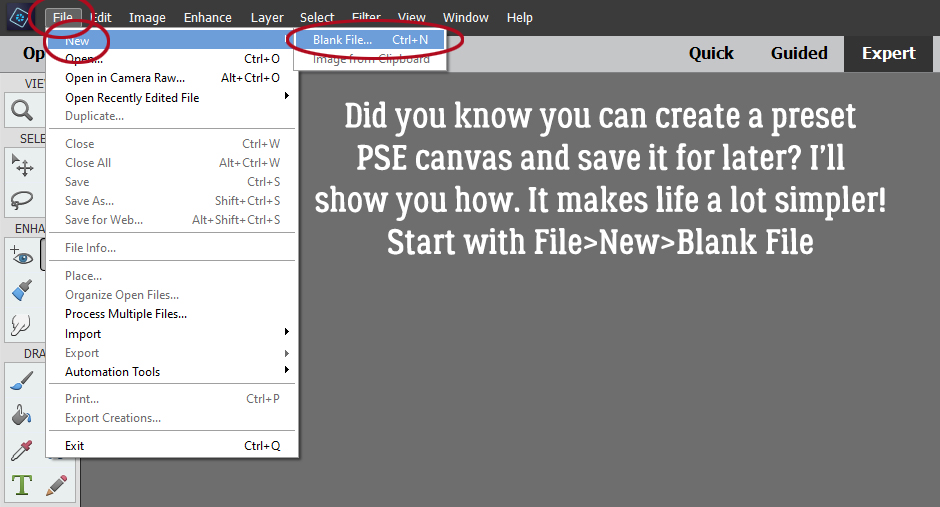
This bit is a little refresher. Did you know you can create and save preset file sizes? I’m going to show you how to do that. I have a 12×12″ preset for my layouts, and a 3500×750 pixel preset for my signature files. Why did I choose those numbers? Simple math. It’s 5 times the maximum size of the signature file; I work on a BIG canvas so I can see what I’m doing and make sure I actually like my results before I Resize and prepare to upload. Now, here’s how to create your own preset: File>New>Blank File
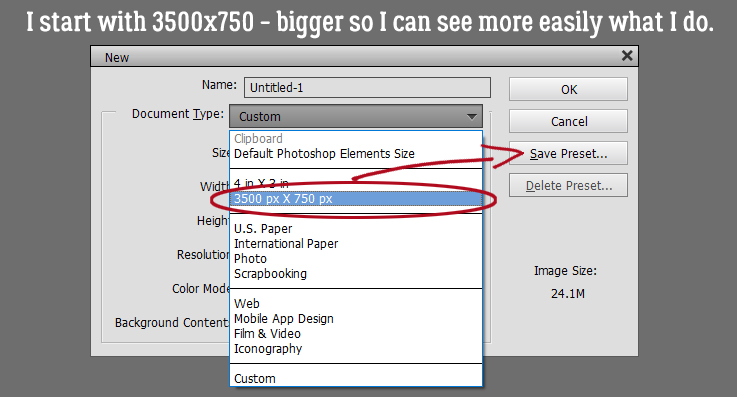
There’s what my New File menu looks like. You can see my siggie preset on there.
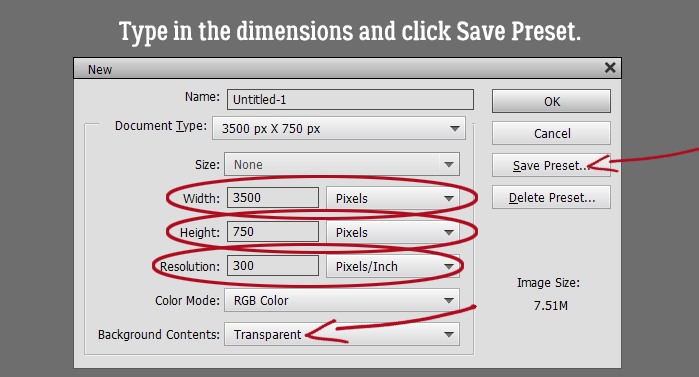
Starting from scratch, type in the dimensions as shown when the New File menu opens. You want Resolution at 300 pixels/inch for sharp images, RGB Color set, and the Background Contents Transparent. (Why? So that your signature file can have a clean background when you use it as your Forum siggie!)
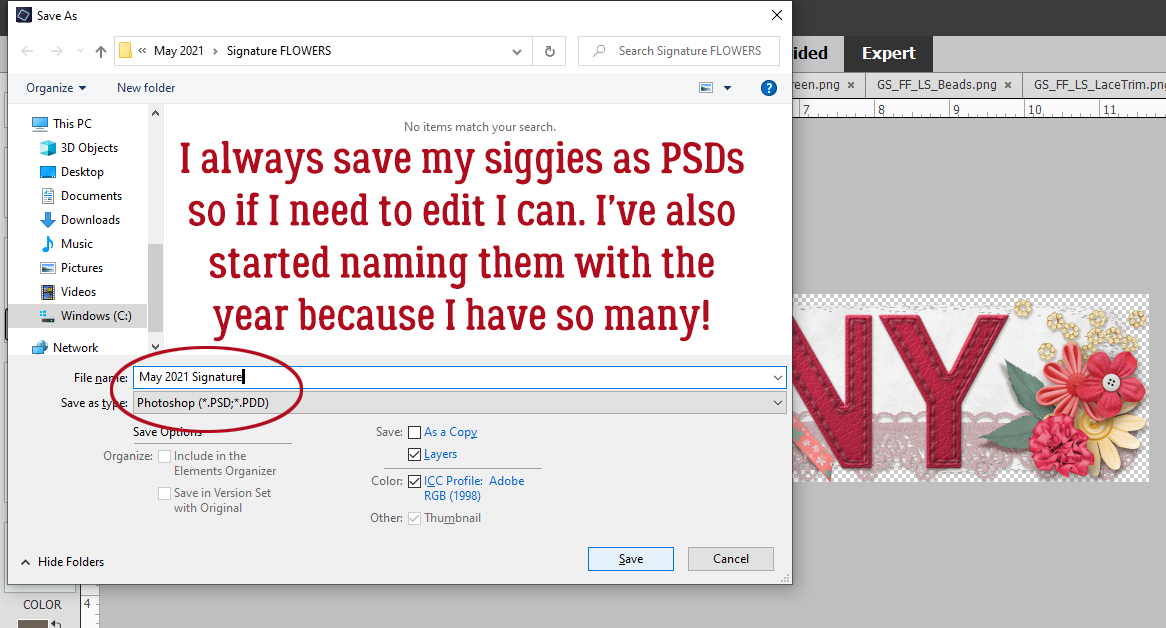
Constructing your signature is just like creating a layout, only with different dimensions. If you need help visualizing how to create them take a look at the ones in the Signature Challenge Gallery. So what to do with your finished creation? I always save my layouts and siggies as PSD files initially in case I have to fix something. That doesn’t happen much with the siggies, but I often find typos in my journaling! Make sure you give your file a name.
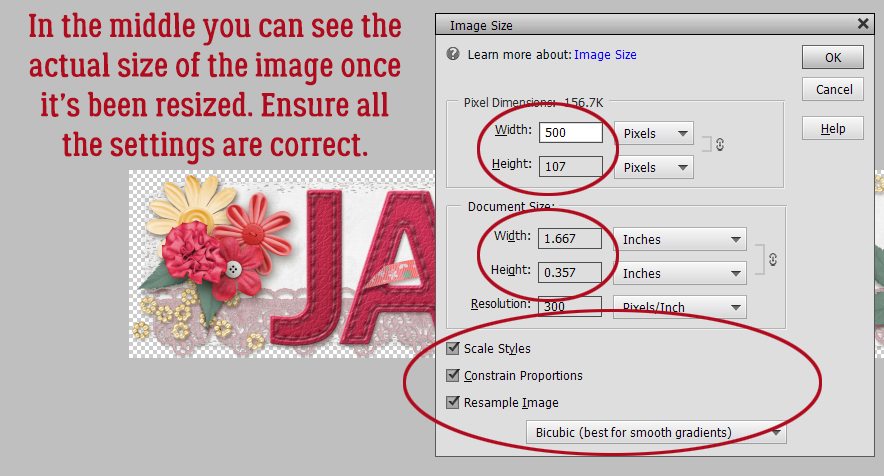
Then I Resize my file to fit the desired parameters. There are two ways to get there. Image>Resize>Image Size will get you to the menu, or CTRL/CMD>ALT>I works for those who like keyboard shortcuts. When the menu opens up, type in your desired width in pixels and Elements will automatically set the height. In the middle of the menu you can see the actual size of the final product. Scale Styles, Constrain Proportions and Resample Image should be checked to get the very sharpest and best final image. As well, choose Bicubic in that box at the very bottom. Then click OK.
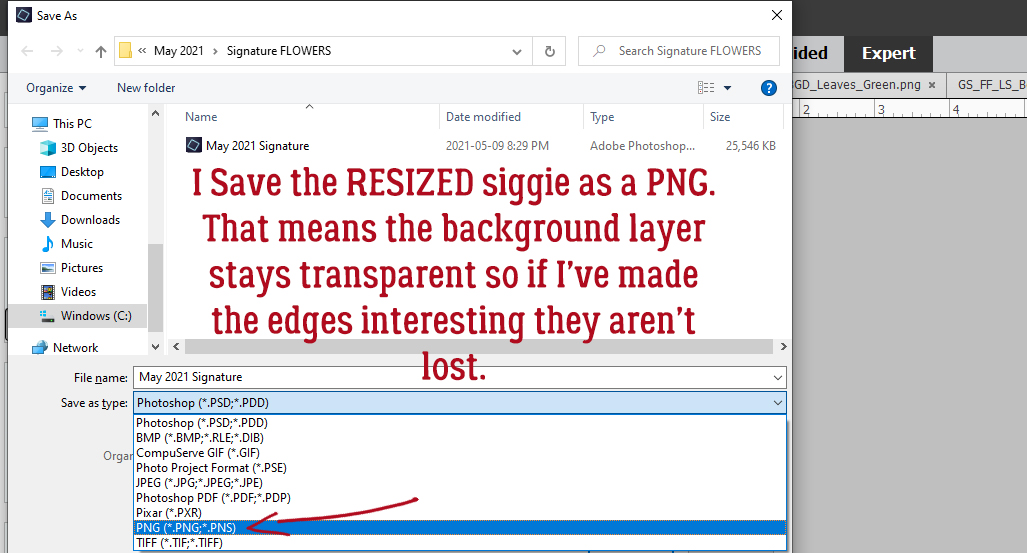
Then I Save the RESIZED image as a PNG. This is where having the transparent background comes in. Let’s say you have a flower or a bow that extends outside the main body of your siggie. If you Save As a JPG, the background will be stark white and when your signature shows up in your Forum posts, it’ll be visible. But by having a transparent background and a PNG file, it’ll look like it’s actually part of the page. For my siggie I used a paint smear with alligatored edges then clipped a paper to it. You’ll see what I mean a few screenshots down the road.
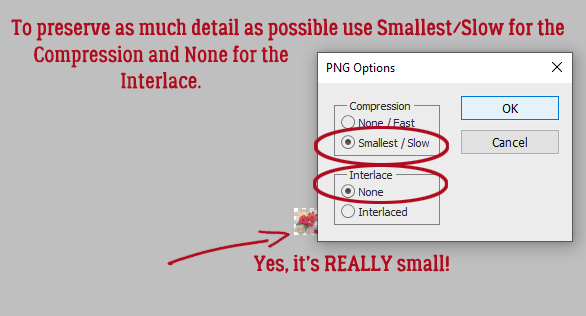
To preserve as much detail as possible in a tiny file like this (see the edge of it peeking out from behind the dialog box?) go with Smallest/Slow Compression and no Interlace.
Now for the fun part!! Let’s upload and add it into your Profile. If you need a review of uploading, see last week’s Tutorial. I work with two GingerScraps tabs open, one to the Gallery and one to the Forum for this part. You can click on the Settings button in either tab, but you’ll need to access your signature image in the Gallery, so I do this step in the Forum tab.
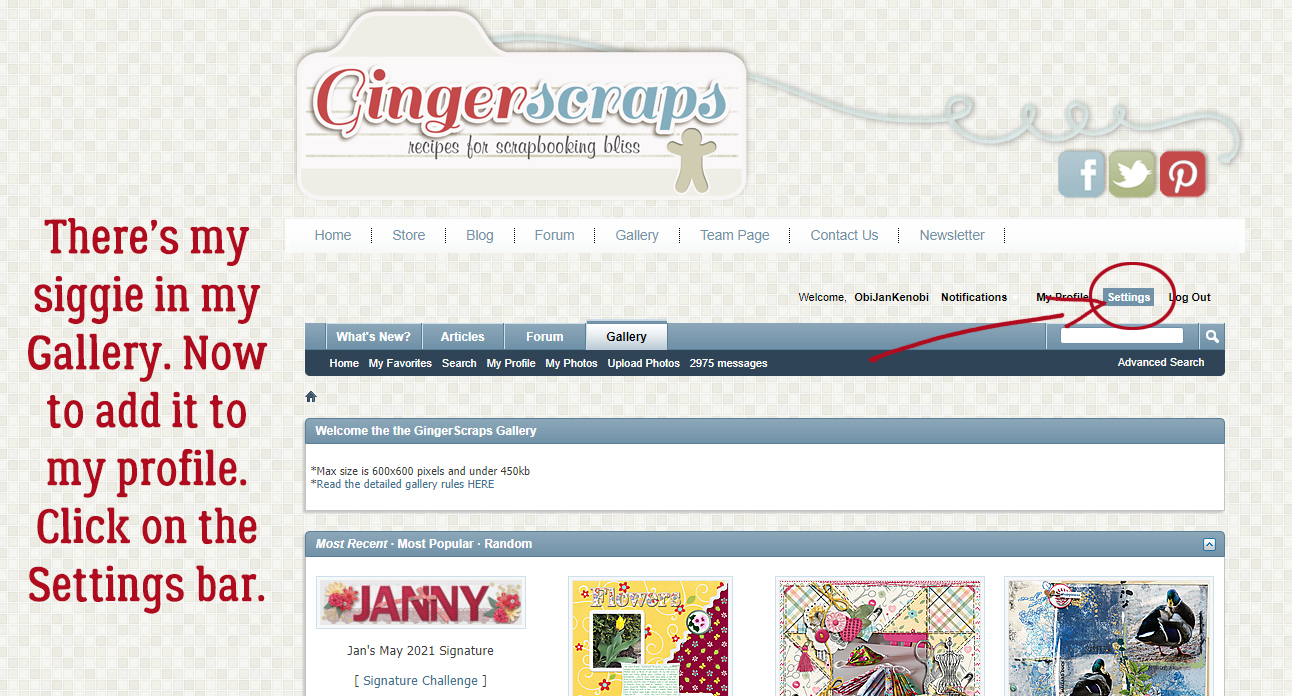
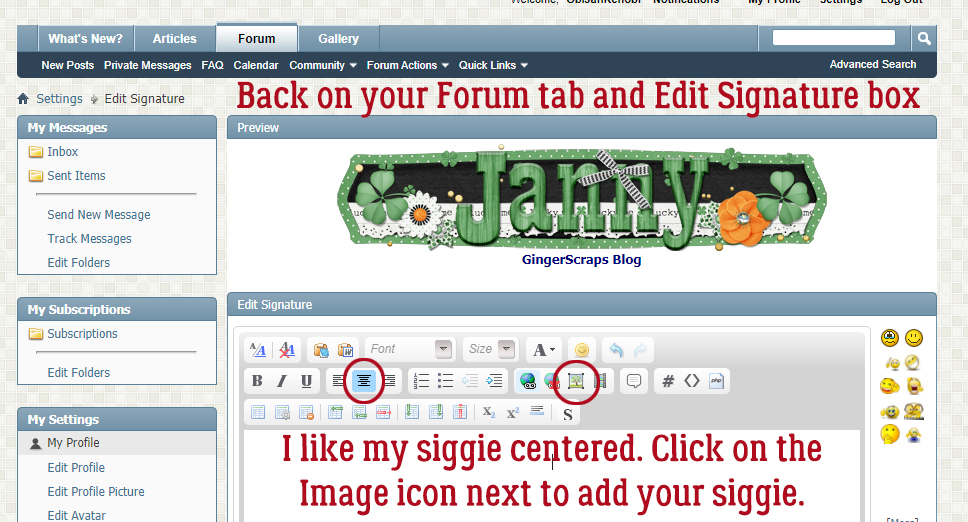
Along the left side of the GS interface you’ll see My Settings and almost at the bottom of that section Edit Signature. Click that.
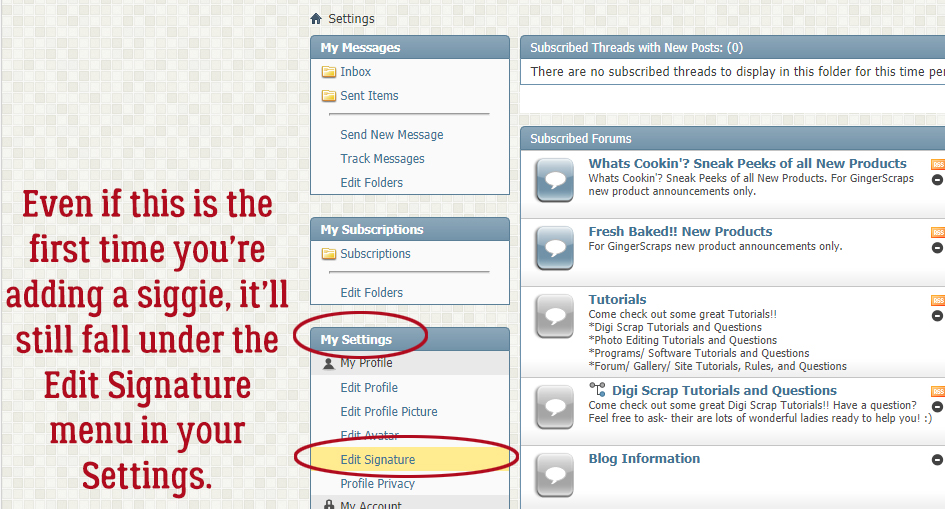
This looks a little busy. It is. This is where the Edit Signature control panel lives. If this is your very first time adding a signature, you’ll still be following most of these steps, you just won’t be deleting the old one. If you’ve already got one up, you’ll see the existing signature above the Edit box, and again inside the Edit box. Right-click on the one INSIDE the Edit box and either select Cut from the dropdown menu or CTRL/CMD>X (or even just hit Delete) to remove the old one.
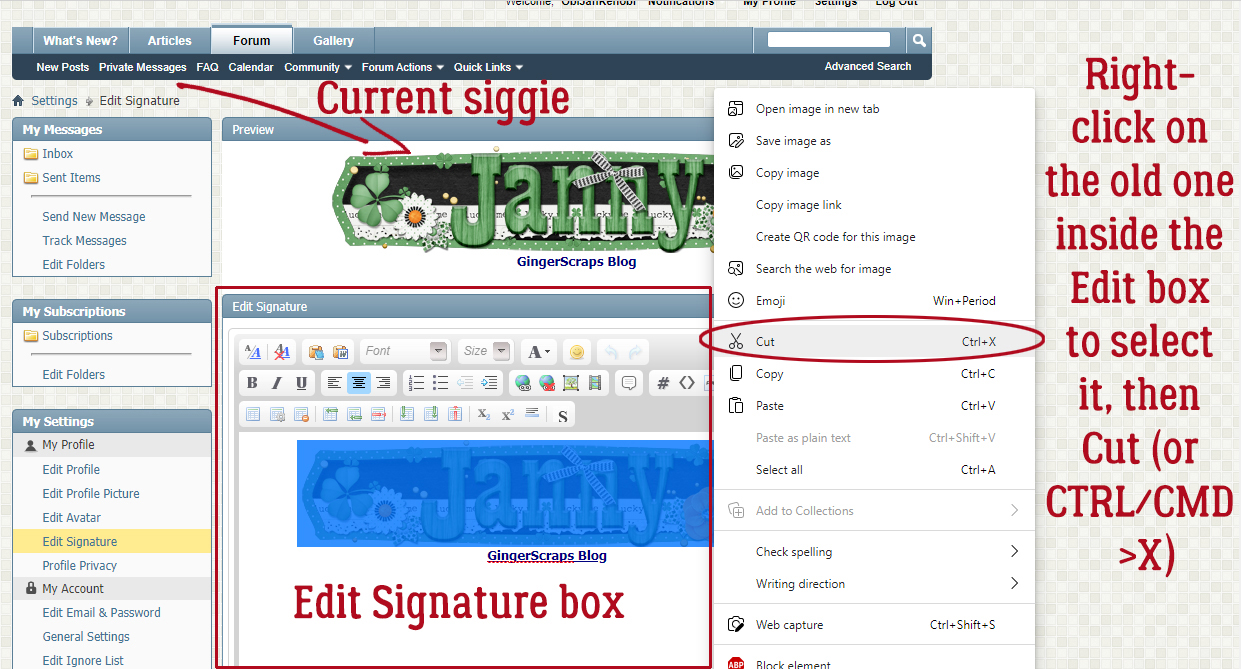
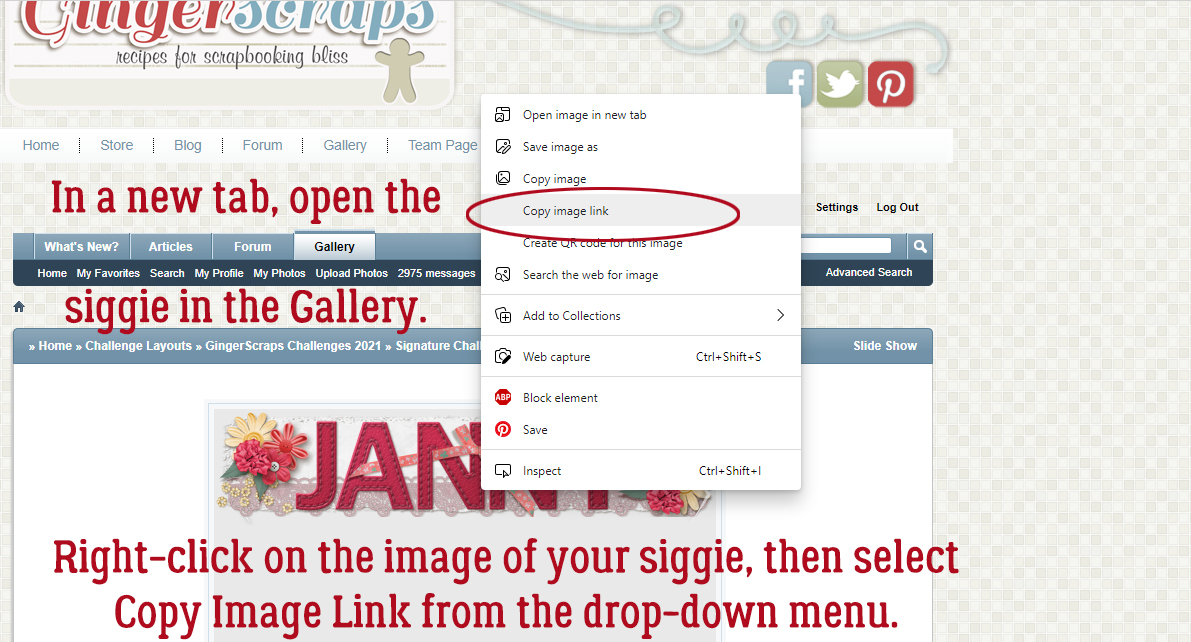
Pop over to the Gallery tab and right-click on the image of your signature. Choose Copy image link from the dropdown.
I like my siggie centered under my Forum posts, so I click on the Center format button (circled on the left) and then I click on the icon that looks like a photo being stretched at the corners (circled on the right).
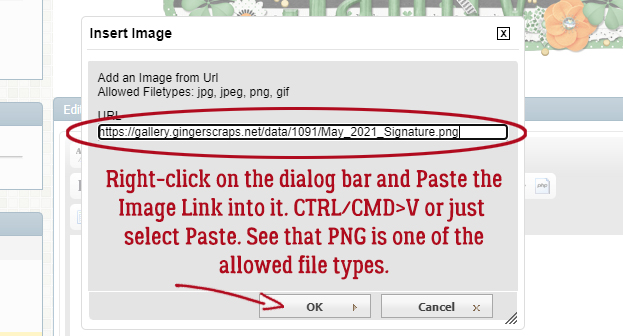
When the Insert Image dialog box opens, right-click on the blank bar in the middle and select Paste (or just CTRL/CMD>V) to tell the site where to find your image.
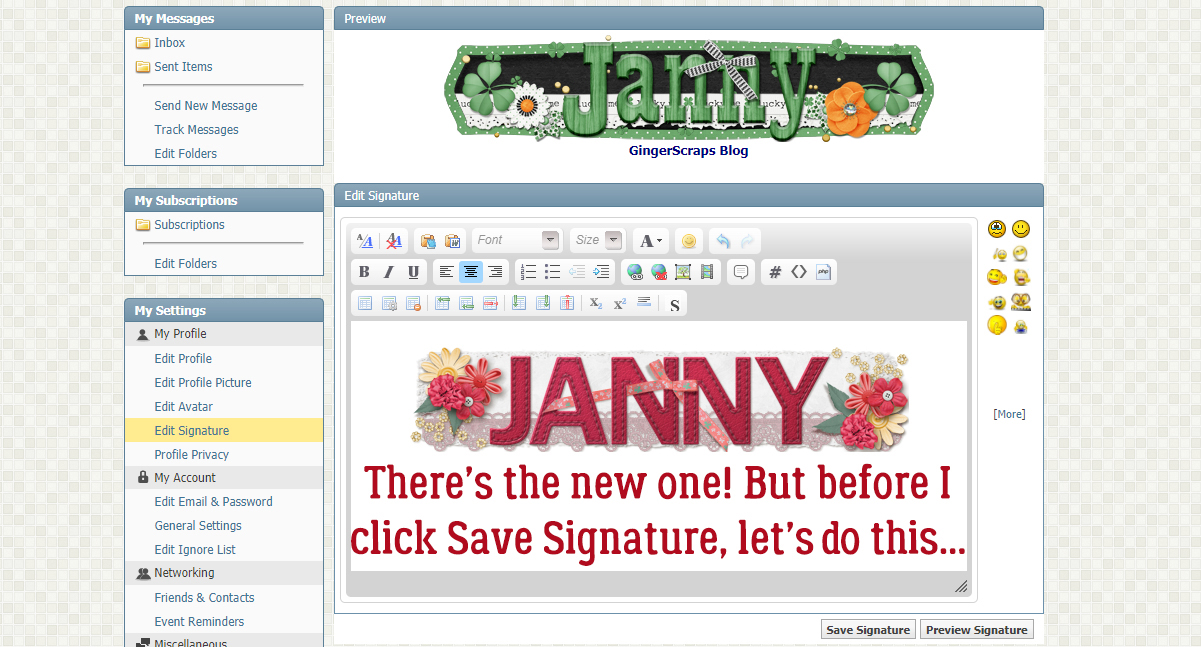
Now I have my new signature in the right place, but before I click on the Save Signature button, let’s look at what’s actually there.
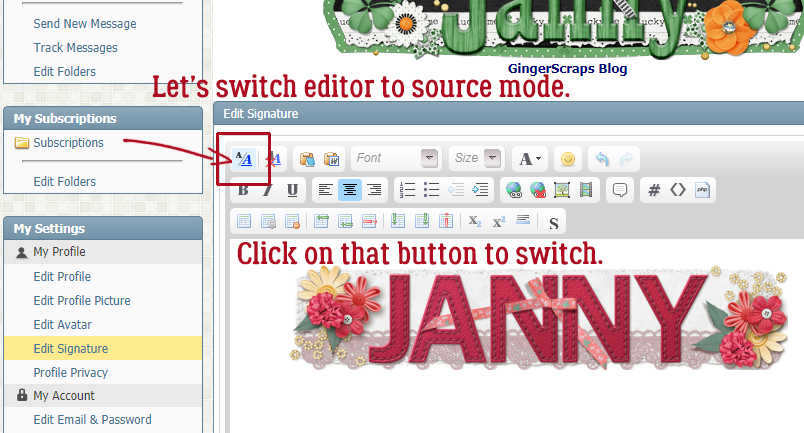
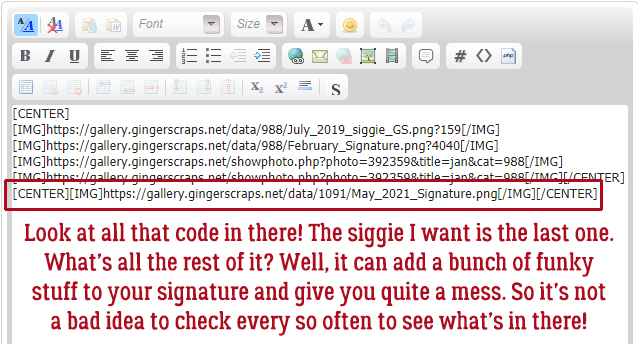
Click on the button I’ve outlined, which switches the editor to source mode. I wasn’t aware of this until Ginger mentioned it, so I had to check out what it does.
Holy cow!! I had no idea all those previous links were still in there!! That explains some of the gobbledygook I’ve had showing up with my siggies. The only thing that should actually be there is the very bottom one.
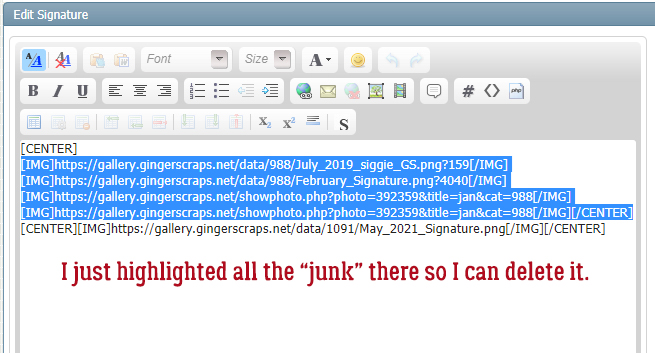
I highlighted all the junk and Deleted it.
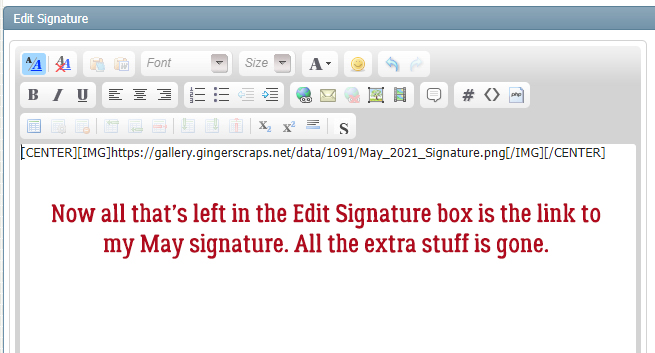
Yes, that’s more like it… just the May 2021 signature is there. NOW I can click Save Signature. If you’re new to all this, maybe try Preview first to see what it’ll actually look like.
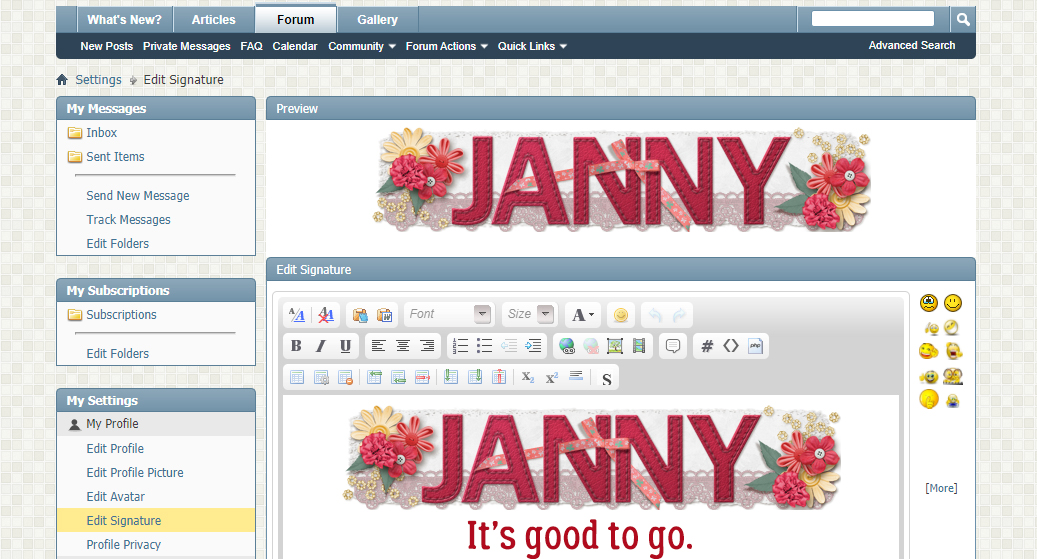
There. All good!
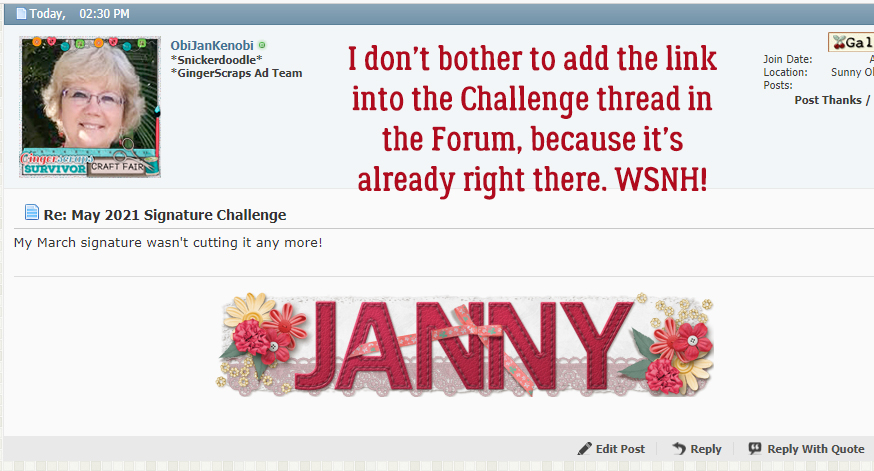
If you’re entering the Signature Challenge, the next images are for you. I don’t bother to put my signature file into my Challenge post in the Forum because it’s going to show up anyway. Whey have two of them in the same place? Of course, you do you. Here you can see that the lace extends past the bottom of the clipped paper and some of the flower petals and beads spill off the base. The messy edge of the clipped paper isn’t really visible unless you really squint.
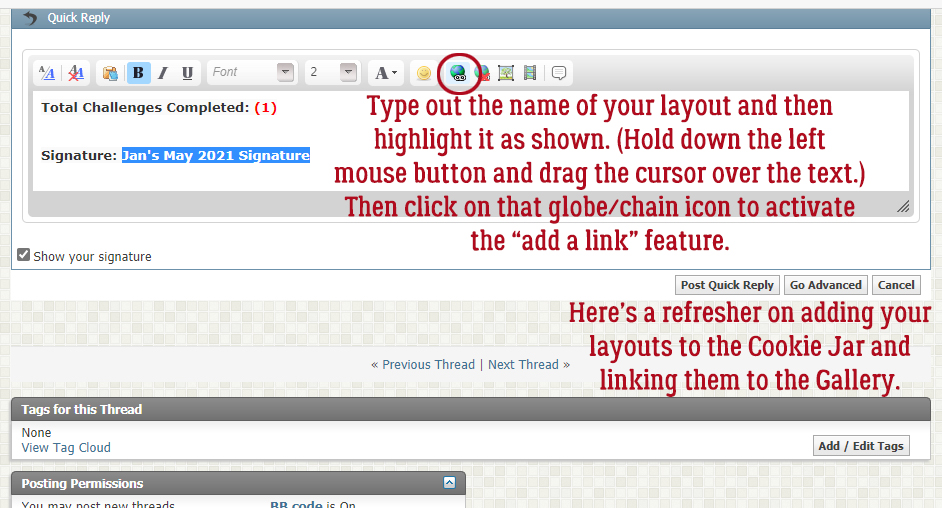
Here’s a quick tip for adding your layouts to the Cookie Jar thread. I type out the name of my layout as shown. Then I highlight the text as shown by holding down the left mouse button and dragging the cursor over it. Then I click on that globe/chain icon.
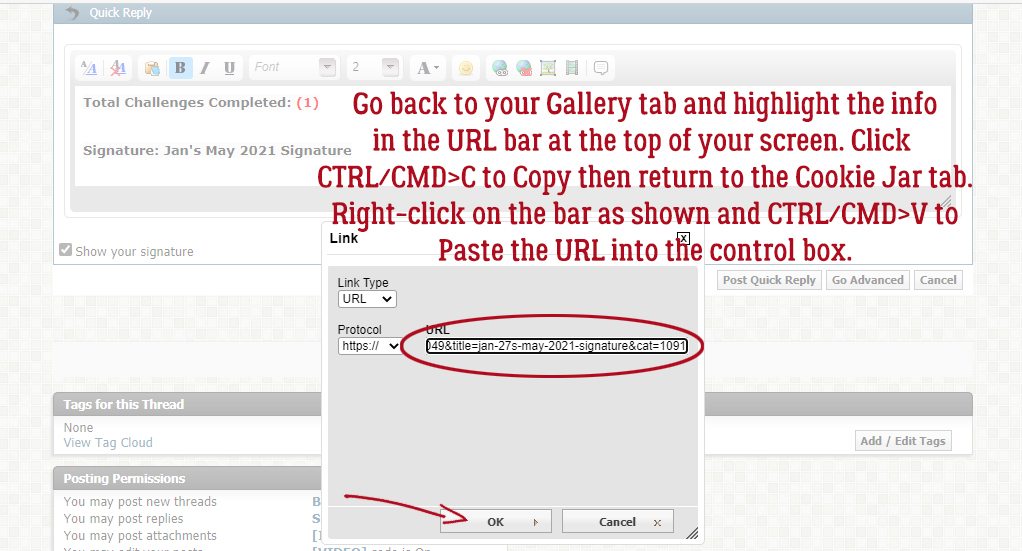
I pop back to the Gallery tab, which should still be set to my siggie, and Copy the text found in the destination bar at the top of the screen where the Universal Resource Locator is. (Hold down the left mouse button, drag the cursor over the URL, right-click and choose Copy, of CTRL/CMD>C.) Return to the Forum tab and Paste the URL into the bar as shown. Click OK.
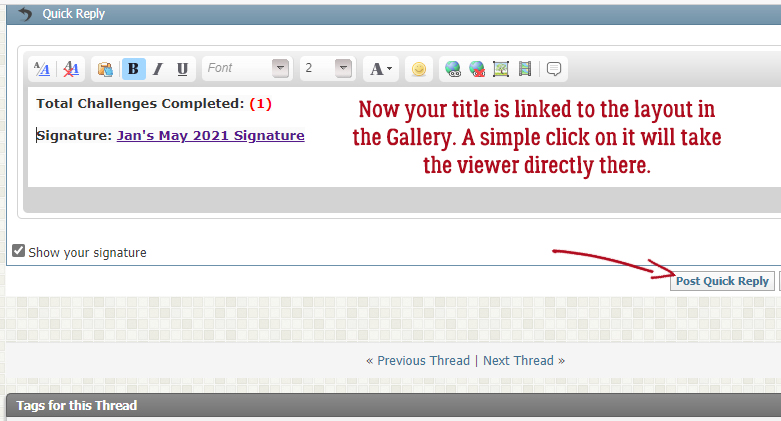
Now the name of my siggie is linked to the file in my Gallery and a simple click on it will take the viewer right to it!
I hope this was easy to follow. If not, please don’t hesitate to ask questions!!
Here is the PDF version of this tutorial: https://bit.ly/3ocHqWe
![]()