The Style File: Where Is It??
![]()
PDF Version : https://bit.ly/4c2NvvL
If you read the comment section, you’ll have seen that Kathi, aka Granny5pics, responded to my question on shadowing transparent objects: ““add and find commercial Styles (and Brushes) to your electronic devices? Do we need a tut on it?” Yes, I would benefit a lot with that tut!”” So this one’s for you, Kathi!
Because I work on a PC laptop running Windows 10, these instructions will reflect that. The process for Mac users will be very similar, and I’ll include a link to help with browsing files on a Mac at the end.
This might not be the smartest way to do this, but it’s been working for me for a long time and I don’t have to remember file paths – BONUS! I have two file tabs open, one with Window Explorer and one with my Digikit folders where the Styles I want to add to the directory currently are. Let’s look at the Digikit tab first.

These are all the Styles Katie, aka Ooh La La Scraps and Just So Scrappy, creates for ALL of her collections. I want to use one of these in my demo.

I’ve used several different versions of Photoshop Elements over the years, and I have directories galore. There’s no guarantee that a current version is going to put things in the same place as the older versions, so I stopped trying to memorize file paths a long time ago. Instead, I let my laptop do the work! Moving to the Explorer tab, I type “.asl” into the Search box – it’s where the arrow is pointing. That’s the file type suffix for Photoshop and Elements Styles. In the screenshot it shows that I’m searching my OS(C:) drive, because it’s the only drive I have in this laptop. If you have multiple drives and aren’t sure which drive to search, you can choose This PC in the folders list to the left of your screen instead. Then I let Windows find all the files with that suffix. It might take a couple of minutes, so I make myself some tea while I’m waiting. 😉
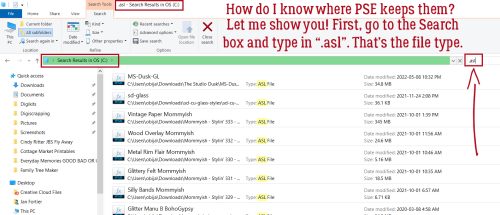
If you’ve used a progression of versions, look for a file path on the list Explorer will provide you that names your current version – you want to be sure Elements finds the files later, and it’s not going to look in those other folders. Mine says C:\Program Files\Adobe\Photoshop Elements 2021\Presets\Styles. Then right-click on that file name and choose Open File Location from the pop-up menu.

Explorer will open up the Adobe folder where all the Styles included with the software are. I have a LOT of Styles I’ve Copied into this folder so your mileage may vary.(I really should merge my directories…)
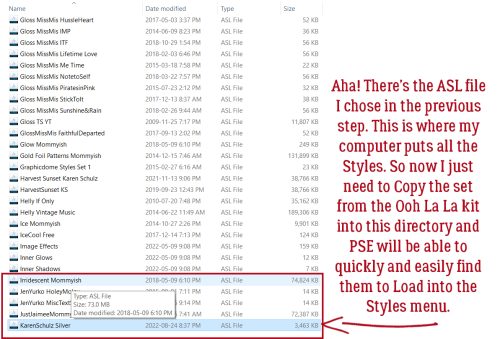
Now I’ve moved back to the tab open with my Ooh La La Scraps kit Styles folder. I’ve selected all of the Styles in the folder [click on the top name, hold down the CTRL key and click on the last name to select all quickly] and right-clicked to Copy. [Keyboard shortcut is CTRL>C]

Back on the Explorer tab, you can see the actual path Windows uses to locate Elements Presets. But why memorize all that? To add the Copied Styles into the folder, right-click and choose Paste or simply CTRL>V.

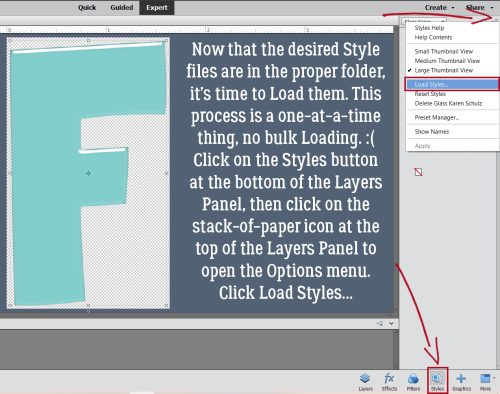
That’s all there is to the process. Let’s give it a quick test. I’ll use this acrylic F as my sample. The new Styles have to be Loaded into Elements‘ menu before they can be used, so click on the Styles button at the bottom of the Layers Panel, and then click the stack-of-paper icon to access the Tool Options. Choose Load Styles…
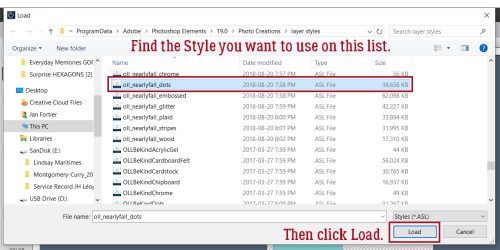
All the Styles in the Directory list will pop up. I’m going to use the Nearly Fall Dots Style on my sample. So I clicked on it then Load.
Et voilà!
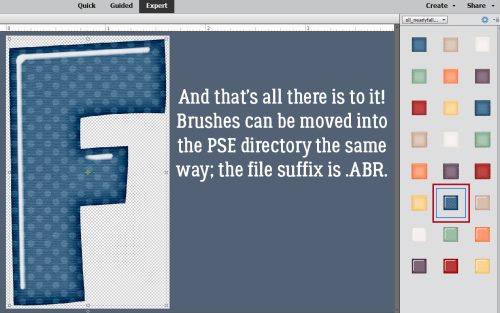
Brushes can be Copied into the Presets directory in the same way, using the suffix “.abr” instead. If you like, you can rename any or all of them to make them easier to find on the Directory list. Make your software work for you!!
Mac users: How to Browse Files on a Mac (howtogeek.com)
![]()