Let’s Get Crafty – Combining DigiScrap and Crochet

Happy Tuesday everyone. I’m here today with a new twist on our blog posts. How many of you have another craft you do? Beading, vinyl, quilting, crochet, knitting? If you do have another hobby, do you ever use your projects in your digiscrap layouts?

I LOVE to dabble in so many things. My husband just rolls his eyes and shakes his head when I jump into another craft because when I jump, I go all the way in. But I seem to have stuck with crocheting the longest. When I started digi-scrapping, I was finding I didn’t have a lot of recent pictures to scrap. My kids absolutely hate having their pictures taken, so those are few and far between. I have a bunch of older photos (both digi and printed that I can scan) but I wanted something more recent, so I started using pictures of crochet projects.

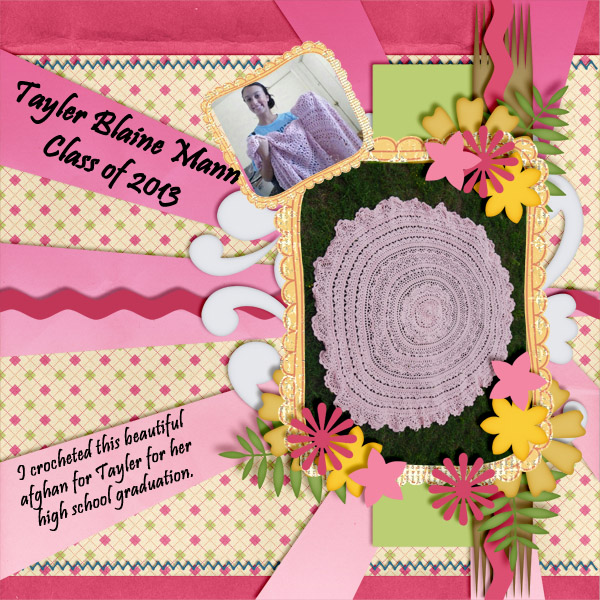
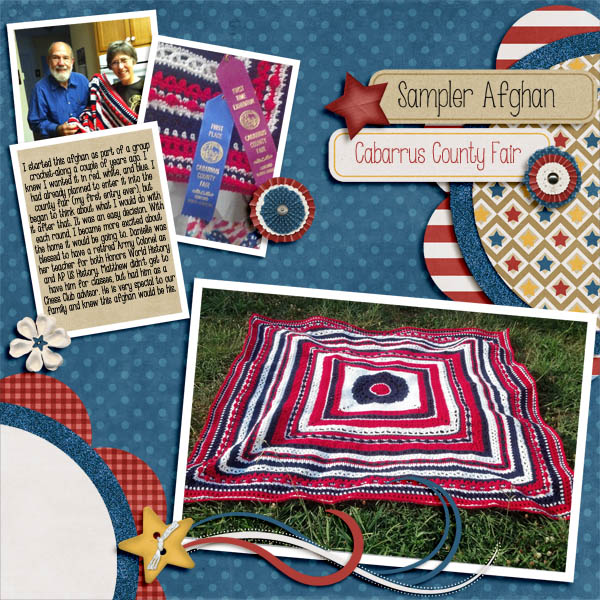
I love to find a pattern that I want to try and then do the project – mostly afghans. Problem there is, we only have so much room and only need so many afghans. So I started doing them to just give away. Below are some of the layouts I’ve done with my projects.

I can definitely see how my scrapping style has changed in the last few years.

Now it’s your turn! Do YOU have a hobby you have used as the focus of a layout. Post the link in the comments. I would LOVE to see what you’ve done.

Enjoy your week!!


Summer Bucket List

Today we are going to talk Summer Bucket Lists. That is exactly like it sounds. A list of fun stuff to do before the summer ends. Did you know you could scrap those lists?! You can! I am going to show you some great inspiration from Pinterest to get those Summer Bucket Lists started. Even if you don’t scrap it, it will be fun to do! (images linked to their pin.)


Here are a few examples of some Summer Bucket Lists that have the digital scrapbooking twist to them.


I am totally going to make one of these this year! Now, you can use any digital scrapbooking supplies you want to make these. (Or none at all!). I personally would use a great summer kit. Since we are going to look at those summer items later in the week, I am not going to show them to you today. You can always find those here.

I am going to show you two great kits that I found in the store that are geared towards Summer Bucket Lists. How cool is that? Everything you need in a kit! Images are linked.


Be Pinspired | Winter Crafts

GS_blog_BePinspired_Header

Hello scrappers! Welcome back from the maintenance downtime. I don’t know about you but I felt a little lost! I check GingerScraps at least once a day. However, during my down time I was looking around Pinterest. Because…duh! 🙂 With the past snow the east side of the states got last weekend, I thought some winter craft ideas would be a good idea! It isn’t just for scrapping. Get out that glue and paper and get ready to be inspired….or Pinspired! 🙂 (Images are linked)


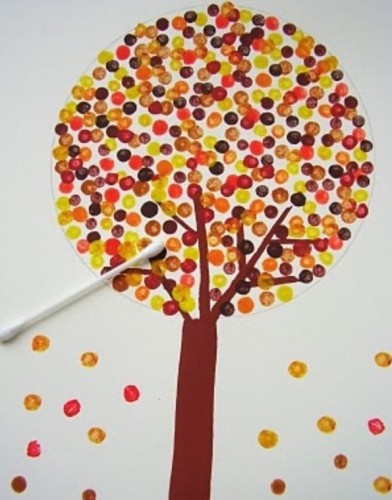
From paper stain-glass crafts to the simplest of finger painting. Are these not some of the cutest winter crafts? If you are looking strictly  looking for some digital scrapbooking ideas, look no further than the gallery and store. If you are looking for some winter supplies, make sure you look back to our celebrating winter post!

GS_footer_LaShawn

Be Pinspired | Christmas Crafts

It’s here!! If you celebrate, the Christmas will be here before you know it. 11 Day away. I know everyone is busy doing their Christmas thing. Spending time with family, decorating, baking, buying, crafting, and more!

Today we are going to take a look around pinterest and see what fun crafts we can find that we can put our digital scrapbooking twist on! We have such great designs and goodies at our fingertips. Sometimes all it takes to get a craft going is a little nudge in the right direction and some printed digital scrapbooking goodies. I did the looking around for you! (images liked to their pin).

Just imagine some of your favorite digital scrapbooking papers printed. Then you cut out your tags & use that paper. I can just see it now in my mind. I think our designers have some of the most creative and pretty paper around! Print, cut, & glue. Volia! All you need to do for the following items is the same! Print, cut & glue. Of course there is a few more steps in between. Take a look at all of these items & then think about your favorite holiday digital scrapbooking paper.


This last one my mom did for me for last Christmas. Except mine has my son’s photos on them. These would make great stocking stuffers! You don’t even have to use your holiday digital scrapbooking supplies. Think of those really fun themed kits that are Princess themed or something from space!


You don’t even have to buy new kits to do this. Just use your favorite you have in your digital scrapbooking stash. That being said, GingerScraps has a great collection of all things digital scrapbooking! Just like I’ve mentioned in the past, there is a section dedicated just to Thanksgiving. You can find that HERE and here is a small glimpse into that category. Go take a look! Rather wait? I will be back later this month with our “Let’s Celebrate Christmas” post. Where I take all the hard work out of looking for kits for you!


There you go. Just a small look at what GingerScraps has to offer. I hope you found some inspiration from Be Pinspired | Christmas Crafts! If you have gotten your digital scrapbooking & crafting on, link us up! We love to see what you are making with GingerScraps supplies! Happy crafting!


Be Pinspired | Thanksgiving Crafts

GS_blog_BePinspired_Header

It is getting that time of the year, here in the states. Let us not pretend that as a whole, we tend to skip over Thanksgiving. We are going to celebrate it for all that it is worth! Being thankful, getting together, taking photos, eating food, crafting, turkeys, history, and more!

Today we are going to take a look around pinterest and see what fun crafts we can find that we can put our digital scrapbooking twist on! We have such great designs and goodies at our fingertips. Sometimes all it takes to get a craft going is a little nudge in the right direction and some printed digital scrapbooking goodies. I did the looking around for you! (images liked to their pin).


You don't even have to get the glue out for this one! Take a look in all your latest kits. Most all of them come with buttons in them. Pull those buttons out, get to placing in photo shop (with some shadows!), save & print! Even your digital version would look great framed!

You don’t even have to get the glue out for this one! Take a look in all your latest kits. Most all of them come with buttons in them. Pull those buttons out, get to placing in photo shop (with some shadows!), save & print! Even your digital version would look great framed!


I am such a sucker for artwork done with sweet little hand & feet print. This is real simple! Find some of your favorite digital scrapbooking paper, print & glue. Think of what pretty feathers those papers will make!

I am such a sucker for artwork done with sweet little hand & feet print. This is real simple! Find some of your favorite digital scrapbooking paper, print & glue. Think of what pretty feathers those papers will make!


Instead of pain, think little elements! Buttons & doodads that are usually always in your digital scrapbooking its. Pull those lovelies out & get to placing. I've seen this done digitally. It is stunning!

Instead of pain, think little elements! Buttons & doodads that are usually always in your digital scrapbooking its. Pull those lovelies out & get to placing. I’ve seen this done digitally. It is stunning!


How easy would this be?!? A grid & your favorite elements. This would make a fun game to play on Thanksgiving!

How easy would this be?!? A grid & your favorite elements. This would make a fun game to play on Thanksgiving!


This is so cute! I really like that they used all those pretty patterned papers. Just think of all of the digital ones you have tucked away in your stash! You could print & have your turkey looking snazzy for Thanksgiving!

This is so cute! I really like that they used all those pretty patterned papers. Just think of all of the digital ones you have tucked away in your stash! You could print & have your turkey looking snazzy for Thanksgiving!


You don’t even have to buy new kits to do this. Just use your favorite you have in your digital scrapbooking stash. That being said, GingerScraps has a great collection of all things digital scrapbooking! Just like I’ve mentioned in the past, there is a section dedicated just to Thanksgiving. You can find that HERE and here is a small glimpse into that catagory. Go take a look! Rather wait? I will be back later this month with our “Let’s Celebrate Thanksgiving” post. Where I take all the hard work out of looking for kits for you!


There you go. Just a small look at what GingerScraps has to offer. I hope you found some inspiration from Be Pinspired | Thanksgiving Crafts! If you have gotten your digital scrapbooking & crafting on, link us up! We love to see what you are making with GingerScraps supplies! Happy crafting!

Let’s Get Crafty {Jewelry Edition}

Hello Bloggy Friends in Digi-land!

My name is Laura and I’m on the store CT here at Gingerscraps!

Today I’m stepping in for Julie and hosting the “Let’s get crafty” edition!I have an awesome tutorial for you and I’m pretty sure you already have most of the supplies needed lying around your house!

These button bracelets are super easy and fun to make. You can also make them to coordinate with your favorite outfit!

To get started you will need these supplies:
elastic: 1/4″ thick
buttons
thread and needle
Wrap the elastic around your wrist to see how long it needs to be. Don’t make it too tight!

Leave an overlap of about an inch on either side. Mark it with a pencil so you know where to sew it together.

Then line up your buttons next to it so you know where you want to place them.

*I decided after I took this picture that I wanted my buttons to overlap a little bit. If you want to try this instead, just overlap them a bit instead of a straight line as pictured below*

Now you want to sew your ends together. Use the pencil mark as a guide and start sewing it together. You can also use a lighter on the ends to keep from fraying.

It should look something like this when you are finished.

Now it’s time to sew the buttons on! Start with the one in the middle and work your way out…..

To secure the button to the elastic, loop it through a few times underneath and then create a knot as shown here….

See how I’ve overlapped my buttons a bit? Cute eh?!

Here is the almost finished product….

And there you have it! Finito!

Super easy, super fun, and the options are endless!!!! I hope you’ve enjoyed this tutorial! For more inspiration you can check out my blog for more tutorials!

Photobucket

Let’s Get Crafty!

Wow…Thursday…I’m totally unprepared forLet’s get Crafty today! Even after Steph posted last week! I’m still not prepared. Since I am such a flake 🙂 For this weeks Let’s Get Crafty I am going to just feature a challenge from Gingerscraps! It’s is a crafty challenge though 🙂 The “Candy Wrapper Challenge” is our “Hybrid” challenge! Now that is crafty right! Hybrid crafts are great! Cute name too huh. Shannon came up with that one, she is so clever!
For the month of March the hybrid challenge is so easy! I made it nice and simple so everyone could play along!

So, for march we are actually doing something pretty easy…although, some of you have probably never used your digi scrapping supplies to make “Home Decor” I do it all the time! Hey, these kits are so cute. Why not show them off in your home!
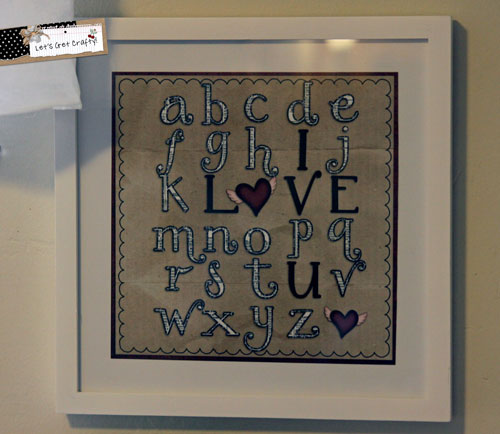
You can get very elaborate with these home decor projects, or they can be as simple as making a “LO” and printing, framing and putting on your wall.
So, let’s start with EASY! Printing, Framing and Hanging on the wall! Any one can do it!
Here is a real simple idea. Take a frame, maybe one that you go buy, or one that is sitting around your house. I have one in my dining room that I put some Valentines day “Digi Artwork” in for the month of Feb. I liked it so much I decided to replace the Artwork monthly for holidays or seasons.
Here is the Feb artwork…

Here it is with the March “Artwork”…

So, your challenge for the month is to get some kind of digi design up in your house somewhere! Anyway you like. you can go the easy way like I did or make something else! Just get some Hybrid juice flowing!

Visit us in the Hybrid Challenge Forum and get your Craft on!

Oh, hey I just thought of something cute to share with you for St. Pattys Day! I guess this post will have a little project..lol..funny how I just though of this! Last night my daughter had to make “Something Sweet” and take photos of it for her 12th grade photography class.  With is being St. Patty’s Day she decided to make these…

The ingerdients…Marshmellows, White Choc Chips, yellow Food coloring and Green Sprinkles!

Melt the chocolate chips, add some yellow food coloring, dip the marshmallow in the melted chocolate and sprinkle on the green! Done! Sweet and cute!! Display them in a cute container with some little decorations. (I used my St. Pattys Day Felties.) It looks like a party! 🙂

Wouldn’t your kids love to have this for a special St. Pattys Day treat!

Happy St. Patty’s Day! Here is a pinch from me if your not wearing GREEN!

Let’s Get Crafty, St Patty’s Style!

Hello friends in digiland! Steph AKA ScrappyCocoa here. I have taken over the blog for today!! Lucky Julie gets the day off! Today I am going to show you how to make a simple and quick St. Patrick’s day wreath. Here is what we are making-

Ok lets get started! You will need a wreath- I found mine at the Dollar Store- some fabric to wrap around the wreath- I love to shop the remnants at JoAnn’s for projects just like this, 3 sheets of green colored felt, scissors, hot glue and gems{also found in the Dollar section at JoAnn’s.

Next cut a long strip of fabric. Grab your hot glue, dab a piece on the wreath {be generous here, you don’t want your fabric coming unraveled} And begin twisting and wrapping your fabric around the wreath, like so-

Continue wrapping until you have covered the whole wreath. This will probably take several strips of fabric. Just remember to use plenty of glue when gluing the end of a strip down. Next grab your felt. Time for flowers! Cut several circles in 3 different sizes. It doesn’t matter if your circles aren’t perfect.

I used dark green for my large circles, kelly green for my medium circles and lime green for my small circles.

Now we are going to burn the edges of the felt. This step could be left out, but I personally like the look of burned edges. Hold your circle with the thumb in the middle. Gently burn the edge with a lighter. Careful, not to much, you don’t want to set your circle on fire!

When you are done your circle should look like this-

Now it’s time to assemble the flowers. Start with a large flower then a medium and end with a small. You could sew or glue these together. If gluing, just just a tiny dab of hot glue between circles because it soaks easily through the felt. Once put together add a gem or button of some sorts into the center of the flower.

And now for the hard part! Ok not really, but I always have trouble deciding how I want to arrange my flowers on my wreath. I think it is the easiest if you prop your wreath up on something to play around. Too bad I cant do it in PS with layers and all that!

I decided that my wreath needed more flowers, so I made a few more with just lime green that were just small in size. Glue them on with plenty of  hot glue. And we have a wreath!

And here is my whole little St Patrick’s day shelf-

I made the subway art, then vases from the dollar store filled with candy and a white plate from the dollar store and vinyl decal from HERE. Hope you enjoyed this tut! Go out and make your own St Patrick’s day wreath!

Fowers, Flowers, Flowers on Let’s Get Crafty Thursday!

It’s Thursday! Yea! Time to get crafty! Well, is wish I had time. I have been busy, busy this week. No time to get crafty yet! But, I will, Oh yes, I will. But, do not fear! We have other crafty ladies in our midst. One of our very own GingerScraps Designers has been making flowers, flowers and more flowers! Stephanie! I’m taking about you! You GingerScraps fans know her as the talented designer Scrappy Cocoa! But..not only is she a fab digi designer! She is a crafty goddess too! Look at all these cute little flowers…cute models too 🙂

Oh and her handsome little son even took his tired little sisters place as a model.

They look great in Mom’s hair too!

Steph even made this cool Flower Necklace.

Even cooler..she shows you all the steps you need to know to make your own on her blog! It’s really fun and pretty darn easy too! Pop over to her blog and make some of your own! You can check out all of her fabulous digi designs while you are there too 🙂

Happy Crafting!

“Clock” Plate on Let’s Get Crafty.

First off, before I start my Crafty Thursday post I want to say Happy Birthday to my best friend, my sister Ginger! She is the strongest, prettiest, smartest, best-est sister ever! Oh and make sure you scroll down to the post below to see a little Birthday Secret!

As I was browsing around some of my favorite crafty blogs the other day I came across this oh so pretty plate. I was like, Oh so cute. I could Hybridize that idea! So today for Let’s Get Crafty we are making a “Clock Plate”. It’s not a “Real” clock :). But, it is so pretty hanging on my wall. The original idea came from this lovely Blog HERE, Vintage Sky.

For my version the first step..well the second, the first was to go to the Thrift Store and find the perfect plate. Measure the plate and design a clock in Photoshop, or do what I did and find one in your digi stash! There are tons of kits that have clocks in them! The clock I used was a freebie I downloaded forever ago, by Digital Anemona. Re size to the size you need for your plate and print!

(Don’t mind those little squares at the bottom, those are for some scrabble tile necklaces I’m making)

Then cut it out and use some ModPodge to attach to your plate. Cover it with another layer of ModPodge to seal it.

It will dry clear.

When it’s dray make a little “hanger” on the back like this. I used my glue gun, but it came off a few days later..lol..so then I used super glue. That is holding so far!

Add a long piece of ribbon of lace to “hang” the plate. It’s really being held by the little tab we made. But it looks like it’s hung with the long pretty ribbon. Just tie the long piece to the short piece.

Ta DA! Here is the finished product.

Close up…

That’s it! Easy and cute!

Have a Crafty Thursday!