Archives for March 2021

Tutorial Tuesday (Photoshop Elements)

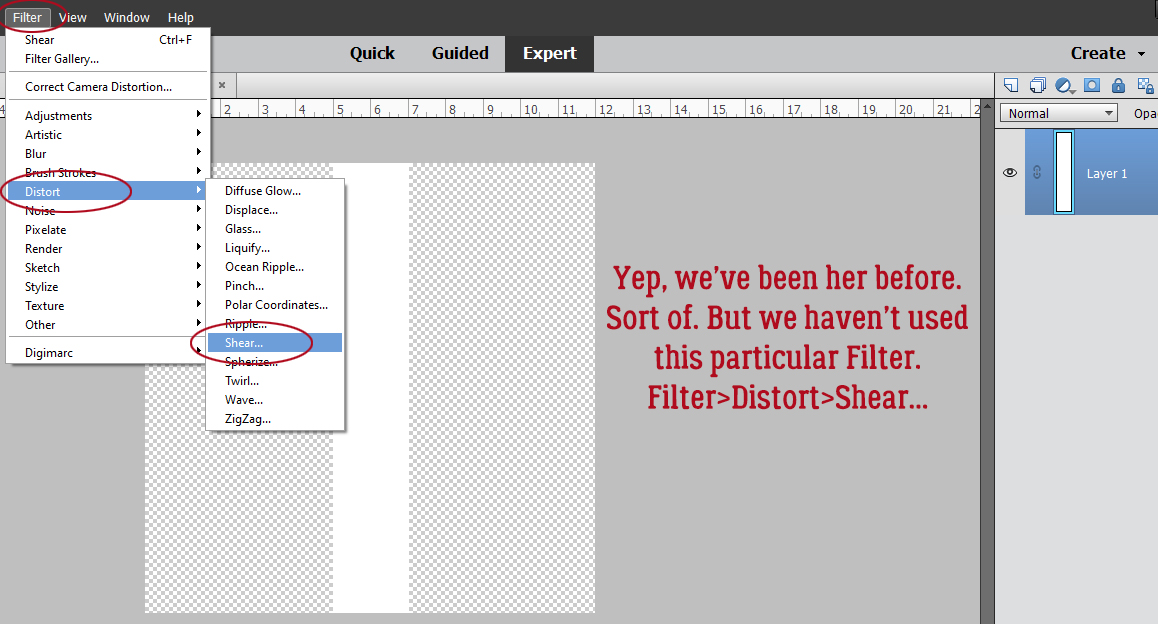
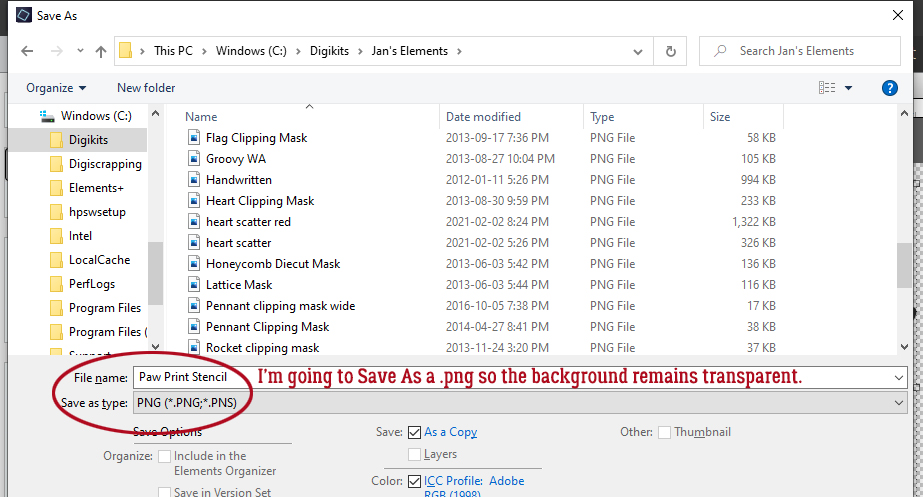
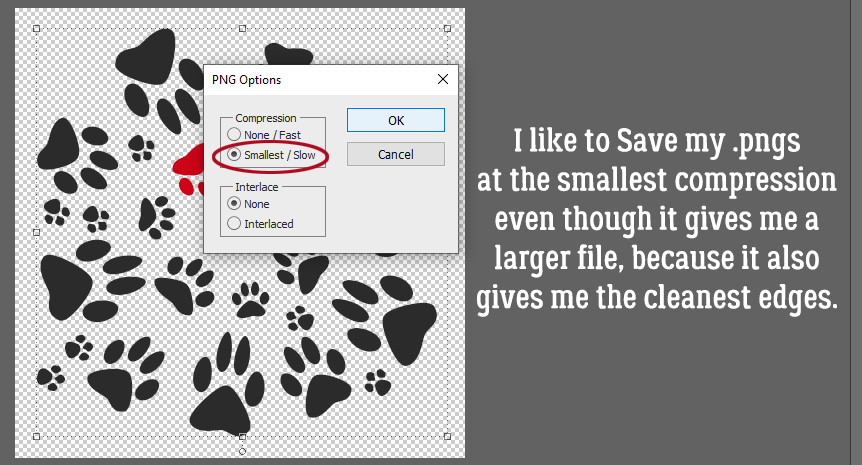
A 3D Title with Punch!

Thanks again to Ellen (gmae) we have another quick technique that has a great deal of appeal. Magical Scraps Galore has a a travel kit with some great title word art in it, called Destinations: Road Trip. The title Ellen particularly liked is the Road Trip one, but she wanted to use a different title in the same style. She messaged me that she tried to get this figured out on her own and eventually succeeded, but she knew there had to be a better way than stumbling around experimenting and undoing for hours. After all, that’s what I’m here for. 🙂 After a little thought and (not very much) experimentation, I can tell you, this does the trick and it’s not a ton of work. So let’s get started!

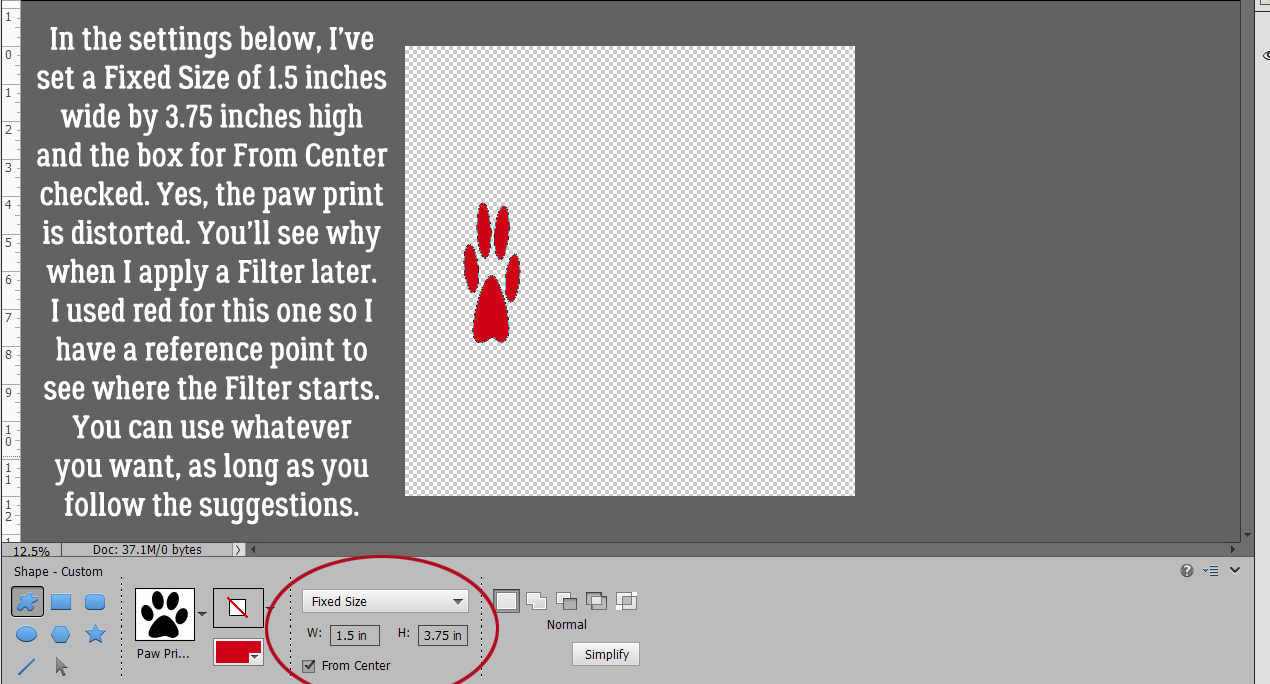
For this little demo I’m using a pretty striped yellow alpha from the GingerBread LadiesSunny Days collab. You can absolutely use a font if you choose, but each individual letter will need to be on its own layer. I opened up a 12×12 document on my workspace.

The first step is to create a elliptical shape to give the lower curve to the title. I pulled out a Custom Shape ellipse as shown. Whatever colour you have in your foreground is fine; I just had white already there. The ellipse should be slim and long, a sort of cigar-shape.

Remember, Custom Shapes are Smart Objects, meaning the pixels in it are locked and there’s not much you can do with them as is. I’ll be manipulating this shape so I right-clicked on the layer and hit Simplify Layer.

I want a Copy of the ellipse, which can be achieved in two ways: right-click on the layer and hit Duplicate Layer (then click OK on the pop-up menu), or simply by CTRL/CMD>J.

I enlarged the second ellipse quite a lot. My title only has 6 letters, but it’s still going to need some room.

I opened up a new blank layer on top of the larger ellipse by clicking on the sheet-of-paper icon at the top left of the layers panel, then I CTRL/CMD>clicked on the ellipse’s layer thumbnail (that little picture at the left side of the layer in the layers panel) to Select the edge of the ellipse. Boom Marching ants.

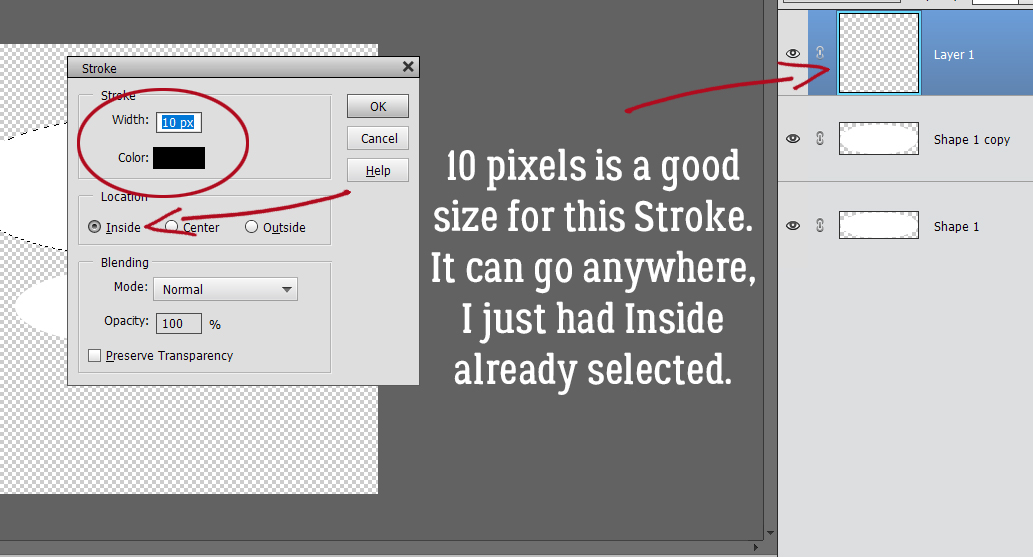
With the BLANK layer active and a contrasting colour in the foreground, I hit Edit>Stroke (Outline) Selection.

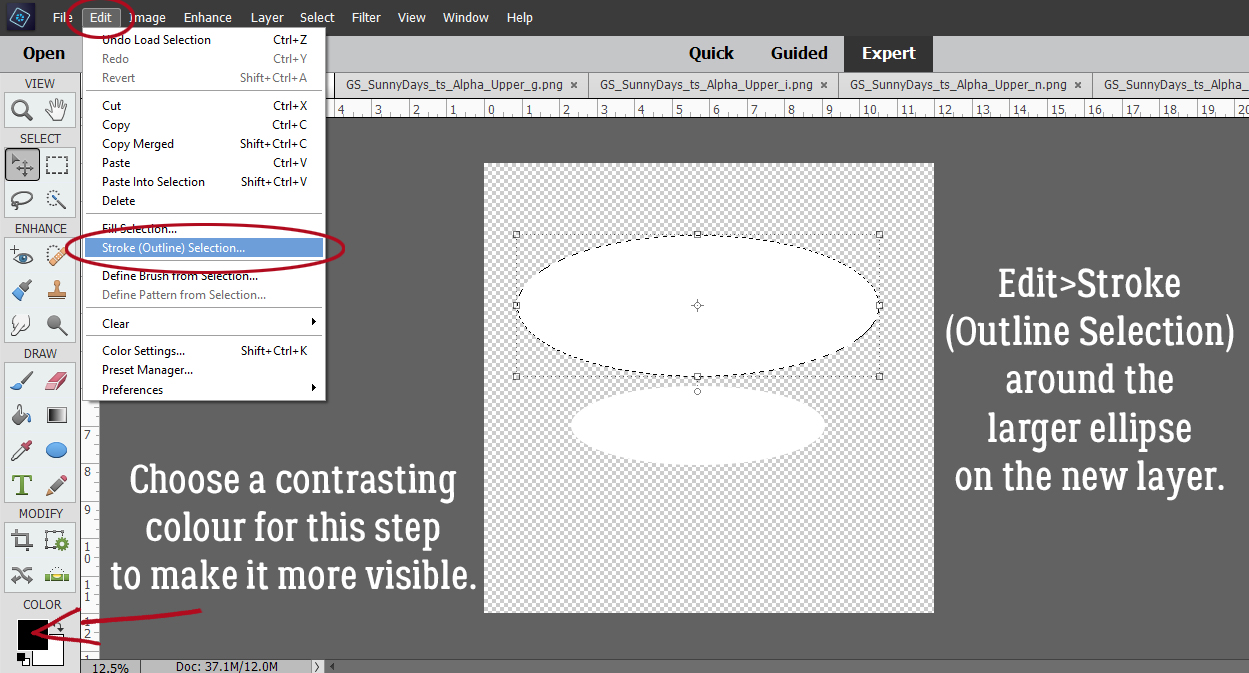
This Stroke can go wherever. I just had Inside already selected and it’s not important for this step. I want the Stroke to be easily seen so I have black and 10 pixels set.

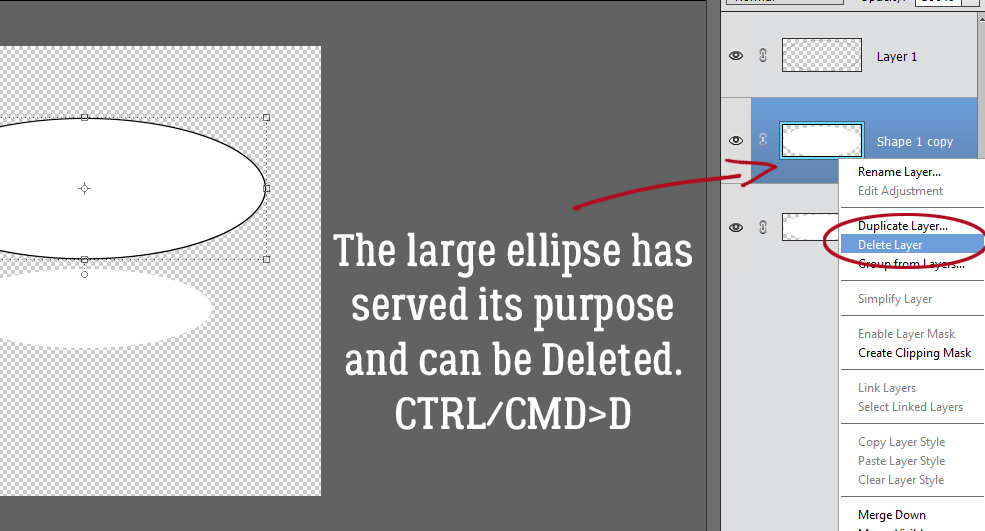
Now that I have a visible outline of the large ellipse on its own layer, the larger ellipse has served its purpose and can be Deleted. Right-click>Delete Layer or simply CTRL/CMD>D.

These two layers will be the guide for positioning my letters. They will sit on the edge of the smaller ellipse and stretch to touch the edge of the larger ellipse. To get that flare at the end of the title, the smaller solid ellipse needs a tilt.

After I looked at the gap for a minute or so, I decided the flare needed some more adjustment so I tilted the larger ellipse a bit in the opposite direction.

I have my guides in place, so now I can add my letters. For this step I’m just going to put them all on the canvas and position them so the bottoms are touching the solid, smaller ellipse.

As I’m placing them into the gap, I’m Resizing so the top is touching the edge of the larger ellipse.

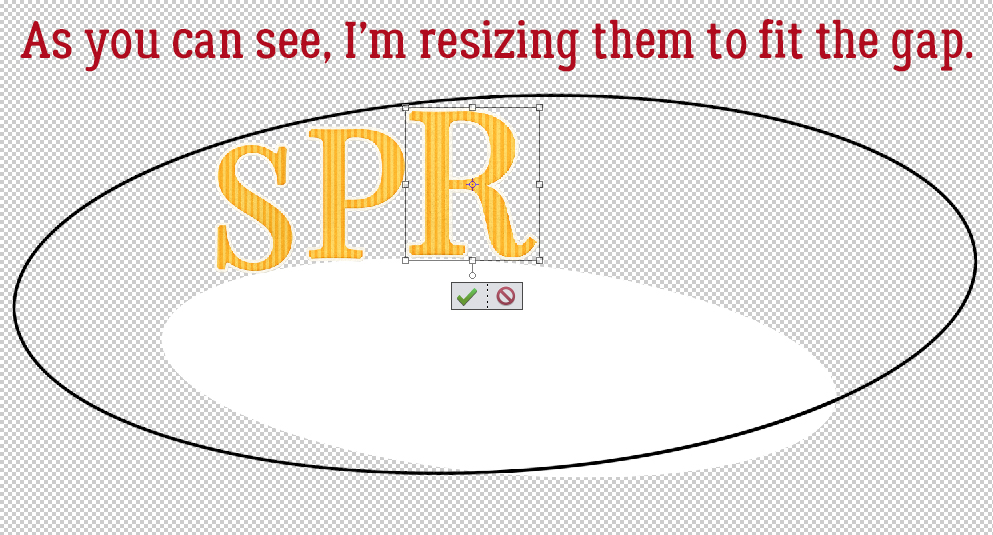
Once all the letters were inside the gap, I took a long look at them. I could just stop here and have an interesting and eye-catching title.

If you’re still with me, I’m now going to Image>Transform>Distort each letter so that they more closely follow the contours of my guides.

All I’ve done is Move the corners of the Bounding Box so that they’re touching the edges of each ellipse. You can see that the sides of the Bounding Box have remained perpendicular to the bottom of the page.

To review: Image>Transform>Distort

then move the corners of the Bounding Box so they touch the edges of the ellipses. Don’t change the orientation of the letter.

Here you can see what I mean about the length of your title related to the size of your ellipses. After all the letters have been placed, the ellipse layers can be deleted.

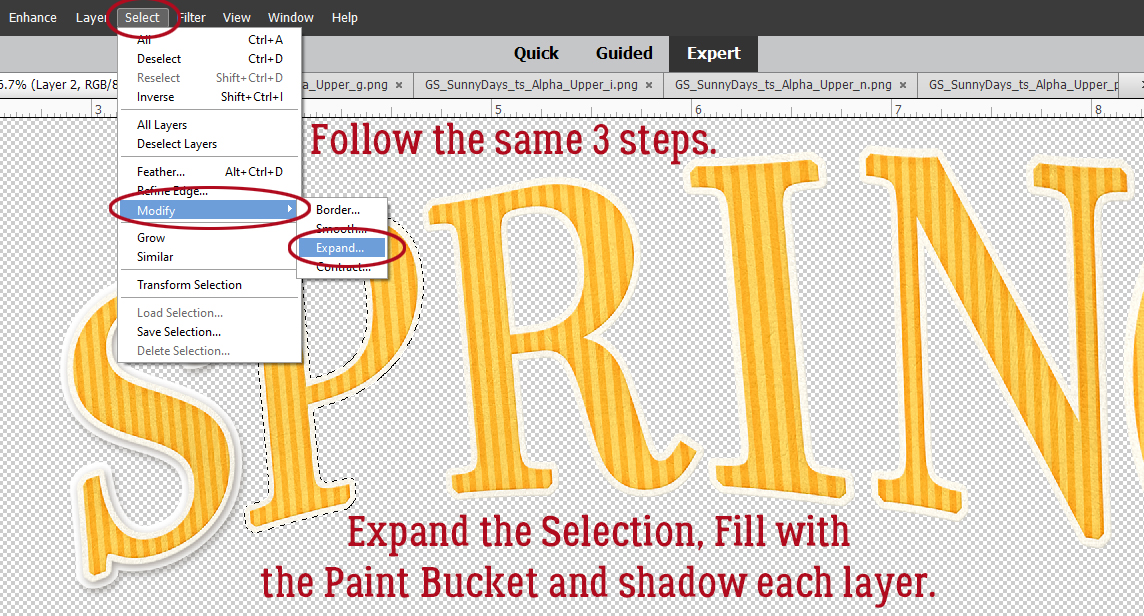
Now onward to getting that 3D look! Add a blank layer UNDER the first letter. You can start with it on top by clicking on the sheet-of-paper, and then move it down. Or you can hold down the CTRL/CMD key and click on the sheet-of-paper and it’s just go there by itself. With the BLANK layer active, CTRL/CMD>click on the first letter’s layer thumbnail to Select the edge.

Next I’m going to enlarge the selected area: Select>Modify>Expand… and my BLANK layer is still the active layer.

The pop-up menu is asking how much to Expand my Selection. 10 pixels is about right.

And there it is. See how the marching ants have moved away from the letter’s edge? Verifying… on the BLANK layer, now I’ll Fill that selected area using pure white and the Paint Bucket tool.

The real 3D look comes from adding shadows to each layer. I used some shadow styles from Karen Schulz. You can find them here.

Let’s review again. Open a new blank layer under the next letter. CTRL/CMD>click on the layer thumbnail for the next letter to Select the edge. Select>Modify>Expand the Selection by 10 pixels. Fill the new Selection with white on the BLANK layer.

This 10 pixel setting will be saved until you change it, or exit from the software, although that doesn’t always reset it to the default. You can keep the Paint Bucket tool active as you work through the letters, which really saves time.

When all the letters have been shadowed, my title is essentially done.

I’ll make sure when I move the letters that I’ve got both layers active, otherwise I’ll be messing it up. The nice part about using a shadow Style is that any changes I make to the layers now will be followed by the Style. That’s to say, the lighting angle, size and opacity will stay the same. (Did you notice I missed a couple of my layers when I was Shadowing? I went back and Copied the Style onto those layers.)

If there are overlapping letters, I’ll shift them a bit so there’s a space between each. There was an overlap at the R and the I, so I’ve “kerned” them.

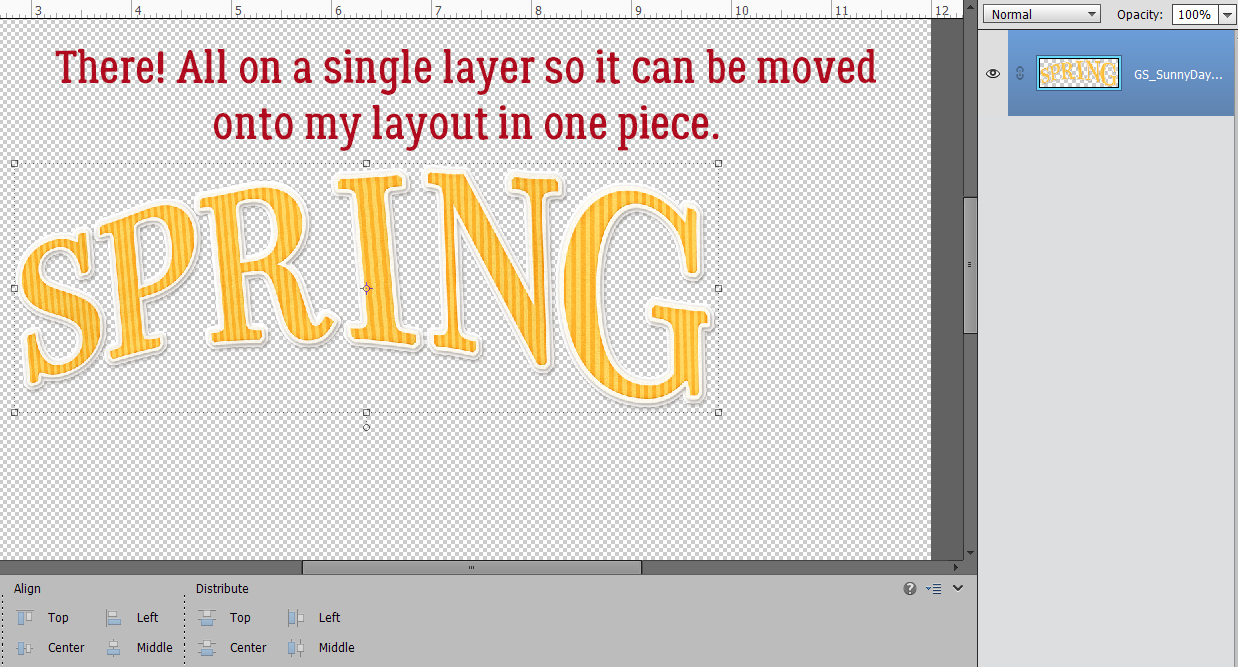
When I was happy with the way my title looked, I Activated all the layers so I could Merge them into a single layer to make using the title easier. Merging can be done either by right-clicking on one of the Active layers and hitting Merge Layers, or by CTRL/CMD>E.

And it’s done.

Is that what you were looking for, Ellen?

Here is the PDF version of this tutorial : https://bit.ly/3sVF93i


Fresh Baked: MARCH 26, 2021

Well, goodness. It’s almost the end of March. How is your spring going? We’ve had rain today. Makes it a bit dreary to work, but it does bring those beautiful flowers we all love to take pictures of.

Remember, when you spend $10 in the store, you get this fun collab for free. This is perfect for those of us the love breakfast for dinner.

Let’s see what our designers have up their creative sleeves this week.

Have you grabbed the March Monthly Mix? The colors are beautiful.

Remember, any ten layouts completed gets you this kit as a reward.

Make sure to watch the Buffet newsletter for a fun not-so-April Fool’s Day Sale.

Tutorial Tuesday (Photoshop Elements)

I Love a Curvy Border


(Bold, coloured text indicates I’ve linked that text to either a designer’s store or a specific kit/collection.)

I’m so glad to know that I’m not the only one with a huge pile of old scrapbooking magazines, and that I’m also not the only one to go through them looking for ways to translate what they hold into a digital version. Ellen (gmae) messaged me about a scrapbooking mag she had that was dated sometime in 2007, a Better Homes and GardensUltimate Guide to Digital Scrapbooking” with step-by-step instructions. The instructions were based on Photoshop Elements 4.0… should be a piece of cake, right? WRONG! I remember trying to follow some of those magazine instructions and being completely lost. Ellen tried to follow the steps for creating a curved clipping mask, like the sort some of our amazing designers sometimes include in their collections, but she couldn’t get past the second step and she asked for help. So I rolled up my sleeves and gave the instructions a spin. And got hung up. At the second step. They totally didn’t make sense. So today, I’m going to show you how to make a curved paper border for your layouts step by step and anybody will be able to follow the instructions!

I think the easiest way to make this work well for you, I recommend opening a canvas on your workspace in the same size as your scrapbook layouts. I always do 12×12, but I know lots of people like the 8 1/2×11 format so you do you. then, using the Rectangle Marquee tool pull out a skinny vertical rectangle as shown.

The next step is to fill the Selection (your skinny rectangle) with a solid colour.

The magazine said to use Edit>Fill Selection and white at 100% opacity so I’ll show you that method. Using the Paint Bucket would work just as well.

And it’ll look like this when you’ve Filled it.

We’ve played around with Filters quite a bit recently and we’re going to do it again today. This time it’ll be Filter>Distort>Shear…

Here is what the default controls for this Filter look like. The two most important parts are the vertical line inside the upper box and the Preview image in the lower box.

To demonstrate what manipulating that vertical line does I simply grabbed the “handle” – that black dot at the very top of the line – and moved it over horizontally to the left. See what happens to the Preview? I love that they’ve put a grid there to make achieving symmetry easier.

To begin with the default setting only has the two “handles” at top and bottom. But you can create a new handle anywhere along that line. Here you can see I put one right in the centre and pulled it one block over to the right, and the stripe follows that curve.

I’ve created a sine wave in this image. The thing to note here is that when you make a deep curve like this, you’re not going to have perfectly parallel outer edges to your stripe, not that it matters much.

You can make your curves as plentiful and deep as you want.


Use the grid! It’s a great tool!

For my imaginary layout I’m going to put the curved border over along the left side so I moved my final camel-hump curved stripe over there. Only problem is I don’t want my background paper to show through at the edge so I’ll need to Fill those two voids.

Here’s where the Paint Bucket rushes to the rescue. All I need to do is dump some white paint into those holes and I’ll have a complete clipping mask.

To see the clipping mask in action I Clipped a paper from Ooh La La Scraps‘s I Heart You kit to my mask. (Sorry for the typo on the screenshot. JSS and OLL are the same person and I sometimes mix them up! BTW… the BUNDLE is on sale today for just $5.00!!!) The keyboard shortcut for clipping is CTRL/CMD>G for versions up to 14 and CTRL/CMD>ALT>G for versions 14 and up.

Because I wanted to see if I could make sense of the directions in the magazine, I followed their third step, which was to Duplicate the curved clipping mask layer to create a white border. I think a Stroke would do that with fewer steps, but okay. Let’s do it. Only problem? When I Duplicated the mask layer, the paper was “released” from the clipping mask! Now I have to redo clipping the paper to the mask again. So yeah, Stroke borders are the way to go!

I nudged the bottom curved mask layer over to the right so it moves out from under the paper and now there’s a white border.

For fun, I created another curved clipping mask, this time with four relatively symmetrical bumps on it. I clipped a paper from ADB DesignsThe Storyteller kit to it. I think the two papers look good together.

Here’s a refresher on using Strokes to add a border. Edit>Stroke (Outline Selection) opens this menu. Decide how wide you want your Stroke and choose a colour for it. Make it 100% Opacity and you can put it wherever you like. I just went Outside because that’s what I used last. 😉

It’s a lot simpler to do a Stroke border. It looks pretty similar but uses fewer steps.

I made one more randomly bumpy border using the same steps and clipped another of ADB‘s papers to it. To give the appearance of paper layers, they need a drop shadow. Feel free to use a shadow Style if you like. I did mine using my tried-and-true method and now there’s some dimension to the border.

Some things I discovered: 1) Subsequent border masks have to be made on their own canvases. The Filter doesn’t understand what you want if there’s already one Shear filter present. 2) When you use the Distort>Shear… Filter and want to do the same technique on a new object, it will return you to whatever curves you used last, unless you close your Elements and reopen it – and who wants to do that?!! So prepare to be a little more challenged on those new curves. 3) To fill the area along the edge of your subsequent border masks, drag out a rectangle with your Rectangle Marquee tool that touches the free edge on the one side and sits inside the filled part of the stripe on the other. Then dump some paint into the rectangle with the Paint Bucket. Easy peasy.

Maybe you’ll be able to work this technique into a Survivor layout. That would be pretty sweet! See you next week.
Here is the link to this weeks PDF version: https://bit.ly/3vN9S4e

Fresh Baked: MARCH 19, 2021

Happy middle of March. Seems like 2021 is going to fly by. I can’t believe we’re halfway through the month already. How is your scrapping going? Are you participating in Scrapping Survivor. Even if you aren’t, make sure you check out the Survivor gallery in the forum and see the gorgeous layouts that are created.

Remember, when you spend $10 in the store, you get this wonderful collab for free.

And now for our new releases this week.

How are your challenges going? It’s not too late to get started. Any 10 completed challenges will get you this amazing collab as a reward.

Tutorial Tuesday (Photoshop Elements)

Making Use of the Circular “Stencil”

There are so many creative ways of using our digital scrapbooking supplies. Some are obvious, others aren’t. Today I’m going to show you some of the ways I used the paw print circular stencil we created in our last tutorial. These are only a few of the ideas and each of them can be improved upon with a little ingenuity.

This first one is a simple stencil effect using a brush. I thought this coloured pencil effect was interesting. There’s a similar demo set of brushes at Brusheezy.com. My background is a subtle gray chevron paper from Aimee Harrison‘s kit Bring Happiness (retired). I covered the stencil with the brush, stamping with it until the prints were completely covered, then cut away the overlap. To give it a bit more substance, I applied a stroke around the outside.

For this look, I reduced the size of the stencil so it filled one quarter of the paper. Then I filled it with a slightly darker shade of gray and changed the Blend Mode to Multiply and decreased the Opacity to 35%. I Copied (CTRL/CMD>J) the layer and redistributed the Copies so they filled each of the corners of the paper. This would be so cute on a newsprint background!

Here, all I’ve done is recolour the red print to the same dark gray as the rest of the prints then apply a Bevel style (Scalloped Edge) to the whole grouping.

This is another Bevel style, the Simple Sharp Outer. It creates a puffy-sticker look.

As you can see, I’ve applied a black Glitter Style from Just So Scrappy‘s Up on the Housetop set to this version.

To achieve this 3D glossy, sparkly look, I used a Glitter Gloss style from the same set as the plain glitter.

And for another look, I applied a Chipboard Style from the expanded set of Up on the Housetop‘s Styles.

Next, I used the stencil to create a cut-out. The papers are from Jumpstart DesignsBetter Together (retired). A narrow shadow gives the illusion of space between the papers.

Reversing the script, I cut the paw prints out of the foreground paper and floated them over the cardstock.

The video this tutorial was inspired by used a shimmery texture paste to add dimension to the card the demonstrator was making. I went through my stash and found some gesso splatters also created by Sheri of Jumpstart Designs. You can find some of her gesso here. Don’t know what gesso is? It’s a mixture of paint (usually white) and a binder like chalk, gypsum, pigment or a combo of them. It’s thick and dried quite hard, with a lot of surface texture. I covered the stencil as much as possible, layering the gesso splatters on top of each other for even more depth. Then I gave each of the gesso layers a faint shadow, adding dimension to each. Once all the layers were shadowed, I cut away the overlap and this is what was left. It looks so organic!

To come even closer to the card in the video, I then applied a superfine white Glitter Style and changed the Blend Mode to Multiply with an Opacity of 60%.

These were the ideas that popped to mind. I’m sure you’ll have some ideas of your own. Steph (CalGirl) used the tutorial to create this beautiful layout. Rather than using a Custom Shape, she used a shamrock element from Karen Schulz‘s This Is Me March kit as her shape and clipped a paper to the stencil.

If you’d like detailed information on any of the techniques I’ve described please drop me a note in the Comments and I’ll show you how I got there.

See you next week!

Here is a link to the PDF version of this tutorial: https://bit.ly/38NSlyV

March $1.00 Bake Sale & $2.00 Tuesday!

 The $1.00 Bake Sale and $2.00 Tuesday are BOTH OPEN NOW!

Come on over and check out what our designers are serving up for the $1.00 Bake Sale (March 15-20) AND $2.00 Tuesday (ends Tuesday at 11:59 pm Eastern Time)!

I promise you will not want to miss these deals!! 

$2.00 Tuesday LINK

$1.00 Bake Sale LINK

Remember, if you spend $10 in the store, you get this fabulous kit for free!

Fresh Baked: MARCH 12, 2021

Welcome to another Friday. It’s an exciting time at GingerScraps with all these fun things happening.

Scrapping Survivor: Season 11 is open for sign ups and we have our annual Win Your Wishlist contest happening now!

Head to the forum for all the details!  WIN YOUR WISHLIST {2021}

WISHLIST

This years Scrapping Survivor theme is Craft Fair!!! You can find all the details about Scrapping Survivor in the GingerScraps Forum!

Survivor

Don’t forget to stop by the shop and pick up the Craft Fair Mega! It is truly AWESOME! Being a crocheter, I LOVE this!!

 Remember when you spend $10 in the store, you get this great kit for free. Tea time anyone?

Let’s see what our designers have this week. There are a LOT of previews!

Don’t forget about our challenges. If you complete 10 challenges in March you will get this great full kit as a reward.

Tutorial Tuesday (Photoshop Elements)

Circular Stencils – Another Paper-to-Digi Technique

Once again, Steph (CalGirl) brought me an idea for something fun to convert from paper to digi and I loved it so much I jumped on it. She shared a video from Mindy Eggen Design with me, showing a paper background technique using a circular stencil and texture paste; the finished product was gorgeous and we both knew there would be a way to do it digitally. We also both recognized that there are lots of ways to use the “stencil”, so today we’re going to create the stencil and next week (or maybe two) we’ll look at how to use it in different ways. Even though I’m going to give you specific details about making this technique work, please be aware that you may still have to tinker with the formula. But I know you’ll like the results.

I started with a 12×12 inch canvas (you can use whatever dimensions you like) because I scrap in that size. As you can see, I’m using the Custom Shape Tool. The video’s stencil is a flight of butterflies, and I worked out the basics using the butterfly shape, but for my example I’ll use the paw print. It’s very hard to see the settings I’ve used but not to worry: it’ll be in the text.

While I was figuring out how to make the technique work, I discovered that I wasn’t able to see for sure where the circle started so I made the first shape in one colour and all the rest in another. That really helped. So I have red as my foreground colour. I have Fixed Size selected and 1:2.5 ratio width to height or 1.5 inches wide and 3.75 inches high. Yes, the resulting shape is really distorted, but that’s a necessary evil.

The Custom Shape Tool creates Smart Objects. When they remain Smart Objects, the only adjustments that can be made are to size and position. And… I can’t change the foreground colour – it’s locked at red. Because I want to use the same shape and settings again, I’m going to Simplify the shape layer. More about that later.

This screenshot shows you the difference between a Smart Object – the gray print – and a Simplified object – the red. On the layer thumbnail there’s a little box in the lower right corner. That’s your clue that the layer is only minimally adjustable. You can place your shapes anywhere on the canvas, since they’re easy enough to move later.

Yes, let’s Simplify things!

The quickest and easiest way to have multiples of something is to Copy it (right-click>Duplicate Layer>OK or even quicker and easier, CTRL/CMD>J). I made 2 more copies of the gray print and moved them around.

One thing that became quite obvious early on was that if this trick is going to work the object furthest to the right has to be touching the edge of the canvas. The far-left object doesn’t have to touch, but it can’t be too far away either.

Next I added in a smaller paw print, using the same 1:2.5 ratio (1 inch wide, 2.5 inches high). Take note of the button I’ve pointed out with the big red arrow. By clicking it, you can create a shape and Simplify it in only 2 moves! Mind blown!!

I made some small print copies and slid them in between the bigger prints. Almost ready for the Filter

If you want to have the centres of the shapes aligned, Select all the layers by clicking on the top layer, hold down the Shift key and click on the bottom layer then click on Align>Center.

To have them evenly spaced, keep them Selected, then click Distribute>Middle.

This is what the line-up looks like aligned and evenly spaced.

And then after I’ve applied the Filter, this is the look. But I’m jumping ahead….

But first, since I want ALL the prints to be Filtered, I’m going to Merge the layers. Select all the layers by clicking on the top one, hold down the Shift key and click on the bottom one. Right-click>Merge Layers, or CTRL/CMD>E.

The Filter I used is Filter>Distort>Polar Coordinates. The key word there is DISTORT! And that’s exactly why the shapes have to be odd to start with.

The method of Filtering I want is Rectangular to Polar. The Preview pane shows how wonky some of the prints look so rather than click on OK, I clicked on Cancel. Now I need to figure out how to overcome that flattening effect.

Rather than go all the way back to the beginning, I chose to stretch the prints’ height by using the Move Tool. It might work, might not! (I estimate the ratio now to be about 1:5)

I went back to the Filter menu and chose Distort>Polar Coordinates again. Remember, if you haven’t shut down and restarted Elements, you can apply the same Filter last used simply by clicking CTRL/CMD>F.

That looks a bit better. Some of the toe prints are still a little unusual, but I can live with that.

The stencil in the video has two circles of butterflies, so let’s make another, bigger circle. I’m going to use my estimated ratio for this set, 1:5.

For this ring, I added an extra large print. As you can see in the screenshot, I’ve turned visibility for the original circle to off, but it’s still there.

Then I put in a few smaller prints too.

Until I apply the B, I won’t know if this steep wave will be okay or not.

Umm. Cosmetic surgery needed! But do I start all over, or do I take what I have and work with it? I think CopyCut-and-Paste will be the easiest path.

Okay! That’s much better. I Cut (CTRL/CMD>X) out the prints that were too distorted, Copied (CTRL/CMD>C) and Pasted (CTRL/CMD>V) one of the large and one of the small prints in their place. Now to see the two rings of prints together so I know what other tweaks are needed…

I Resized and Rotated the rings a bit, using the Move Tool and I like the result.

But wait, there’s more! In the Custom Shapes menu I found this pair of tiny paw prints. I’m going to pop some of them into the mix. Because they’re not going to be filtered, I used a symmetrical setting of 1.5:1.5 inches.

Okay, so I also added a couple (3) single prints too. But this looks a lot like the stencil in the video so I’m very satisfied with my result. If you want to add a circle in the centre, you can do that quite easily.

I want to Save my stencil As “Paw Print Stencil” in my personal digital elements folder. The format is .png so the background will remain transparent. That way I can use it in a variety of techniques later.

And for Compression, I’ll go with Smallest/Slow non-Interlaced so it retains its crisp edges. Yes, the file will be bigger, but the quality will be better, so it’s a sacrifice I’m willing to make.

Start thinking about the different options I have for using this stencil. Will I find a way to make it look like I’ve used texture paste? You won’t know unless you come back next Tuesday!

Here is a link to the PDF version of this tutorial: https://bit.ly/3rGYILY

March 5, 2021: Fresh Baked and Survivor Destination Reveal!!

Happy Friday!! In addition to our regular amazing Friday New Releases, we have two super exciting announcements today! Scrapping Survivor: Season 11 is open for sign ups and we have our annual Win Your Wishlist contest happening now!

Head to the forum for all the details!  WIN YOUR WISHLIST {2021}

WISHLIST

And now, the moment you have all been waiting for!! 

Are you ready for the big reveal? There were so many good guesses in the forum. Without further ado… Drum Roll Please … This years Scrapping Survivor theme is … Craft Fair!!!

Survivor

You can find all the details about Scrapping Survivor in the GingerScraps Forum!

 Don’t forget to stop by the shop and pick up the Craft Fair Mega! It is truly AWESOME! 

 Remember when you spend $10 in the store, you get this great kit for free. Just looking at the preview makes me want to grab a cup of coffee.

Now let’s see what the designers have for us this week.

Don’t forget about those challenges. Any 10 completed challenges gets you this beautiful collab as a reward.


Tutorial Tuesday (Photoshop Elements+)

Fooling Around With Gradients: Graduated Filters in Elements+

As someone with Irish heritage, March and St Patrick’s Day always makes me think of Ireland. And that makes me pull out the photos I took during my two trips to the Ould Sod. And perusing them makes we wish the sky wasn’t completely blown out in every. Single. Outdoor. Photo. You know what I mean… that almost white, totally featureless sky that definitely didn’t look like that to the eye. Why does that happen? Well, as sophisticated as today’s digital cameras are, they’re still not great at filtering the bright light from the sky while keeping the foreground properly exposed. Landscape photographers understand this principle and carry a selection of neutral density filters they can pop over their lens to improve their shots. Neutral density filters have a section of the glass coated with a smoky transparent film that gradually gets lighter as it approaches the centre. This means that the section of the frame behind the smoky part will see less light than the part of the filter that’s completely clear, making the exposure of that part of the frame less bright. They can be positioned so that the dark section is where it makes the most sense; the resulting image will have a balance between the brightness of the sky or water and the remainder of the scene. So what if you’re not a famous landscape photographer and you have a bunch of photos that could be great, if that balance was there? Elements+ to the rescue!!

For those unfamiliar, Elements+ is an add-on application that allows Elements to do a bunch of things found in the more-versatile-more-expensive-and-more-difficult-to-learn Photoshop. It costs $15 or so and is version-specific. I use Elements 2019, so the version of Elements+ I have is the 2019 one. I wrote a tutorial overview of it last year that you can find here. So let’s see how it can take the place of a neutral density filter.

This photo of the bridge over the River Erne in Beleek, Fermanagh is one that I’ve played with before but I was never totally happy with the outcome. (A little trivia: The border between Donegal, Ireland and Fermanagh, Northern Ireland runs right down the centre of the bridge! It’s one reason Brexit has been so contentious for those living in Northern Ireland and why a hard border would be so difficult to re-establish.) The day I was at Beleek, the sky was cloudy, but not as it looks in the photo.

Once you’ve installed your copy of Elements+, all its awesome power can be found under File>Automation Tools. The graduated filter tool is in the RAW Corrections set, so I went ahead and clicked through.

The Graduated Filter tab is the second one from the left as shown. You can click on the tab, or the icon just above it. Then click on New.

The filter creates a mask over the photo on a separate layer. Click on the Mask tab and you’ll see which part of the photo is being filtered. Those boxes with green sections show you the orientation of the filter, with green being the darker part. The default setting is to place the darker part of the filter over the top half(ish) of the photo. You can already see how the default setting has changed the image. The green line with the big green dot at one end and the red dot at the other is how you control where the filter is actually applied.

My first goal is to make the sky as interesting as possible, so I moved the top slider labeled Zero Effect to the left, past midline, and the red dot moved up past the railing on the bridge.

Now to make some adjustments. I played with the sliders in the Adjustments menu, moving them just a little in one direction or the other and watching my preview image to see what changes. Not surprisingly, the Exposure slider has been moved a good bit to the left, or lower, and I also darkened the Highlights a smidge. All of a sudden, there are layers of clouds in the sky! Clarity adds a hint of detail, while Dehaze changes contrast and overall sharpness. Sharpness adjusts focus and Noise Reduction can minimize pixelation. These two adjustments need a very light touch, because they’ll make your image look really phony if you go too far. The changes should be quite subtle to the eye, but make a big impact all together. I wanted the grass on that little knoll to be a tiny bit more vivid so I added some more Saturation.

The neatest thing about these filters is that you can layer them one on top of another and adjust whole areas of photos quickly and easily. So now I’m going to add a filter to the bridge and water. I clicked New then clicked the second left filter with the darker area at the bottom. The default setting for this filter is as shown.

As you can see, I moved the red dot up so it sits directly over where the other red dot was, using the Zero Effect slider. Then I moved the bigger green dot down to the very bottom of the photo with the Full Effect slider.

These are the adjustments I made to the lower half. Can you see how much brighter and sharper the reflection of the bridge looks on the river? I really cranked up the Shadows.

Here’s the final image. The ripples in the water are much more visible and the reflection of the trees is brighter.

Check out this difference! This is the original.

Let’s talk a minute about some of the other icons on the menu. Up at the top right there’s a drop-down that will show you how many filters you’ve added and which one is currently active for further adjustment. The eye icon lets you turn on and off the filter to better assess whether you’re getting the look you want. And the garbage can – self-explanatory. If you don’t like it and aren’t interested in tweaking any more, just toss it! But… if you have a bunch of photos you’d like to apply the exact same settings to, if you click on the icon I’ve pointed to at the bottom, you can save them as a script and have them readily at hand later!

Let’s do another one. You might look at this photo of Ross Castle in Killarney National Park and wonder what I could possible find faulty with it. Well, maybe I can punch up the blue in the sky a bit more, maybe add a bit more detail to the clouds and to the trees.

So let’s get into the RAW Corrections menu again.

We’ll add a New Graduated Filter. The sky already looks bluer!

Now the sky is closer to the blue Lough Erne is reflecting. But I feel like the centre of the photo is too dark now, so I’m going to adjust the area the mask is covering.

Here’s the default. I want to move that red dot up so that it sits right were the grass meets the castle wall.

There!

After I played with the various sliders, there’s more detail in the clouds, the sky is deep blue, the trees in the background are sharper and so are the stones in the castle walls. I wish the bird in the sky was clearer though!

I added a second mask to the lower part of the photo. It looks pretty awful right now, but I’m going to fix it.

I moved the red dot down to my original pivot point. Isn’t it so accommodating of Elements+ to save that for me?

After looking at it a bit longer, I decided the red dot needed to be lower on the grassy area. And look! I’ve swung the green dot over to the left so the dividing line hugs the edge of the grass better. By pulling the lower slider for the Full Effect mask adjustment over to the left, I can section off just part of the lower half of the photo! All that really needs to be adjusted is the grass, so this should work!

Now the grass is brighter and there’s more detail in the foreground trees and shrubs. Apparently, these last adjustments were made on a thrid mask. Somehow that slipped past my notice!

The final version:

And the original:

What do you think? I know I’m going to be doing this a LOT!!

Have you seen the announcement for the Season 11 of  Digiscrapping Survivor? The new destination theme will be announced and sign-ups start March 5 and I’m so excited!! The prizes are insane. Simply INSANE! I haven’t ever been in a place in my life where I could join in the fun, but this year I am, so I’m going to get my feet wet. I’d love to write a tutorial but I’m a babe in the woods here. If you’ve played along in the past and have any advice for me (to share with the rest of the GS community), send me a private message. I’ll compile all the hints and tips into a post and we can all hit the floor running. You can find a teaser for Survivor here. It’s the sign-up thread for Season 10, and gives a good overview of the competition. But I think the tips will be very useful, so bring ’em on!

Link to PDF download of this tutorial: https://bit.ly/2Oi6w80