Archives for December 2024

Tutorial Tuesday (Photoshop Elements)

Quick Trick: Styling Strokes

What a way to close out the year! Today is my husband’s and my 47th anniversary – yes, we got married on New Year’s Eve… so he wouldn’t be able to forget the date. πŸ˜‰ And it’s Tuesday, so tutorial time. Today’s Quick Trick tut evolved out of a private message I received from Jennifer: “I use Photoshop Elements. I know how to add a stroke to a photo or title with a solid color from the color picker. Is there a way to use a style (like a glitter style) for the stroke outline? I can’t figure it out.” Well, of course there’s a way, it’s very quick and easy, and I think I know why she’s struggling. Let’s play!

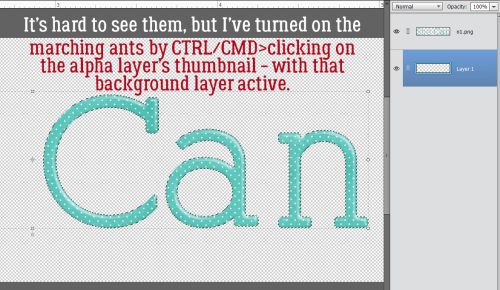
I just whipped up a simple title using one of the alphas in Just So Scrappy‘s collection She Can. I Merged the letters in the title, and they’re on the top layer in the Layers Panel. The background layer is my working layer now.

The next step is to Select the edges of the title by CTRL/CMD>clicking on the Layer Thumbnail for the title layer. (Make sure you still have the background layer active!!)

To create the Stroke, click Edit>Stroke (Outline) Selection…

The colour of Stroke here doesn’t matter because the Style will change it. I went with white, a width of 20 pixels and set the location to Outside.

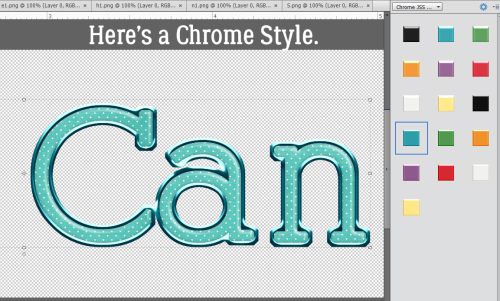
The Stroke will pop up on the background layer, all by itself. So when I do something to it, nothing else is touched. I think this is where Jennifer was having trouble. If the Stroke is on the same layer as the title, the Style‘s going to hit EVERYTHING.

The following screenshots will show you some options. All the Styles I’ve used in these samples are available at GingerScraps. They’re either Just So Scrappy or Karen Schulz products. Here I’ve used a chrome Style from JSS. It’s shiny and rounded.

Remember when using glitter Styles that scale really matters here. If you use a really chunky glitter Style on a smaller object, like this title, it’s not really going to look like glitter. I’ve used the finest glitter in this JSS batch.

The best way to choose a Style from these batches is to try them on! When you find the look you like, you’ll know. This silver Style from KS has the look of wire.

JSS‘s Styles bundles usually include chipboard! There’s a coloured version and a painted, kraft-edged version.

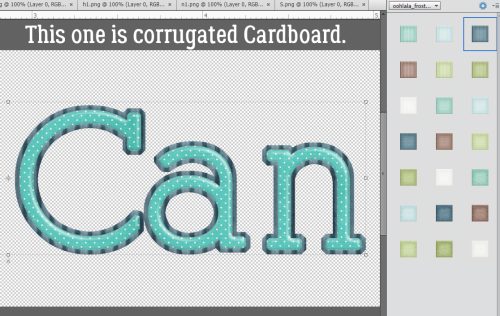
This corrugated cardboard Style is from the same JSS Styles bundle. It gives an interesting look to the Stroke.

Now, here’s a little bonus for you. Let’s see what a TEXTURE does! Make sure you’re still on the background Stroke layer… Click Filter>Texture>Texturizer.

Don’t be intimidated by this Tool interface. Anything you do is Undoable! One thing I don’t love about this Tool is that the Preview is really hard to see (even with perfect vision, and Lord knows I don’t have that!) so I often have to CTRL/CMD>Z my way out of something ugly. Anyway, here’s where you choose what Texture you want, and how visible it is. There are four options: Brick, Burlap, Canvas and Sandstone. I went with Canvas. Scaling determines the size of the texture’s visible effect – for Canvas, think the width of each thread. Relief determines how high off the paper the Texture appears to rise. It’s almost like a Bevel effect. Play with your sliders. Don’t be afraid to experiment. Nothing is final until you’re satisfied! And Light source MUST match the light source for the rest of your layout, otherwise it’s going to look wonky.

I Zoomed in a lot so you could see the effect. Barely-there, but pretty. To my eyes, this looks a lot like satin stitch embroidery on canvas. Maybe it’s just me…

For 2025, there will be some new and exciting changes here at GingerScraps, and here on the Blog. We have some new Designers coming aboard, and each month, we’ll be offering TWO Designer Spotlights! (Designers are not expected to chat with me so I can Blog about them. 100% voluntary.) What does that mean for you? Double the Daily Downloads, for one! Plus some great coupon codes, maybe more Challenges… I guess we’ll see. Tutorial Tuesday will be changing somewhat too. There will be a Greatest Hits tutorial, a new content tutorial (as long as I can come up with something πŸ˜‰ so keep the suggestions coming!) and a Challenge Spotlight each month. I’m slowly moving files onto my new laptop, and hope to have it finally set up soon. Then I’m going to strip this one down and only use it for Cricut Design Space… where the naked keys don’t matter so much. πŸ™‚

Happy New Year to all of you!


Fresh Baked Friday at Gingerscraps: December 27, 2024

We have reached the final Friday in 2024. Do you look back at the year to see what you have accomplished, memories you have made, trials you made it through? Do you wait until the end of the year to start on your 2024 memory scrapbook or do you work on it throughout the year?

As I look back as 2024, I will say I am blessed to be involved with a great place we have in GingerScraps. Ginger gives us such an amazing platform to find the perfect accessories to scrap our memories.

Spend $10 in the store and you will get this great GS Ladies collab for free.

You are going to love the new releases this week. I see a couple that will be perfect to use in my journal in 2025.

Have you grabbed the December Montly Mix? This is your last chance to get it at this special price.

How are your challenges going? If you complete any 10 challenges this month, you get this gorgeous collab as a reward! (Or a variety of other choices, visit the forum for all the details).

Fresh Baked Friday at Gingerscraps: December 20, 2024

Merry Christmas. This is the last Fresh Baked Friday before Christmas and we at GingerScraps want to wish all of you a happy and blessed holiday. We hope you have the opportunity to spend time with family and make many memories.

We’re having a great sale in the store for the holidays. 45% off store wide and a special selection of $3 kits.

Spend $10 in the store and you will get this great GS Ladies collab for free.

There are a lot of Christmas and holiday kits this week to help you scrap those great memories.

How are your challenges going? If you complete any 10 challenges this month, you get this gorgeous collab as a reward! (Or a variety of other choices, visit the forum for all the details).

Tutorial Tuesday (Individual Style)

Challenge Spotlight: Daily Download

The Challenge Galleries are just a-hoppin’! I thought everybody would be too busy to get much scrapping done (like me πŸ˜‰ ) but I was wrong! I have a layout for the Daily Download Challenge, hosted by the lovely CarolW and featuring Twin Mom ScrapsFeel Better Soon, so I had a peep at the other layouts, and I’m going to share them with you. But first, let’s preview the DD kit. It’s bright and cheerful, with a smattering of themed elements.

The upcoming layouts are all linked to their spots in the Gallery, so if you choose to take a closer look and leave a comment, you just have to click on the Scrapper’s Forum handle. They’ll appear below in the order they appear in the Gallery, earliest first. Let’s have a look…

First up is trinanne. She has two layouts in the Gallery, so for her entries, they’ll be linked separately HERE and HERE. As you can see, she’s created a double-layout spread, recording the events surrounding her Achilles tendon injury (which is exquisitely painful). I like that she used the solid yellow paper for her backgrounds, which keeps the layouts bright. One page is dedicated to the injury and includes a number of themed elements, the other to how she filled her time while she healed.

It’s clear that people aren’t the only ones who need medical attention. Poor kitty… Alasandra added some text to the ID band and incorporated some themed elements into her cluster. I like how the banner ties the whole layout together.

Windswept‘s layout reminds me of the time my #2 daughter broke her wrist for the first time. It was also in 1992, oddly enough! I like how she’s anchored the photos with bandaids and made mirror images of the clusters.

For her layout, greenfiend27 managed a masculine look by using the plaid paper as a border and keeping the palette to blues with accents of the other colours. The placement of the fluid bag makes it look like it’s actually infusing into her subject. [Editor’s note: those thermal mugs are HORRIBLE!!]

Did your internal monologue just go, “OWIEOWIEOWIE” like mine did? No more tripping over kids’ shoes for Got2Scrap! I like the way she’s framed her photo with clusters to keep the eye moving.

Whew! An off-topic layout!! The palette of the kit coordinates perfectly with the photo kabrak1207 chose and that cluster is perfection. I love the way the rick-rack is anchoring the entire layout.

MarilynZ has used quite an assortment of papers to document her story. I think she changed the Blend Mode to give the red diamond-patterned paper a faded look. She also lightened the frame around her photo.

Here’s another non-themed layout from makeyesup, which is a desktop wallpaper. The little clusters don’t obstruct the calendar’s boxes, but do anchor it to the page. And that cutie-patootie extracted photo would put a smile on any face.


Content Warning! BriannasScrapper‘s photos are a bit gnarly. I like that she masked her large photo then added a photo strip down the side to show the reason for the large photo. The layout is clean and simple.

Here’s another nasty gash from domino44, but the way she cropped her photo blunts its impact a bit.

Is there anything that touches one’s heart more than the look on this little person’s face? The design of dhariana‘s layout makes the photo the focus, from the fade on the patterned paper into the solid to the arrangement of the embellishments. The little pops of red also lead the eye to the photo.

Route66‘s journaling reminds me of #1 daughter’s nose… broken multiple times. The record card is one of those priceless finds that only a documentor-of-life would understand.Β  I like the way it has been framed with all the themed elements, and the use of the word strips augments her story.

Content warning! More gnarly photos from nimble4u … but I love the ugly Christmas sweater! See how the clusters move the eye around the layout? The bits of black tie the sweater to the rest of the layout.

I think every hospital in the world has the same blue gowns. They’re more flattering than the yellow isolation gowns, but a lot more drafty. πŸ˜‰ The paper choices pbhill made pick up colour from the photo for a cohesive look.

Content warning! More gnarly fingers. I think we’re pretty lucky if we depart this world with all of them still attached. Jill has built her layout around the photos. keeping the palette on the masculine side. I like the black frames on the photos, they accent them nicely.

The journaling on mom2triplets04‘s layout does a lot of heavy lifting. I’m very relieved for her family that it turned out well.

What a note to end on… my layout hasn’t been posted to the Gallery yet – Christmas time is challenging. We drove up to Kamloops on Sunday to see my mom and deliver their gifts, which turned out to be great timing. Yesterday it snowed ALL day, so I know the drive through the mountains would have been nasty, especially coming back in the dark.

Since next Tuesday is Christmas Eve and the last day before Chanukah, I’ll be giving you all the day off, so to speak. I have one more tutorial request for 2024 and we’ll close out the year with it. I wish you all the best for the holidays. Take care of each other, life is short.

Fresh Baked Friday at Gingerscraps: December 13, 2024

Happy Friday! Can you believe we have less than two weeks until Christmas? Is your shopping done? I haven’t even started. I think those online stores may be my best friend this year.

Β If you spend $10 in the store, you will get this great collab for free.

Now let’s see what the designers have cooked up for this week.

How are your challenges going? If you complete any 10 challenges this month, you get this gorgeous collab as a reward! (Or a variety of other choices, visit the forum for all the details).

Tutorial Tuesday (Potpourri)

Here’s a Hybrid Gift Card Tag

Today’s tutorial is a big departure from the usual. I’ve created a hybrid project that mashes up a gift tag and a gift card holder, using digital scrapbooking images. I used the GingerBread Ladies Magic of Winter to build the look I wanted.

My brother is a humbug kinda guy when it comes to special occasions. He always says he doesn’t want anything for Christmas, but he’s also relatively impoverished, so I usually get him a gas gift card, something he definitely needs and will use. This year, I plan to give him a gag gift with the gift card inside the tag. Let me show you how I made it.

I started by making a template using the Custom Shape Tool. I measured an old gift card to get the dimensions. The template is the actual size I’ll need.

I Clipped a paper to the template then added a snowy overlay, also Clipped to the template. Then I added some wintery embellishments, the same as I would for a layout. Note that the text (Merry Christmas with love from Jan) is upside down in the image. That’s so that when I fold the cardstock to form the pocket, it will be facing in the right direction.

Before I moved on to printing, I Saved the finished tag by clicking File>Save As>PNG then deciding which folder to stash it in so I can find it later. I gave it a name I would remember then clicked OK. Why a PNG? I want the background to remain transparent.

The dialog box default settings are the ones I typically use so that I have a clean, crisp, solid image.

After I Saved everything, I put a sheet of white 65 lb cardstock in my printer and hit Print.

I used a guillotine paper trimmer to cut away the excess cardstock to make cutting out the tag a bit easier. Scissors work equally well. Rounding the corners takes a bit of finesse though. If you have a Cricut or similar cutting machine, you could do a Print and Cut with it to save yourself some effort.

Well #%@&!***. I used a new scoring board and the stylus that came with it to score the fold lines. But the cardstock I used tore! I’ve had some scoring issues with that particular brand of cardstock before, so I shouldn’t have been surprised… [Note to self: DON’T use the stylus that came with the board, use one with a ball tip!]

Back to the printer. This time I used premium matte photo paper, which gives a somewhat sharper, brighter image. It’s a 61 lb weight, and the finer fibers in it make it very smooth. I know from previous experience it scores nicely.

You can sort of see the horizontal scored line in the photo below. I’ve folded in the flaps and reinforced the folds to make them sharp.

For this step I used narrow double-faced tape. You could use quick setting liquid glue or a glue runner if you have one. Only the two flaps will be stuck down.

I tucked the flaps in as I folded the back up to meet the front. I put a ruler across the tops of the flaps while I did the fold to keep them flat, so I wouldn’t stick them crookedly.

Here’s the back of the tag with a gift card inside. It slid in there easily and there’s a decent amount of room to spare… It could probably hold several cards.

All that was left was to add a twine loop to hang it from the gag gift package.

If you want to give it a try, you can download the template HERE.

Next Tuesday will be Challenge Spotlight Day. Which Challenge will I pick this time? Check back to find out. πŸ™‚

BUFFET BLOWOUT & Fresh Baked @ GingerScraps : 12/6/24

Hello, GingerScrappers!

The holiday season is in full swing, and we’re here to sweeten your week with amazing deals and delightful new designs!

Fresh Baked Goodies for the week of December 6, 2024
Our talented designers have cooked up a fresh batch of stunning new products for you to explore. Perfect for documenting your holiday memories, crafting gifts, or simply indulging in your creative passions.

Buffet Blowout Alert!
Get ready for an incredible 50% OFF ALL Buffets from 2023 and 2024! Stock up on your favorites or grab the ones you’ve been eyeing all year long. Don’t miss outβ€”this sale runs from December 6th through December 12th only!

Head over to the store now and treat yourself to some GingerScraps magic!

Happy scrapping!
The GingerScraps Team

BUFFET BLOWOUT! December 6-12, 2024

FRESH BAKED for the week of December 6, 2024!

Tutorial Tuesday (Fonts)

Wintery, Christmasy Fonts

I didn’t realize it’s been FOUR YEARS since I last did a winter/Christmas font post! Just what I need… more fonts while I’m trying to move all my Very Important Files to a new laptop (thank you Black Friday sale at Costco!), right? I’m going to have to make a resolution to get MainType properly set up so all my fonts are sortable. Might need y’all to hold my feet to the fire. Anyway, let’s look at some new-ish seasonal fonts and a few related dingbats, shall we? If you see something you like, click on the name, it’s linked for you, and the download is FREE….

Christmas Comeback is what’s known in the industry as a “display font”. It’s a solid font with an assortment of glyphs and ligatures – those extras that really zhuzh up your titles.

Last Christmas is a multilingual script font that would be legible enough for journaling. Now I’ just have to hope I escape Whamaggedon, having just typed out that title..

Home Christmas is another solid display font. It’s an all-caps typeface, but has an upper and lowercase set. It includes punctuation and numerals, but no fancy swashes.

Wonderful Christmas is a multilingual mash-up; it has curly-swirly uppercase characters and formal serif-style lowercase caps. It’s definitely legible, so it’s suitable for titles, subtitles and journaling.

Santa’s Air Mail has a lot of title potential. The snowy tops could be glittered, while the actual characters could be any colour, pattern or texture. It includes numerals and punctuation.

Whoa! Christmas Squad. Are you seeing what I’m seeing? The whole family in matching PJs on Christmas Eve… this title is included in the character map! The basic character set has those swashy caps, and offers multilingual options too.


Magic Christmas is an all-caps vintage display font. The character set includes both the version you see in the screenshot and a solid version. They could be layered with a shiny or glittery Style added to create a pretty fabulous title or siggie.

Magical Nordic includes BOTH of these typefaces in your download. Along with multilingual support, the snowflake is in the special character set. Since I’m currently working thrulines on my Swedish family tree, I was very drawn to this one.

Winterlight Season has such whimsy! The multilingual fairytale quality is charming, including punctuation and numerals.

Snowballs has a handwritten look to it, with snowflakes surrounding each character. Some characters have swash versions.

This one, Snowinter, started giving me ideas the second I saw it. The actual letters in white, with maybe a glossy coloured Style, and the crystally bits in matching glitter? Oh, yeah! I’m definitely going to play with it! It’s an all-caps-in-two-sizes multilingual typeset.

St Nicholas is giving me really strong A Christmas Carol or ‘Twas the Night Before Christmas vibe. It’s such an old-timey look; there are numerals and basic punctuation marks in the set.

This one, Mickey’s Merry Christmas, is my seguΓ© from font to dingbat. This all-caps set has a Mickey in a Santa hat in all the uppercase characters! Christmas at Disney World, anyone?

I’m really doomed… Last Christmas Symbols is a collection of Christmas and winter images.

If you’d rather have festive outlines, Christmas has got you.

And last, a seasonal but not festive set of mittens!Β Christmast Gloves could be used in so many ways.

I’ve got an idea for next week’s tutorial that might be a useful one. It’s a hybrid technique. Stay tuned!


GingerScraps: New FREE with Purchase Collab, New Monthly Mix, New Buffet & More!!

It is the 1st of the month and you know what that means; a huge, exciting newsletter! We have a New Buffet, New Monthly Mix, New Free With Purchase Collab, New Challenge Reward, and a New Daily Download at GingerScraps!

Don’t forget to check out the Buffet Bundles. One easy click to add bundles of Buffet goodies to your cart.

I’m feeling all the Christmas kits with these colors. I can’t wait to see what our designers have come up with for these colors. Remember you can mix and match the buffet kit contents to get what you need.

Remember any $10 spent in the store gets you this great collab.

“Winter Is Coming” by The GingerBread Ladies captures the magic of the season with a serene winter theme. Featuring snowy elements, frosty accents, and a cool palette of blue, green, and white, this kit is perfect for documenting chilly days, cozy moments, and winter adventures!

This collab includes: 1 Alpha {Uppercase, Lowercase, Numbers & Punctuation}, 61 Papers, and 106 Elements.

This Free With Purchase was created by Connie Prince, Key Lime Digi Design, Lindsay Jane, Memory Mosaic, and ScrapChat Designs.

Celebrate the magic of the season with “Christmas Momento” by The GingerBread Ladies. Packed with festive elements, seasonal patterns, and a classic holiday palette, this kit is perfect for preserving your cherished Christmas memories!

This kit includes: 3 Alpha {Uppercase, Lowercase, Numbers & Punctuation}, 44 Papers, 85 Elements, and 4 12×12 Template {page, png, psd, tif file formats}.

This Monthly Mix was created by ADB Designs, Alexis Design Studio, Karen Schulz, Tami Miller Designs, and Tinci Designs.

Now to the December Daily Download Sneak Peek. This month’s Daily Download is from Neia Scraps! Make sure you are checking the blog every day to get all the pieces of this kit!

Take a look at the new challenge reward kit. If you complete any 10 challenges this month, you get this gorgeous collab as a reward! (Or a variety of other choices, visit the forum for all the details).

“Vintage Holiday” by The GingerBread Ladies brings nostalgic charm to your holiday projects. Featuring festive elements in a unique palette of pink, teal, and red, this kit is perfect for creating layouts with a timeless and whimsical holiday feel. Celebrate the season with vintage-inspired style!

This kit includes: 1 Alpha {Uppercase, Lowercase, Numbers & Punctuation}, 55 Papers, and 96 Elements.

This Challenge Reward was created by Adrienne Skelton, Cutie Pie Scraps, Magical Scraps Galore, Scraps N Pieces, and The Scrappy Kat.

Here are a few layouts from our store CT using the December Free With Purchase.