Making Multi-photo Layouts Work
![]()
PDF Version : https://bit.ly/42fFbp4
Last week I threw out a “tutorial-writer-needs-topics” plea at the end of the Challenge Spotlight. In the comments, lisar threw a couple of topics back. (For one of them I need some clarification.) “I don’t remember if you’ve done one on a gazillion photos on a page…” As someone who tends to want to scrap single-photo layouts, I’ve discovered I actually have quite a lot of multi-photo (but not quite a gazillion) layouts that turned out quite well. So that got me thinking. What makes a good multi-photo layout? So today, I’m going to pick apart a dozen of my own layouts. Brace yourselves!
I started off thinking about what I consider to be “multi”. Four photos are easily scrapped within the constraints of a 12×12 or 8.5×11 canvas, five only a little less so. That led me to only looking at layouts I’ve created with six or more photos. What became immediately apparent was that the photos I used for each had something in common. A theme, if you will. Some of them were taken on the same day, some of them were taken on different days but were linked in some way, some showed a progression.
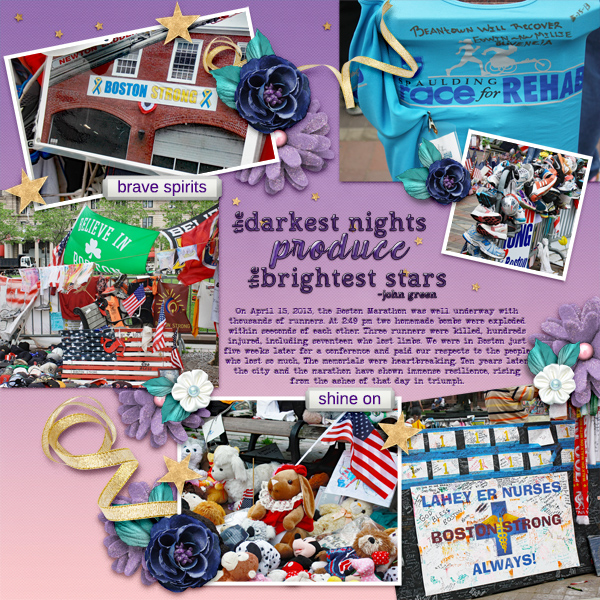
Let’s start with this six-photo layout from my 2013 trip to Boston. The theme of my photos is the Boston Marathon bombing. Because we were there only 5 weeks after it happened, it was very much front-of-mind; the blast area was still filled with memorials. Rather than focusing on tragedy I looked at resilience. I chose a template designed by Dagmar Krupalova (who no longer has a shop at GS) because I could fit in all the memorial images I had. The photos are roughly the same size so no one image is the focal point. With the photos arranged in a loose circle gave me room to journal about the event and its aftermath.
You may have seen this layout here on the Blog. The photos are a mélange of images from my two trips to Ireland. They were selected to coordinate with the blessing I chose as my theme. The largest photo reflects both the iconic Celtic cross found everywhere on the island and my Irish Catholic ancestry, the others the beauty of the country. I used a Miss Fish template from her Travelers Notebook V.9 pack.

This layout is built on a Neia Scraps template from Enjoy the Moment V.10 (retired) to commemorate Maeve’s first week with us. I liked it for this layout because I could have a large photo of my husband holding her the moment she became ours. The smaller photos offer glimpses into her personality. The way they overlap the large photo lets me conceal some background that isn’t interesting. Neia has quite a selection of multi-photo templates that I encourage you to check out.

My last six-photo layout for today is another travelogue with a mariner theme; the photos were taken by my sister who took a 3 week-long driving tour through Canada’s Maritime provinces. I used LDrag Designs‘ May 2019 challenge template because it has large photo spots in both landscape and portrait orientations. That let me crop the photos to keep the important elements of each. I like the asymmetry of the photo spots too. Lina likes journal cards but I tend not to use them, so I swapped them out for journal spots; there was lots to say about this fishing village. At the end I’ll talk about photo and template selection a bit more.

I have a couple of seven photo layouts to dissect next. My “celebration” of Orangemen’s Day in Northern Ireland was memorable for several reasons. The things I saw that stayed with me are a metaphor for struggle. The churches in the village of Derrylin are one kilometer apart at opposite ends of the main road and are starkly different in design. St Ninnidh’s (Catholic) is smaller and plainer than Holy Trinity (Church of Ireland/Protestant). The village is much closer to the Republic of Ireland than it is to most of Northern Ireland, which may be why there’s a visible Catholic presence in the village. Enniskillen Castle was the garrison for English soldiers and looks more Scottish than Irish; it represents the Plantation of Ulster in my mind. Okay, enough history. That’s not what we’re here for. I chose this template for the pocket-scrap organization. Each photo is quite separate and the eye moves around the page easily and it has a big spot for storytelling – which could easily be replaced with another photo.
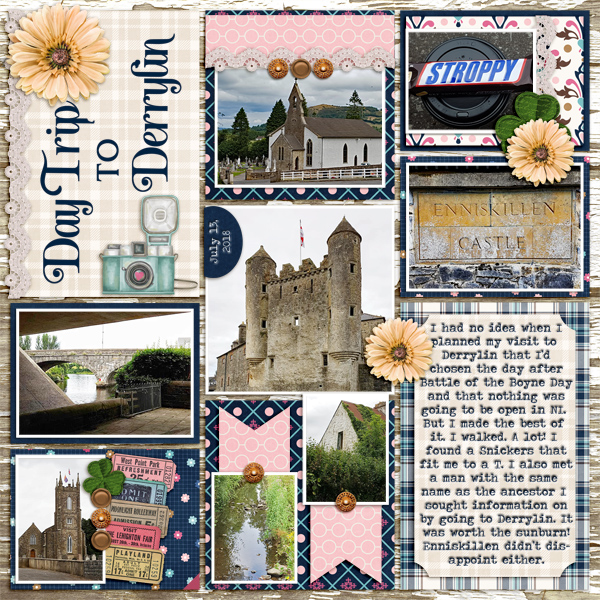
I like the different photo spot shapes so much better than I like some of my hairstyles in these photos. I used a template from JBStudio‘s Put It All Together V.1 that I rotated a quarter turn to the left which gave me lots of room for the quote I wanted to use as a subtitle.

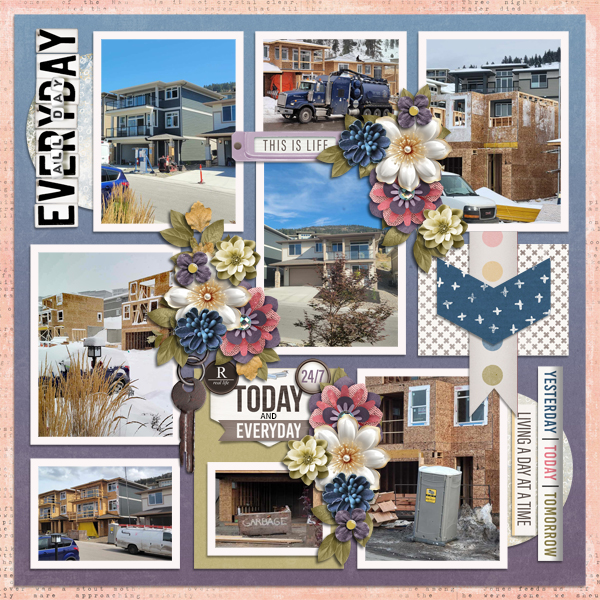
Now let’s do some eight-photo layouts. The first two are a sort of diary looking at the same topic from slightly different perspectives. The first was built on a Dear Friends template now retired. The basic grid style works well to provide continuity and the varied sizes of photo spots let me show the details of each.

Its counterpart is more venting than art. I was so glad to see the last of the porta-john! The template I used is one from Tinci Designs Autumn Stories V.1. I replaced the journal card with a photo. The symmetry of the template echoes the symmetry of the new houses being built and shows the haphazard placement of the porta-john so clearly.
Another eight-photo layout captures the horror of Ronan Gillespie’s Famine Memorial in Dublin. I couldn’t leave out any of these images. It would have felt incomplete and dismissive. It’s based on another of Tinci Designs Autumn Stories V.1 templates, and again, I rotated it a quarter-turn to the left. I felt it was suited well to the photos I’d chosen; the four small photo spots let me zoom in on the faces of the statues. I moved and rotated one of the rectangular photo spots, moved the circle of paper up and rotated the paper flag to better accommodate my photos so they told a story.

Let’s move away from sad and depressing. I wanted to document the transformation of our new yard from dirt to landscaped. I like the diagonal arrangement of this Pixelily template; it took some fiddling to get the photos positioned so the overlap concealed things that should be concealed, but didn’t hide what should be visible. But it was worth it in the end. Each of the eight photos here lent itself to my story.

And last, I have a layout with NINE photos. It was created for a Journaling Challenge using another Dagmar Krupalova template. The ring-around-the-page orientation suited the photos and having the journaling in the centre added to the effect. I was able to show the significant parts of each photo clearly, despite the number and size of the photo spots.

So what’s the process for creating a multi-photo layout you can be happy with?
- Choose your photos first!
- Examine each for the parts of them you want to be featured. Don’t get hung up on orientation. Cropping can deal with that.
- Think about the story you’re trying to tell.
- Look for a template that will tell your story with the photos you want to include. If you’ve organized your templates the way I do, renaming the preview with the number of photos for easy searching, this step can be a lot simpler than it sounds.
- Don’t fixate on using your template exactly as designed. If you find one you like but it’s short a photo spot, look at how you can add one in. Similarly, if you like one but it has too many photo spots, how can you remove the extras? Can you make each spot slightly bigger? Can you combine two spots into one? Substitute journaling for a photo? This applies to photo spot orientation too. If you have 4 photos that are in landscape and 3 that are portrait, but the template has 3 portrait and 4 landscape, rotate the template! If other aspects need to be tweaked, tweak them! You’re cooking, not baking; you don’t have to follow the recipe exactly to have something you love in the end.
- Once you’ve settled on the basics, you can choose the kit(s) you want to use. You may have already picked a kit, so now you’ll need to figure out how to make all three components work together. This is the fun part.
So there you have it. Multi-photo layouts that tell your story and look great doing it!
If any of you are wondering about the shelves… I finally had them up securely on Friday by suppertime, and I only had to make one trip to Home Depot for better anchors. Sheesh.
Okay, so next Tuesday is the last of January (insert collective groan here) so it’s Quick Trick Tuesday. I’ll be filling a request…
![]()