It is your lucky day!! TODAY is a $2.00 MEGA SALE at GingerScraps!
Stop by the shop to see all these deals AND MORE! There are over 150 products for only $2.00, sale ends August 7 @ 11:59pm Eastern Time.
It is your lucky day!! TODAY is a $2.00 MEGA SALE at GingerScraps!
Stop by the shop to see all these deals AND MORE! There are over 150 products for only $2.00, sale ends August 7 @ 11:59pm Eastern Time.
Magical Scraps Galore!

Well, here we are staring August in the face. I’m not going to lie, I have quite a bit of anxiety when I remember last August, and the wildfire we faced then. Thankfully this year I have the Olympics to distract me. I don’t usually watch much in the way of sports, and the Olympics is no exception, but this year, here I am, glued to my chair watching even sports I don’t like (looking at you, soccer!) and getting loud and proud of our athletes. That’s why this Blog post is a bit behind my original plan. But not TOO late! Let’s meet Marina, the designer known as Magical Scraps Galore. [editor’s note: Any coloured text in bold and underlined is hyperlinked for your viewing pleasure.] Our conversation took place before the Games started so I’m working from memory. 😉
J: Marina, thanks for giving me the opportunity to shine the Spotlight on you and your work. Why don’t we get the mundane stuff out of the way first, then we can get to know YOU. When did you get bitten by the design bug?
M: I’ve been designing for 13 years now!
J: That’s a good long time. I guess it explains the depth and breadth of your GingerScraps shop! What was the catalyst for you?
M: I started creating my own digital papers and embellishments for scrapping our second trip to Disney World, since the digital offerings were very limited back then. It didn’t take long to realize that scrapbook design was my passion, and I started participating in the design challenges hosted by MouseScrappers. I opened my first shop in 2013 and I’ve been part of the wonderful GingerScraps family since 2014.
J: I joined the GS family at the end of April, 2013, so we’re cohorts in a way. This truly IS the friendliest scrapping community on the Web. I work on a laptop seated in a comfy armchair in my living room. What does your workspace look like?
M: I design in my studio at home, with my three cats sleeping by my computer or on my lap. Sometimes they like to sleep ON my computer and they mess with my designs, LOL! I have to be very careful but I just love them! I use Photoshop, Illustrator, Procreate, and ArtRage.
J: What kinds of things motivate you when you sit down to create?
M: My main motivation and inspiration are my kids and my trips around the world.
J: Same! Many of my layouts are trip-related or have either my kids or grandkids in them. I’m busy creating a memoir for my sister, who travelled to the East Coast last year, for Christmas and love to scrap travel photos. What would your perfect vacation look like?
M: My perfect vacation is a road trip with my family, hiking national parks and visiting small towns along the way.
J: I live in a tourist destination! This year has been quieter than usual, I think because of our wildfire last year. People are scared, rightfully so. Not a fun topic at all, so let’s change it up. Do you have a favourite kit in your shop?
M: What a hard question! It’s hard to pick just one, it’s like choosing your favorite child, LOL … I have several kits that I love, especially my travel collection, but one of my favorite kits is Magical Memories, it’s all about my happy place and it’s a reminder of all the magical moments I spent there with my family.

J: Everybody says that, but what a fun collection!! I’ve been to Disneyland twice, once when I was about 12, and again in 1988 with my kids. I should dig out all those photos and do something with them. What did you want to be when you grew up?
M: I wanted to be a flight attendant or a rock star.
J: And here you are, a travelling rock-star digital scrapbooking designer! What super-power would you wish for?
M: Teleportation, so I can travel anywhere in no time and with no jet lag!
J: Amen sister! That would make life so much simpler. And healthier! One last question. If you had a warning label, what would it say?
M: Warning: Crazy cat lady!! LOL! I’m a huge cat lover, and if my family would let me, I’d have 10 cats or more!
J: If current events are any indication, you’re in good company! I’m not a cat fancier, but our neighbours have two beauties who sit on their deck and drive my dogs batty. Thanks so much again for chatting with me. I hope your Spotlight brings you all the best kind of attention in the Shop and the Forum.
Marina is not just the Spotlight Designer for August, she’s also providing the Daily Download. Each day a link for the day’s pieces is posted on the Blog, and it stays active for a full 5 days so you don’t have to worry if you miss a day. If you find you’ve missed a bunch of days, the entire kit will be released in the Shop at a later date. In addition to her monthly Surprise Challenge, she’s also hosting the Designer Spotlight Challenge this month too… just in time for the Summer GingerScraps Scrap-a-Thon! Check them out, they’re ALWAYS fun!!
![]()
Happy Friday, Scrappers!!
I’m so excited for the weekend! I’ll be heading out on a short getaway with my family to the coast. We’re thrilled to escape the triple-digit heat and enjoy the ocean and 60-degree weather! I can’t wait to wear a sweatshirt, lol!
I’m planning to take LOTS of photos to scrap, and I can’t wait to get home and SCRAP! I hope you’ll join me in the forum/gallery for the SUMMER Scrap-A-Thon.

Are you ready to see what new products we have today? And don’t forget to check out the August Buffet when you stop by the shop—the new Buffet items will be 50% off until the 5th!
Ok, ok, ok… here’s what we have this week!

When you spend over $10.00 during the month of August you will get this super cute Let’s Shop collab by The GingerBread Ladies!

And last but definitely not least, when you complete 10 challenges during the month of August, you will receive this (or a variety of other choices, visit the forum for all the details).

But you might as well keep going and complete enough challenges to get the usually monthly challenge reward AND this AMAZING MEGA collab by The GingerBread Ladies: Sun-Kissed Memories
It is the 1st of the month and you know what that means; a huge, exciting newsletter! We have a New Buffet, New Monthly Mix, New Free With Purchase Collab, New Challenge Reward, a New Daily Download on the GingerScraps Blog, and the {Summer} Scrap-a-Thon!
Don’t forget to check out the Buffet Bundles. One easy click to add bundles of Buffet goodies to your cart.
This month’s colors are a perfect transition from summer to fall. Remember that you can mix and match these kits to get just what you need.
Remember any $10 spent in the store gets you this great collab.
This Free With Purchase was created by CathyK Designs, J. Conlon and Sons, Kristmess, Lisa Rosa Designs, and Twin Mom Scraps.
Celebrate your shopping adventures with “Let’s Shop,” a digital scrapbooking collab by The GingerBread Ladies! Perfect for all your shopping trip photos, this kit includes everything you need to capture the excitement of a day out. Featuring shopping carts, bags, sale tags, money, and more, “Let’s Shop” provides all the elements to create stylish and fun scrapbook pages. Turn your retail therapy moments into cherished memories with this fabulous collab.
This collab includes: 1 Alpha {Uppercase, Lowercase, Numbers & Punctuation}, 59 Papers, and 100 Elements.
This Monthly Mix was created by JB Studio, Just So Scrappy, Miss Fish Templates, Neia Scraps, and Sweet Pea Designs.
Embrace the coastal charm with “Salty Little Beach,” a digital scrapbooking collab by The GingerBread Ladies! Perfect for all your beach photos, this kit is infused with sand, sun, and surf elements, capturing the essence of your beach vacations. Whether you’re building sandcastles or soaking up the sun, “Salty Little Beach” provides everything you need to create vibrant, beachy scrapbook pages. Turn your seaside adventures into lasting memories with this delightful, beach-themed collab.
This kit includes: 1 Alpha {Uppercase, Lowercase, Numbers & Punctuation}, 79 Papers, and 117 Elements.
Now to the August Daily Download Sneak Peek. This month’s Daily Download is from Magical Scraps Galore! Make sure you are checking the blog every day to get all the pieces of this kit!
Take a look at the new challenge reward kit. If you complete any 10 challenges this month, you get this gorgeous collab as a reward!
This Challenge Reward was created by Aprilisa Designs, Jumpstart Designs, Scrappin’ Serenity, and WM[squared] Designs.
Document your daily adventures with “On The Record,” a digital scrapbooking collab by The GingerBread Ladies! Perfect for capturing everyday moments, this kit is packed with essential scrapping basics. “On The Record” provides everything you need to create beautiful and organized scrapbook pages. Keep your memories fresh and detailed with this versatile and practical collab.
This kit includes: 1 Alpha {Uppercase, Lowercase, Numbers & Punctuation}, 45 Papers, and 96 Elements.
Special for the {Summer} Scrap-a-Thon, complete 20 challenges during the month of August and receive the August Challenge Reward and the Sun-Kissed Memories Mega.
Capture your sun-soaked adventures with “Sun-Kissed Memories,” a digital scrapbooking MEGA collab by The GingerBread Ladies! Perfect for all your beach photos and summer fun, this extensive kit is brimming with vibrant, summery elements. From sandy shores to playful waves, “Sun-Kissed Memories” offers everything you need to create stunning scrapbook pages that celebrate the joy and warmth of summer. Turn your beach days and sunny escapades into treasured keepsakes with this ultimate summer collab.
This kit includes: 2 Alphas {Uppercase, Lowercase, Numbers & Punctuation}, 113 Papers 12×12 {Including Coordinating Cardstock & Coordinating Glitter Sheets}, 185 Elements {Including Journal Cards, Ribbons, Flowers, Trims, Wordart, SO much more!}, 1 12×12 Template {page, png, psd, tif file formats}.
Quick Trick: What the Font?!
![]()
PDF Version : https://bit.ly/3SqmX0b
Today’s Quick Trick is literally a 5 second life saver! You may recall that I’m teaching myself to use Cricut Design Space. It has some similarities to PSE, although it’s REALLY not intuitive at all. One similarity is the extensive use of fonts in projects. Which, of course, leads to… “ACK!! I need to update this/correct spelling/change wording/add something and I can’t find the font I used! Help!!!” This one little trick will end that – and it works on both platforms!
In my screenshot, the text in the speech bubble is a font I picked up somewhere… could be dafont, or Creative Fabrica, or Font Bundles… I don’t know. I love it for this layout of my youngest grandpuppy. But it’s not going to stay in my brain.

But – if I double-click on the text to the right of that big T where Elements is just showing the first couple of words of my text, I can type in the font’s name there and the layer will save it for posterity! Now, this only works if you save a layered version, either PSD or TIFF, of your layout, as I do. If you know you’ll be Simplifying your text – to change fonts, for example – you can do this step before you Simplify. The layer’s new name will be the same as your font.

Another option is to add a text layer to your layout somewhere with the names of all the fonts you’ve used. This layer can be made invisible by closing the eye on the layer; it won’t show in the Gallery or if you decide to print your layout, but it’ll be preserved in case you need to use the same fonts again!
Personal note: My dad’s cancer is back and he’s filled with metastases. He has declined treatment and will be receiving palliative care. It’s impossible to predict how long he has, so if I’m suddenly MIA, you can assume I’m with my family.
![]()
Happy Friday everyone! Hope you’ve had a wonderful week.
Remember any $10 spent in the store gets you this great collab.
Let see what pretties we have this week.
We had so much fun with the {Spring} Scrap-a-thon that we are having another one in August. See the forum for information on the {Summer} Scrap-a-Thon.
How are your challenges going? Complete any 10 challenges to get this kit as a reward.
The Style File: Where Is It??
![]()
PDF Version : https://bit.ly/4c2NvvL
If you read the comment section, you’ll have seen that Kathi, aka Granny5pics, responded to my question on shadowing transparent objects: ““add and find commercial Styles (and Brushes) to your electronic devices? Do we need a tut on it?” Yes, I would benefit a lot with that tut!”” So this one’s for you, Kathi!
Because I work on a PC laptop running Windows 10, these instructions will reflect that. The process for Mac users will be very similar, and I’ll include a link to help with browsing files on a Mac at the end.
This might not be the smartest way to do this, but it’s been working for me for a long time and I don’t have to remember file paths – BONUS! I have two file tabs open, one with Window Explorer and one with my Digikit folders where the Styles I want to add to the directory currently are. Let’s look at the Digikit tab first.

These are all the Styles Katie, aka Ooh La La Scraps and Just So Scrappy, creates for ALL of her collections. I want to use one of these in my demo.

I’ve used several different versions of Photoshop Elements over the years, and I have directories galore. There’s no guarantee that a current version is going to put things in the same place as the older versions, so I stopped trying to memorize file paths a long time ago. Instead, I let my laptop do the work! Moving to the Explorer tab, I type “.asl” into the Search box – it’s where the arrow is pointing. That’s the file type suffix for Photoshop and Elements Styles. In the screenshot it shows that I’m searching my OS(C:) drive, because it’s the only drive I have in this laptop. If you have multiple drives and aren’t sure which drive to search, you can choose This PC in the folders list to the left of your screen instead. Then I let Windows find all the files with that suffix. It might take a couple of minutes, so I make myself some tea while I’m waiting. 😉
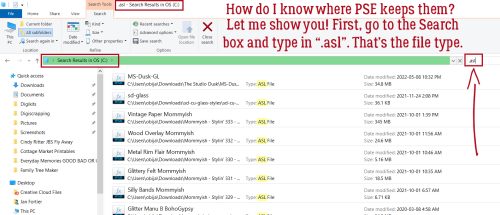
If you’ve used a progression of versions, look for a file path on the list Explorer will provide you that names your current version – you want to be sure Elements finds the files later, and it’s not going to look in those other folders. Mine says C:\Program Files\Adobe\Photoshop Elements 2021\Presets\Styles. Then right-click on that file name and choose Open File Location from the pop-up menu.

Explorer will open up the Adobe folder where all the Styles included with the software are. I have a LOT of Styles I’ve Copied into this folder so your mileage may vary.(I really should merge my directories…)
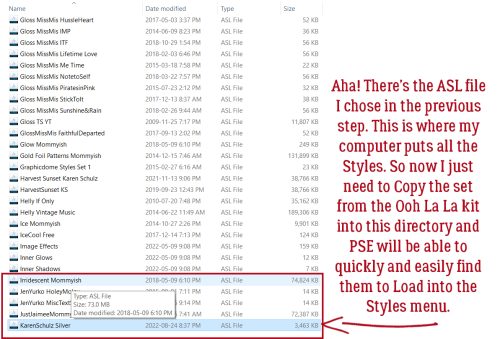
Now I’ve moved back to the tab open with my Ooh La La Scraps kit Styles folder. I’ve selected all of the Styles in the folder [click on the top name, hold down the CTRL key and click on the last name to select all quickly] and right-clicked to Copy. [Keyboard shortcut is CTRL>C]

Back on the Explorer tab, you can see the actual path Windows uses to locate Elements Presets. But why memorize all that? To add the Copied Styles into the folder, right-click and choose Paste or simply CTRL>V.

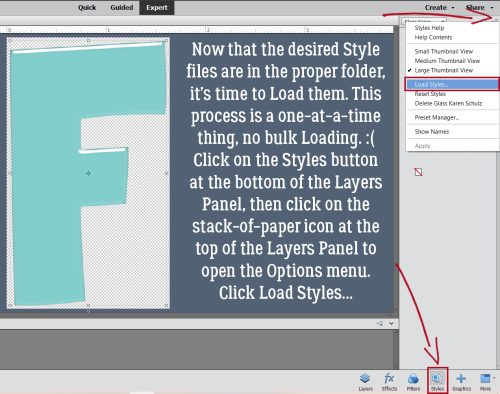
That’s all there is to the process. Let’s give it a quick test. I’ll use this acrylic F as my sample. The new Styles have to be Loaded into Elements‘ menu before they can be used, so click on the Styles button at the bottom of the Layers Panel, and then click the stack-of-paper icon to access the Tool Options. Choose Load Styles…
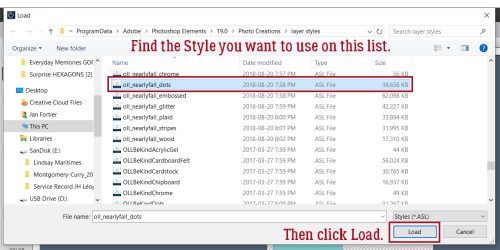
All the Styles in the Directory list will pop up. I’m going to use the Nearly Fall Dots Style on my sample. So I clicked on it then Load.
Et voilà!
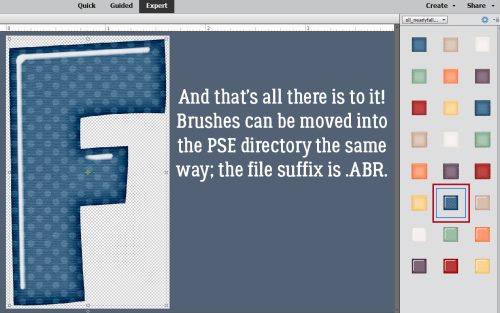
Brushes can be Copied into the Presets directory in the same way, using the suffix “.abr” instead. If you like, you can rename any or all of them to make them easier to find on the Directory list. Make your software work for you!!
Mac users: How to Browse Files on a Mac (howtogeek.com)
![]()
Happy Friday friends. We’re almost at the weekend. And already halfway through July. Make sure you read all the way to the end for some sneak peek news.
Remember any $10 spent in the store gets you this great collab.
Let’s see what is new this week. I’m seeing quite a few Christmas in July kits.
We had so much fun with the {Spring} Scrap-a-thon that we are having another one in August. See the forum for information on the {Summer} Scrap-a-Thon.
Have you grabbed the July Monthly Mix? Only a little bit longer to get it at the sale price.
How are your challenges going? Complete any 10 challenges to get this kit as a reward.
Challenge Spotlight: Recipe
![]()
It’s time again to shine the spotlight on all of YOU! But first… did y’all get your Prime Day shopping done? 😀 I paid my credit card off yesterday so I’d have a wide-open window. 😉
Let’s get down to business. This month the Challenge in the Spotlight is the Recipe Challenge, which is hosted by Sweet Pea Designs. It’s a good Challenge for a Blog post, since all the participants are working from the same set of required elements. So I’ll be taking a close look at each of the layouts to find each of the things on Penny‘s list. The layouts will appear in the order they were uploaded to the Challenge Gallery, and as usual, they’ll be linked to the Gallery so you can get a closer look. Just click on the Scrapper‘s name and you’ll be zoomed right to their layout. (Anything I underline will be a hot link!)
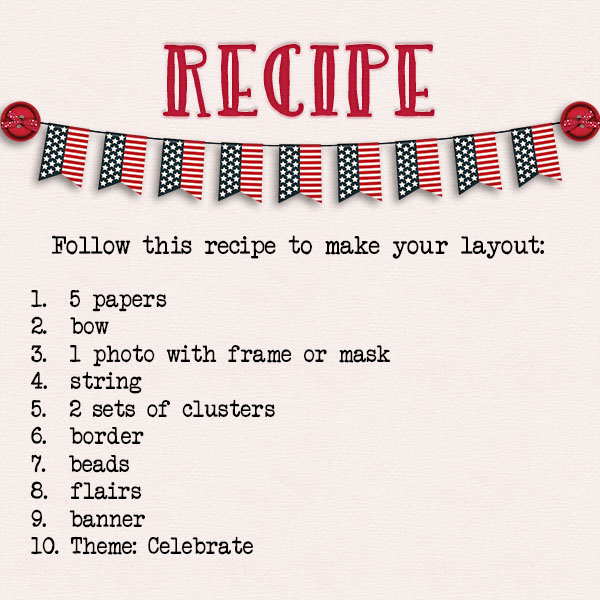
First up is this pretty layout from alexandergirl68. She’s definitely got 5 papers there, a tiny string heart, a ribbon bow and there are flairs on her title. banner Single photo, frame, 2 clusters and border, check. I had to zoom in to see that the heart on the frame is made of beads, check! And the theme is perfectly represented.

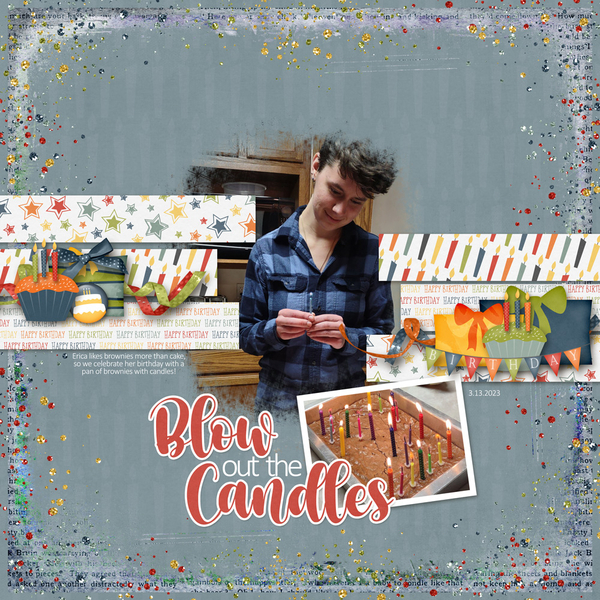
Let’s look at this one from snickels next. She’s used 2 photos, one with a thin white frame and one masked. Check! One of her 5 papers has been clipped to her border. Clever! Beads are all over the place, I’m guessing the string is holding up her birthday banner and she found a birthday flair to coordinate. Bow, yep; 2 clusters, yep; looks like all the boxes are ticked!
GrannyNKy‘s layout is so feminine! Like snickels, she has clipped one of her papers to an overlay. I like how she’s interpreted the “photo with frame” by putting the frame behind her photo. 10 points! I see 2 clusters, 2 bows – one of string, several flairs, a lovely banner, some paper borders and a celebratory theme. The beads are there, scattered under the larger cluster. Zoom in if you don’t see them. Full marks.

Katherine Woodin‘s clebration isn’t obvious, but it’s everywhere in her journaling. I had to look really hard to see all 5 papers, which is a sign of a crafty Scrapper. The rest of the required elements are much more easily spotted. That happy face emoji flair cracks me up.

I didn’t have to look too closely to see the theme for dj_w‘s layout. Every one of the listed ingredients is easily identified. Good job!

Macsandy had me squinting… she used a string of beads and I overlooked them 3 times! I love the stamped-heart border she chose and her clusters are perfection. This might be my favourite of the six layouts I found for this Challenge.

One thing I noticed about these layouts is that four of them have a similar colour palette, which has to be a coincidence.
I hope everyone is safe from all the weather-related events we’re seeing. Last night’s derecho was pretty frightening. We’re seeing quite a bit of smoke today, as we head into week 3 of 90+°F temps. I’ll be driving up to have what might be my last visit with my dad later this week… he’s tired of feeling unwell and is talking about being “ready to go”. So if I miss a post, that might be the reason. Stay cool and stay safe, my friends.
![]()
Here we are at another Friday. These weeks are just flying by. I feel like it was just Monday.
Remember any $10 spent in the store gets you this great collab.
What’s new in the store this week?
How are your challenges going? Complete any 10 for this kit as a reward!
Autumn Baker's Best bake sale Book Club buffet Calls celebrate challenge spotlight craft Crafts crafts with kids Daily Download Designer Spotlight Digital Scrapbooking Digital Scrapbooking Freebies fall Feature Designer font fonts freebie Fresh Baked From the Archives gingerbread girls GingerBread Ladies guest designer halloween holiday home made hybrid let's celebrate March 2025 Challenges mini kit new products new releases news reuse sales Scrap-a-thon Scrapping Survivor sneak peeks Team Spotlight template Tutorials Tutorial Tuesday Weekly Wrap-Up
Full and detailed Privacy Statement can be found here: Privacy Statement